P11 basket case

Footpeg bolt.
P11 basket case

I can't get at that primary to crank case spacer to get an accurate thickness measurement. It looks like it might be 3/16". Mine had a thick gasket behind it. Fully compressed it was probably around 1/32". I currently don't have a gasket behind it and everything lines up enough. It's not an exact science though. It's a Norton. ;)

Here are some random shots of the few spacer pics I took during disassembly. These were for my reference, and may not make any sense to anyone else.
P11 basket case

Below pic: There is a spacer out of focus upper far left that goes between the frame and bottom front right engine mount.
P11 basket case

P11 basket case


I'll see if I can dig up some more later. Gots stuff to do in the yard for now.
 
I think you can buy just about all of it from Andover and Eurotrash Jambalaya. Spensive though

Footy pegs
https://www.eurojamb.com/collection...rton-750-p11-footpeg-assemblies-ranger-p11a-a

Thanks, Schwany! Those pics are more useful than you might realize. I knew there was a need for a spacer underneath the engine, and of course the ones in front we talked about earlier, but I did not realize that effectively the entire left rear engine mounting plate has to be moved over to the left by almost 1/4" it looks like. Now seeing it, a lot of other things make perfect sense, like for example how the trans is supposed to line up once the primary case is installed. Thankfully I can make all those little spacers pretty easily on the lathe, I just need to figure out how thick they need to be.

Happily this will also alleviate some of the final drive sprocket line-up issues that are looming on my horizon! Excellent.

I've looked at those footpeg assemblies several times over the past few years. I just can't bring myself to buy them when I know that I will probably want to modify them anyway. I am sure I can fabricate my own.
 
I think you can buy just about all of it from Andover and Eurotrash Jambalaya. Spensive though

Footy pegs
https://www.eurojamb.com/collection...rton-750-p11-footpeg-assemblies-ranger-p11a-a
Those foot peg loops are rather thin-walled (Reynolds 531 tubing as well) and difficult to fabricate. The aftermarket part offered is probably made with common size mild steel tubing.
Despite the cost, I think buying the finished article is sensible, unless you want to alter the design.

- Knut
 
Happily this will also alleviate some of the final drive sprocket line-up issues that are looming on my horizon! Excellent.
You need to hunt down the Hycam spacer table for the P11, posted on this site many moons ago.

I've tried to locate it - no chance, so I am posting it again.

- Knut
 

Attachments

  • _P11 STUDS SPACERS.pdf
    128.9 KB · Views: 171
Last edited:
Those foot peg loops are rather thin-walled (Reynolds 531 tubing as well) and difficult to fabricate. The aftermarket part offered is probably made with common size mild steel tubing.
Despite the cost, I think buying the finished article is sensible, unless you want to alter the design.

- Knut
Yeah, you are right, the sensible thing to do if I were restoring this bike would be to buy them. And if I sit on the bike and realise that the original footpeg position is perfect for me, then maybe I still will do that. Chances are though, that I will just make my own. I have access to chromoly tubing, I may even make them out of that.
 
Good to know about the spacer between the primary drive case and the crankcase--I can make one on the lathe, if I can find a piece of alumin(i)um that big around. Seems odd to me that the one I have is only 1/8" thick. The fact that it is stamped like an old aftermarket part makes me wonder if it was maybe intended to be used along with the thicker one?

It's a steel spacer, Zn coated, .210" thick.

I do not know why AMC made it out of steel. It looks like a deliberate choice. The elaborate coating is necessary to prevent galvanic corrosion.

- Knut
 
It's a steel spacer, Zn coated, .210" thick.

I do not know why AMC made it out of steel. It looks like a deliberate choice. The elaborate coating is necessary to prevent galvanic corrosion.

- Knut
This confirms my suspicion that the one I have is an old aftermarket part, as it is very clearly made out of aluminum. Now that you mention that the original was made out of steel, I'll take a good look through the parts pile and see if there is one laying around that I've overlooked (doubt it). If not, I'm making a new one out of alumin(i)um.
 
Started making my spacers today--mdt-son's reposted Hycam spacer chart was particularly helpful along with Schwany's pics. At first I was having a little trouble understandign what went where, so eventually I just started making spacer according to the chart, and then once I had the first 3 or 4 in, the rest all started to make sense. I've been making them all out of alumin(i)um.

P5280084.JPG
P11 basket case
P5280086.JPG
P5280087.JPG
 

Attachments

  • P11 basket case
    P5280084.JPG
    309.2 KB · Views: 138
  • P11 basket case
    P5280085.JPG
    290.1 KB · Views: 205
  • P11 basket case
    P5280086.JPG
    275.6 KB · Views: 129
Got all the spacers done and in place now. I realised, after studying the Hycam list again (thanks, Knut!) that I had several spacers in the wrong places., which explained a discrepancy that was popping up in discussions about spacers: some say that the 2 spacers at the front, (frontmost? foremost?) engine mount are of equal thickness, whereas the Hycam list shows one to be more than twice as thick as the other. We'll get back to this in a minute.

Wrapping my mind around the placement of the spacers was more difficult than I expected. I at first assumed that the left rear engine plate was simply spaced over to the left a ways and the gearbox moved over to meet it and then more spacers between the gearbox and the right rear engine plate. And yes, it probably can be assembled that way and work just fine as long as you make all the necessary allowances in other places to compensate.

But the Hycam list clearly labels some spacers as fitting between the right rear engine plate and the frame. It wasn't until I tried putting myself in the position of the guys who built the first prototype that I finally understood correctly what was going on: the production models are built like the prototype, just a Norton engine in a Matchless frame rather than a Norton engine in a Matchless derived frame.

So! Back to those front spacers. If you have the spacers on the rearmost frame lugs (upper and lower) on one side, you'll end up needing equal thickness spacers on the front mount. If you have the spacers on the other side, then you will need the spacers described on the Hycam list, AND your engine will actually be centered in the frame.

So NOW I have the right spacers in the right places. I went ahead and bought a engine/primary cover spacer off of eBay. It's exactly the same as the ones sold by Baxter Cycles, and if I had to do it over again, I'd just by it from Baxter, as once the shipping and taxes were added on, I only ended up saving a whole dollar over Baxter.

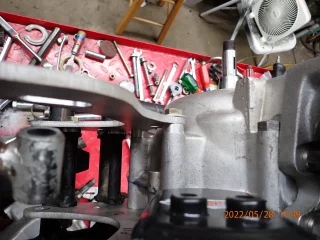
Here's pics of what I assume will be the final positions of the spacers--these are made and placed according to the Hycam descriptions. Note the gearbox spacer slightly right of the centre of the photo and the engine spacers in the upper right quadrant:

P5300088.JPG
P5300089.JPG


Here we see the front spacers--do it this way and your engine ends up centrally located in the frame--or at least mine did....
P5300090.JPG


Here you can see a little of the difference between the front engine mounting plate and the rear engine mounting plate in terms of spacing. The front engine mounting plate has the spacers on the outside (between the frame and the plate), whereas the spacers on the rear plates are between the engine and the plate on the left side, then between the frame and the plate on the right side. On the gearbox the spacers go between the gearbox and the right mounting plate.
P5300091.JPG


Here's a good shot of the .343" thick spacers between the engine and the left rear plate and the .156" thick spacers between the frame lugs and the right mounting plate:
P5300092.JPG


I feel pretty confident now that the spacing is all correct. although I do not have my engine/primary case spacer yet, I did experimentally put the inner primary case in place and was pleased with how much better the line-up of things in that area seems to be now--the inner case itself seems parallel with the mounting plate and the gearbox input shaft sticks out far enough now that I am not wondering how in the world the clutch is going to fit.

Anybody know if a Burkhardt magneto cover will fit a Hunt magneto? We're about to find out....
 
Last edited:
Hi JB, I have never heard of a Burkhardt magneto cover. Was it an aftermarket item for the P11?

Your crankcase vent is rather vulnerable to damage, don't you think? I fear your crankcase may suffer too if you run against an obstruction.

- Knut
 
Hi JB, I have never heard of a Burkhardt magneto cover. Was it an aftermarket item for the P11?

Your crankcase vent is rather vulnerable to damage, don't you think? I fear your crankcase may suffer too if you run against an obstruction.

- Knut
I found the Burkhardt magneto cover on eBay, I liked it because it was cast alumin(i)um and might seal better than the bakelight one. I also know from experience just how fragile the bakelight covers are.

On the crankcase vent, yes, it might be vulnerable. I've noticed it hanging out there in the breeze and I do have some concerns about it. Once I have the primary case on, I may need to design and build some kind of a case guard. At the time that I bought that vent, it was the more affordable option. There's a chance I may eventually look for another option--the whole idea of having to the vent the crankcase through tiny holes in the camshaft is another concept that I am struggling with, but I will suspend judgement until sometime after I actually have the engine running.
 
Still waiting on the big engine/primary case spacer. Since I am effectively blocked from working on the primary drive or clutch for now, I decided to trial fit the exhaust. I bought this system from Armour's a few years ago, today was the first time I have actually seen it, and I confess it was not what I was expecting. I was expecting the exhaust system that everybody else seems to have, the one with a long straight stretch right out of the cylinder head befor e the first curve, but no! The ones I have look (to my eye) more like the OEM ones, with a tiny little jog right out of the head before getting to the big curve.

I found a set of heat guards at Lowbrow Customs, (where I usually buy Harley parts). These are really nice quality, cast aluminum parts. But if anybody is interested, better get them soon, as their selection of these seems to be a lot less than it was a few years ago.

P11 basket case


I also checked out my NEB clutch. Holy Cow! That is a heck of a clutch. Lots more friction surface than I was expecting.
 
More exhaust pics. How noisy is a P11 with straight pipes? The silencers I got don't look like they would do very much, and they run into my rear shocks.

P11 basket case

P11 basket case


Strightened out my previously bent shift lever and used a thin washer to take some of the excess play out of the folding part of my kick start lever.
P11 basket case


Considering an alternate means of mounting the rear fender--probably I won't go this route, but will instead do a little more bending on the cheap reproduction rear frame loop until it looks right to me.
P11 basket case
 

Attachments

  • P11 basket case
    P6010096.JPG
    512.2 KB · Views: 125
Back
Top