My First Commando...

Status
Not open for further replies.
Found my problem...I took Common to mean exactly how LAB describes it, but when looking at schematic, I couldn't understand why two different coded wires would come into contact within one of those doubles...then split apart again when leaving other side of the double. Why not just run one line leaving, two entering? And further I couldn't understand how two different circuits could share a contact in the double and still behave like two circuits, not one. I now see these circuits have switches before the connectors (left side of it in full schematic), so no current flows down a circuit if switch is open. Even if the shared circuit switch is closed. It makes no difference that they share electrons at the double! Yes, they could use singles at every point...but those Brits like scrimp and save every little bit of material :)
Thanks for being patient with me once again!


Somehow you appear to be overthinking this or misinterpreting the schematic as no two circuits (so no two different colour wires) share the same 'common' connector.
The exception is WY connecting to WU, but although there is a colour change they are the same circuit.
 
Yeah, Mike, they are all isolated unless same color. Just 'cause there's a switch involved does not mean you can put different colored wires in the same common double, with the one exception LAB mentions above, WY coming in, and WU going out. And you don't need a double for that one anyway.
And you can't really just use all singles: You need all those white wires in the same connector. Likewise for the red (ground wires).
 
I found to reason my low beam was not coming on...I had swapped switch gear left to right on handle bar to give me turn signal control on left. Placing the dip switch on rightside...and I inverted the actual lever so that it's long extension point outward as designed...but b/c this particular lever is only on/off two position, and assymetric where it interacts with the internals, it was no longer operating the switch to turn on the low beam side. So by re-inverting it as original, it now works but the extension points inward making it slightly harder to reach with a thumb. I think there is an appropriate right side lever to buy...

Also found a few other gremlins. The pilor, instrument, tail light were only on with Master switch in parking mode...traced this to the new Emgo switch not powering that circuit in run or run with lights positions, as the original Lucas switch does. I'm checking with Walridge to see what they can tell me. B/C my Lucas switch is shot, flaky connections etc. I've set up the Emgo with pilot circuit sharing same terminal as the Run with Lights circuit.
Based on advice here and from Bruce on his YouTube Motorcycle Oil & Beer Norton Restoration video
series , I removed the 2n1 manifold to refresh seals to eliminate possible air leaks...giving the rough idle and bluing left side header.
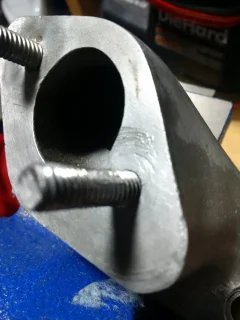
Found some deep scoring near the carb side stud, crossing the sealing ring area...see photo. The stud there also quite chewed up mostly where it passes through carb flange. Will find a new one.
What should I do with the scoring? Thinking a bit of epoxy filler then glass plate sanding flush to surface.
 

Attachments

  • My First Commando...
    IMG_20180426_1102398.webp
    63.9 KB · Views: 345
Been suspicious of those main connector bullets...any tips on how to separate them without damaging the wires? My rubber holder is completely shot and cannot seem to find a source for replacing it (not shown on the AN parts diagrams).

throw the original harness away, it is junk, the wiring will be corroded under the cover jacket and there will be salt and dirt migration from every end point, I recommend you eliminate the junction blocks and wire from point to point.

I have assumed that the emgo switch was a duplicate of the lucas, the park lights should come on when the switch goes to run with lights (second stop). if the switch doesn't do it the same as the factory we can kiss it off as an option.
 
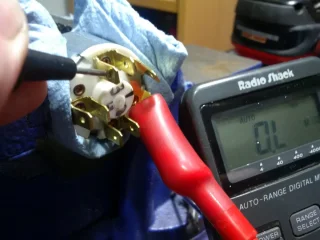
It maybe I have a dude...but I tested it off bike to find the pilot light circuit terminal (#3 in this pic) does not connect to terminal #1 when key is in Run with Lights mode, only connects in Park mode.
 

Attachments

  • My First Commando...
    IMG_20180425_182817.webp
    69.6 KB · Views: 367
It maybe I have a dude...but I tested it off bike to find the pilot light circuit terminal (#3 in this pic) does not connect to terminal #1 when key is in Run with Lights mode, only connects in Park mode.

The original switch was 1-4-2-3 but pattern switches can have the terminals arranged in a different order (1-2-3-4) yours is marked 1-2-4-3.
 
The usual 'Lucas' replacement switch appears to be 35351 however, the internal connections are not the same as the original switch!

My First Commando...
 
Thanks LAB. Functionally looks like what the Emgo is doing. The Lucas I have adds #4 terminal to ign/lights position.
In your last diagram, how does switch activate ign/lights(headlamp)/parking (pilot, instruments, tail lights) in the second position clockwise key turn?
 
Thanks LAB. Functionally looks like what the Emgo is doing. The Lucas I have adds #4 terminal to ign/lights position.
In your last diagram, how does switch activate ign/lights(headlamp)/parking (pilot, instruments, tail lights) in the second position clockwise key turn?


To use the 35351 switch you would have to connect the running lights (brown/blue) and headlamp (blue/yellow) to terminal 3 and go without parking lights.

The correct switch is 39784 (or 30552 which has a different bezel/nut)

https://www.classicbritishspares.co...gnition-lighting-switch-w-keys-30552-54335169

Edit: Linking terminals 3 & 4 would give parking lights but the headlamp would then have to be switched off at the headlamp switch.
 
Last edited:
OK. So much Emgo switch is not a dud and I need to forego parking light mode...no biggie.

Any tips on dealing with the scored manifold flange I posted a shot of a few posted above?
 
Any tips on dealing with the scored manifold flange I posted a shot of a few posted above?

They don't look too bad so it should be possible to clean it up on a sheet of fine abrasive paper on a flat surface.
 
Been suspicious of those main connector bullets...any tips on how to separate them without damaging the wires? My rubber holder is completely shot and cannot seem to find a source for replacing it (not shown on the AN parts diagrams).

Sorry for the delay in responding. I generally spray penetrating oil into the connector. I then remove the wires by grasping the male bullet using needle nose pliers. The female socket may be cracked or ruined during the removal.
 
OK. So much Emgo switch is not a dud and I need to forego parking light mode...no biggie.

I would think based on this info that the Emgo switch is still usable in NA if the wiring thought out carefully, as we have no legal need for a park light circuit. elsewhere that may not be acceptable
 
Spent most of yesterday and today messing with the timing and points. The timing scale on primary cover had be replaced by DPO with a blank piece of metal with three magic marker lines on it, presumably the 20, 30, 40 deg marks on original...I had seen this month's ago and had a proper scale in hand and in a installed it with fresh tap in screws. Timing wheel work with homemade piston stop showed marks were off by roughly 1.5 degrees over actual setting...so 28 by wheel showing as 29.5. Messing with points, getting gaps set at 0.015", checking opening point (AA locked full advanced) with a test lamp...seemed to indicate about 8 degrees BTDC!! Then found no amount of tweaking the left side contact adjuster nor the whole plate slotted screws adjuster could move the advance further than 10 degrees. Something not right. Could engine even run at 8-10 degrees
advance? Slept on that a bit to think over...suspected AA might need rotating on cam flange to get into adjustment range. But, in the end decided to leap forwards to installing the VapeWassell EI kit. Pulling AA off was quite easy...a little penetrating oil, a correct thread bolt (5/16" -24 UNF) and a few light taps side to side and it started to release, then fully off.
Tossed on two fresh 6v coils wired in series with the EI kit. Pretty straightforward wiring. Had some issues with one pillar bolt at the timing stator...it felt stiff threading in the casing and thought maybe cross threaded so backed out only to have the hex section come off the threaded section. Very odd, as the other one was one solid piece, thread not threaded into hex. Seems DPO had cobbled this one together and was a slightly different thread pitch than proper one...and would only go in one of the two casing holes (presumably tapped to fit). Anyway used so loctite to hold hex to thread section and made sure it went in the right casing hole. When fitting the timing cover plate...found the hex sections now sitting to proud of the casing flange so the bolts were bottoming out before drawing the cover against the casing. I guess the Stator slotted holes are thicker than OEM. Had to Dremel off 2-3 threads from the cover bolts to make it snug.
While I still have plugs out and tank off, I want to check valve rocker gaps. Then get the carb and mani back on and give her a try.
 
IT'S ALIVE!!
Took quite a few (+15-20) before it fired...checked both side for good spark...A OK. Thought about going over all the connections but just tried a few more kicks and up she came. Tweaked pilot and air idles and got it to hold OK at 11-1200...much smoother than ever before. Going lower seemed to bring on the shakes and lumpiness, so needs more dialing in I suspect...but she's rideable. Will take her out in a few minutes...if going solidly will ride to a local bike shop to arrange for timing light check.
 
Welp, time to be humbled once again.
Getting much above 3 k on the side roads gives a distinct power pulse, as if one cylinder is mis firing. By 4-5k it's like a red line limiter has kicked in. Is this just a timing tweak or something unrelated?
 
Last week I limped it to a local shop to get it strobed...well was a bit gob snacked when told that they would not do it...and I could not make an appointment....they just wanted quick fix jobs like tires and Nortons are considered winter project work!


Called up a Norton,classic bike specialist...he could do it next week, but suggested issue was not static vs dynamic timing, but most
likely fueling, idle circuit. After thinking on this overnight, and pricing out various new carb solutions ( Mikuni, Wassell, Amal Premiers) decided to have another
go at my 1974 Amal. Read up that the pilot fuel gallery can be a major issue on a long stored bike. And I found mine isn't flowing much fuel to ports in carb throat when
sprayed with aerosol cleaner. Gave it an overnight soak in Acetone...still not much change. Pulled my second carb out of its storage box and tested it...quite a
bit better flow! Slapped it on bike and she seems to now ran way better...no more missing, chopped idle, and pretty smooth down to 1000. Out riding today and no more power jerking while cruising along side roads.
Very happy in finally seeing improvements.
 
Last edited:
It'd be good to get a few miles on the bike now you have it running ,
Then maybe work on the faulty carb and get that working right then fit and balance the pair to have the full Norton commando experience
 
Agreed. Growing confidence in bike had me ranging out of my local hood and even stopping for lunch without worry of not getting started.
One issue it does seem to have, a dip in rpm just as you roll throttle from idle the tiniest amount. It was enough of a dip to stall once today. What should I look at, more idle jet or elsewhere?
 
Status
Not open for further replies.
Back
Top