Knocking / rattling inside primary drive case + backfire

I've removed the rotor and stupidly (getting tired), I forgot the rotor key would drop out. I'll have to figure out how it all goes back together later! I.e. which way around the key goes. Also, whether the collar/shim goes behind or in front of the rotor spacer.


View attachment 103495

I then mounted a DTI to see if the crank is bent. It's definitely not 100% true but I don't know what the tolerances are. I think it's deviating about 0.1mm. Is that normal?

Not sure what else to look for while the rotor is off. The sprocket seems to have a very small amount of play to it. Also, not sure if that's normal. I'm favouring Kommando's suggestion that the crank must be slightly bent, and a rotor skim could be the solution.

In the meantime, I've tightened the primary chain to a smidgen over 3/8's (preferring to err on the side of loose than tight).
Grab the end of the crank and see if there's any up/down or left/right movement. If there is, you main bearing is bad and that's where the noise is coming from.

You've found the rotor problem - not sure about the noise. If the end of the crank is wobbling but the sprocket is not then only the end has a problem.

When you put it back together, leave the stator off and try it. That will clear up whether the rotor and stator are touching.

When putting the rotor back on, remove everything but the sprocket. Then put on the thick spacer you show in the picture in the direction you have it in the picture. Then the key and then the rotor. Leave all thin spacers off.
 
With the rotor/stator off, try turning engine over by turning rear wheel in gear, to be watch/listen for the noise. If there still, your rotor/stator are not the issue. I'd be checking the inner cover clearance to chain run and if case clearance to crank sprocket is same at clutch sprocket. There is a shim between the engine side of casing and its holding stud for changing that clearance and setting squareness.

As for chain tension, I had never done one before when I thought it was too loose. I could make it move much more that spec by mild finger pressure. Could keep some force on chain and increase movement a fair bit. Then I learned from recs here that you should only use very light pressure, to just flick it up and down, not push it at all really.
 
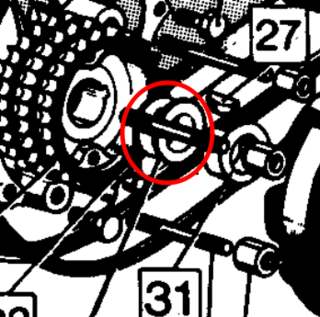
Shims (as required) go behind the rotor spacer, '31'.
Knocking / rattling inside primary drive case + backfire
Agreed, but IMHO, you don't need/want rotor shims on pre-MKIII and I have no opinion on MKIII rotor shims. Many pre-MKIII rotors already touch or nearly so the timing scale without shims. With a flat timing scale, you could add some shims to better center the rotor in the stator and possibly get higher output from the stator.
 
Agreed, but IMHO, you don't need/want rotor shims on pre-MKIII and I have no opinion on MKIII rotor shims. Many pre-MKIII rotors already touch or nearly so the timing scale without shims. With a flat timing scale, you could add some shims to better center the rotor in the stator and possibly get higher output from the stator.

Fair enough but it was a reply to M-Hawk's comment about the correct placement of shims.
 
Here's a quick video of me wiggling the sprocket, and the shaft:


The shaft seems to have no play at all. The sprocket has only a very small amount - maybe normal?

Regarding the shims - this is a photo of what I have. I can't remember whether it was behind the rotor spacer or in front. I'd describe it more as a collar than a shim to be honest. It's about 6mm thick.

Knocking / rattling inside primary drive case + backfire
 
With the rotor/stator off, try turning engine over by turning rear wheel in gear, to be watch/listen for the noise. If there still, your rotor/stator are not the issue. I'd be checking the inner cover clearance to chain run and if case clearance to crank sprocket is same at clutch sprocket. There is a shim between the engine side of casing and its holding stud for changing that clearance and setting squareness.

As for chain tension, I had never done one before when I thought it was too loose. I could make it move much more that spec by mild finger pressure. Could keep some force on chain and increase movement a fair bit. Then I learned from recs here that you should only use very light pressure, to just flick it up and down, not push it at all really.
Thanks Tornado, that’s really useful. I think I’ll loosen it a bit in that case. I used some finger force to test the deviation.
 
The sprocket has only a very small amount - maybe normal?

No, definitely not normal. The sprocket should be tight on the taper, tight enough to need an extractor to remove it.
Regarding the shims - this is a photo of what I have. I can't remember whether it was behind the rotor spacer or in front. I'd describe it more as a collar than a shim to be honest. It's about 6mm thick.

The shims behind spacer '31' should be either 0.010" or 0.036".
 
Any ideas on what this collar is? It definitely came from the rotor zone.

Looking at the exploded diagrams I can’t see anything like it.

It seems to fit on the shaft and into the recess thus. But doesn't feature on the diagrams. Weird?

Knocking / rattling inside primary drive case + backfire
 
Last edited:
Thanks for the quick reply L.A.B.

Well it's a mystery. I'm a bit nervous about leaving it out but if it's not on the diagrams then I guess it doesn't belong.

Silly question perhaps - but what is the function/purpose of shims 32/33? They are listed as 'rotor spacers'. I guess I mean, how do I know if I need them?
 
Well it's a mystery. I'm a bit nervous about leaving it out but if it's not on the diagrams then I guess it doesn't belong.

I can't see how an additional spacer of that width could be fitted without the rotor timing pads wiping out the timing scale unless the timing scale has been removed.

Silly question perhaps - but what is the function/purpose of shims 32/33? They are listed as 'rotor spacers'. I guess I mean, how do I know if I need them?

Presumably, the spacers are intended to position the rotor as close to the timing scale as possible.
 
I can't see how an additional spacer of that width could be fitted without the rotor timing pads wiping out the timing scale unless the timing scale has been removed.


Presumably, the spacers are intended to position the rotor as close to the timing scale as possible.
There is no timing scale that I can see. This bike gets weirder by the day :)
 
There is no timing scale that I can see. This bike gets weirder by the day :)

Ok, as there would normally be an ignition timing scale inside the front chaincase inspection port.

 
Last edited:
Righto, I'll order one of those along with a new grommet, and also I guess a new woodruff key. This one looks pretty worn. Could this even have been the source of the noise perhaps. It's not even the correct shape is it? The ones I've seen are uniform, rather than having a flat edge at one side.

IMG_7151.jpeg
 
Righto, I'll order one of those along with a new grommet, and also I guess a new woodruff key. This one looks pretty worn. Could this even have been the source of the noise perhaps. It's not even the correct shape is it? The ones I've seen are uniform, rather than having a flat edge at one side.

View attachment 103514


I'd guess you have found the source of the knocking as that key probably wasn't allowing the taper of the engine sprocket to seat on the crank taper hence the looseness of the engine sprocket which would almost certainly have ended in disaster if the bike had been ridden because the crankshaft would be driving through the woodruff key and not the 'fit' of the tapered joint causing the woodruff key to ultimately shear not only losing all drive between the crankshaft and primary but probably wrecking the tapers of both parts in the process.
 
I can't see how an additional spacer of that width could be fitted without the rotor timing pads wiping out the timing scale unless the timing scale has been removed.


Presumably, the spacers are intended to position the rotor as close to the timing scale as possible.
I would say the spacers are to position the rotor centrally within the stator for maximum alternator power. As long as you keep parallax in mind, the distance from the rotor doesn't matter. It's probably not accurate anyway unless you've checked it with a dial gauge and degree wheel.
 
Back
Top