Tools You Have Made to Maintain your Norton

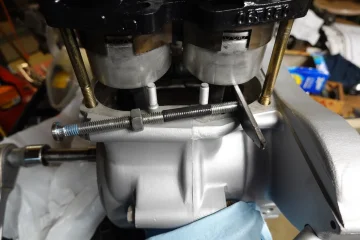
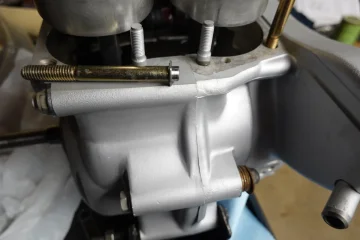
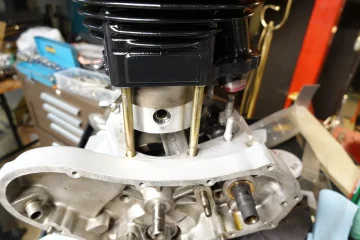
Whenever I replace pistons and assemble the cylinders, I feel like it's a little out of control. Probably the most popular way to assemble is to put pistons on the connecting rods, then use a ring compressors to slide the two pistons into the cylinders at once. This is where it seems a little shaky, possibly marking rods or piston or a broken ring. Today I put pistons into the cylinder first. Used 3/8 bolts to hold the barrel inplace. Then pulled wrist pins into place with protected all thread. The bolts held the cylinders in place and allowed you to move the connecting rods around to feel the proper alignment. No rush fearing your gasket sealer will hardened before you get it together. I am not using a base gasket. May not be the best but works for me!

Tools You Have Made to Maintain your NortonTools You Have Made to Maintain your NortonTools You Have Made to Maintain your NortonTools You Have Made to Maintain your Norton
 
Last edited:
Whenever I replace pistons and assemble the cylinders, I feel like it's a little out of control. Probably the most popular way to assemble is to put pistons on the connecting rods, then use a ring compressors to slide the two pistons into the cylinders at once. This is where it seems a little shaky, possibly marking rods or piston or a broken ring. Today I put pistons into the cylinder first. Used 3/8 bolts to hold the barrel inplace. Then pulled wrist pins into place with protected all thread. The bolts held the cylinders in place and allowed you to move the connecting rods around to feel the proper alignment. No rush fearing your gasket sealer will hardened before you get it together. I am not using a base gasket. May not be the best but works for me!

View attachment 111945View attachment 111946View attachment 111947View attachment 111948
Great minds etc…..

 
Whenever I replace pistons and assemble the cylinders, I feel like it's a little out of control. Probably the most popular way to assemble is to put pistons on the connecting rods, then use a ring compressors to slide the two pistons into the cylinders at once. This is where it seems a little shaky, possibly marking rods or piston or a broken ring. Today I put pistons into the cylinder first. Used 3/8 bolts to hold the barrel inplace. Then pulled wrist pins into place with protected all thread. The bolts held the cylinders in place and allowed you to move the connecting rods around to feel the proper alignment. No rush fearing your gasket sealer will hardened before you get it together. I am not using a base gasket. May not be the best but works for me!


View attachment 111945View attachment 111946View attachment 111947View attachment 111948
I have done it this way
But I find it easier with home made ring compressors
I use ordinary house gutter drainpipe clamps
Tighten them up on the piston rings then tap the barrel down and remove the clamps
 
VW ring compressors work for me, and I usually have my mate helping me, I done a few Norton motor using them over the years.
 
When doing a 4-cylinder engine I put PVC pipes under each side of the piston and tape or wire them in place. I cut up a plastic milk jug into strips and surround with big hose clamps for ring compressors. For the Norton I built a jig out of plywood that cradles the bottom end the same as ones you can buy.
 
(More of an adaption than a new tool). I made some new starter cables for my 961 (well it is a Commando ;) ), but I had nothing beefy enough to crimp the ends. I rummaged around and found an old pair of crimping pliers which have an Ignition cable terminal position. Once I had fenagled all the strands into the terminal, I was able to put the whole lot in the vice and squeeze. As the pliers are pretty thin I was able to get three crimps on each end....
 

Attachments

  • Tools You Have Made to Maintain your Norton
    20240111_223423.webp
    140 KB · Views: 131
  • Tools You Have Made to Maintain your Norton
    20240111_223608.webp
    278.3 KB · Views: 132
  • Tools You Have Made to Maintain your Norton
    20240111_223814.webp
    239.1 KB · Views: 131
  • Tools You Have Made to Maintain your Norton
    20240111_223824.webp
    261.7 KB · Views: 129
  • Tools You Have Made to Maintain your Norton
    20240111_224018.webp
    176.7 KB · Views: 133
(More of an adaption than a new tool). I made some new starter cables for my 961 (well it is a Commando ;) ), but I had nothing beefy enough to crimp the ends. I rummaged around and found an old pair of crimping pliers which have an Ignition cable terminal position. Once I had fenagled all the strands into the terminal, I was able to put the whole lot in the vice and squeeze. As the pliers are pretty thin I was able to get three crimps on each end....
Came out looking very professional. Assuming you didn't touch the bare wires or the inside of the connector with your fingers, those connections should never cause you a problem!
 
Came out looking very professional. Assuming you didn't touch the bare wires or the inside of the connector with your fingers, those connections should never cause you a problem!
Thanks Greg, no I just used needle nosed pliers to get a couple of the strands in.
 
(More of an adaption than a new tool). I made some new starter cables for my 961 (well it is a Commando ;) ), but I had nothing beefy enough to crimp the ends. I rummaged around and found an old pair of crimping pliers which have an Ignition cable terminal position. Once I had fenagled all the strands into the terminal, I was able to put the whole lot in the vice and squeeze. As the pliers are pretty thin I was able to get three crimps on each end....

Bought this to uprate my Tiger 1050 cables. Works GREAT!
Must be something similar there...
 
I wanted to pressure test an interstate tank before listing it for sale, but I had no way to seal the filler neck and didn't want to make up something specifically for it, so I had a think and came up with this idea...
It's a party balloon, blown up whilst halfway inside the tank, and then held in place with a strip of masking tape to stop it popping out when pressure was applied. It worked like a charm, and no leaks were detected. :)
 

Attachments

  • Tools You Have Made to Maintain your Norton
    20240114_124258.webp
    154.1 KB · Views: 145
  • Tools You Have Made to Maintain your Norton
    20240114_124739.webp
    162.3 KB · Views: 146
Easier way to find out if a tank is leaking is look for the petrol stains or droplets from the seams or smell of fuel, bike parked up in a enclose shed you will know as soon as you walk in if you had a leaking tank or fuel tap, with a well sealed tank you should get no fuel smell at all, I just fix my Featherbed tank up from 2 slight seeps from the tank as you could smell it as soon as I came into the shed, been like that for sometime but now I found where it was seeping and fixed no longer can smell fuel in the shed.
My dear old dad put me onto this product a very long time ago call Jenco, its a 2 part mix and is design for sealing cast iron pipes the hardener is white and the other is black, mixed together it turn grey, it can be mixed in water to make it easier to work, it can also be used when the fuel is leaking and will set even quicker and once set its as hard as metal, I have used it many of times and when traveling in my 4x4 I take it with me just in case.
Jenco is a wonder product and has many uses, better than JB Weld by far.

Ashley
 
I wanted to pressure test an interstate tank before listing it for sale, but I had no way to seal the filler neck and didn't want to make up something specifically for it, so I had a think and came up with this idea...
It's a party balloon, blown up whilst halfway inside the tank, and then held in place with a strip of masking tape to stop it popping out when pressure was applied. It worked like a charm, and no leaks were detected. :)
Let the party continue .
 
(More of an adaption than a new tool). I made some new starter cables for my 961 (well it is a Commando ;) ), but I had nothing beefy enough to crimp the ends. I rummaged around and found an old pair of crimping pliers which have an Ignition cable terminal position. Once I had fenagled all the strands into the terminal, I was able to put the whole lot in the vice and squeeze. As the pliers are pretty thin I was able to get three crimps on each end....
Love that “ finagled”….great word 👌
 
I was talking to a mate today & Jenco came up , never heard of it before , he used it to fix a split in his boats hull , also recommended by his dad , lasted for 15 years before he sold it .
 
I was talking to a mate today & Jenco came up , never heard of it before , he used it to fix a split in his boats hull , also recommended by his dad , lasted for 15 years before he sold it .
Originally it was call Fropoite or something like that, as I say its good for many repairs and goes as hard as metal and yes fixing alloy boats has its part, I remember when I was a kid we had a 10' car top alloy boat and one day it flew off the top of the EH station wagon and smashed onto the road and put a few holes in it, well dad repaired it with the Fropoite and was good for another 20 years.
 
Back
Top