
You are using an out of date browser. It may not display this or other websites correctly.
You should upgrade or use an alternative browser.
You should upgrade or use an alternative browser.
Exhaust port repair
- Thread starter baz
- Start date
baz
VIP MEMBER
- Joined
- May 26, 2010
- Messages
- 8,103
What thread are people using for the OD of the port repair sleeve ?
In this video he uses a 2"1/8" UNF
I was wondering if a 1"3/4" bspp would what?
With the I'd tapped to 1"15/16" x14 UNF ?
https://www.classicbikespares.com.a...8-lazQdiNuLixQfniGZnmcvdxtrzmG6X_M5_OQbkIUSe0 I think I've just answered myself!!
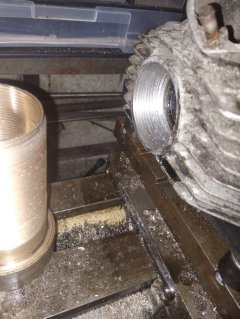
The problems start when you have a previously repaired head that has been repaired with a welded in aluminium sleeve. Seen a few of these where the sleeve has broken the weld when the rose has been tightened. You'r into screwcuttting the head to accept an oversize custom made sleeve using a better material (bronze)
baz
VIP MEMBER
- Joined
- May 26, 2010
- Messages
- 8,103
I'm thinking bronze or brass ?The problems start when you have a previously repaired head that has been repaired with a welded in aluminium sleeve. Seen a few of these where the sleeve has broken the weld when the rose has been tightened. You'r into screwcuttting the head to accept an oversize custom made sleeve using a better material (bronze)
I don't think aluminium is up to the job ,after all it's aluminium in the first place and that fails
And I know there's many reasons for the thread to fail
Exhaust tab washers
Badly machined exhaust roses
Cross threading etc etc
Aluminium bronze would be the best material, a bit over the top and can be tough stuff to machine, needs dead sharp tools. A free cutting bronze will be good.I'm thinking bronze or brass ?
I don't think aluminium is up to the job ,after all it's aluminium in the first place and that fails
And I know there's many reasons for the thread to fail
Exhaust tab washers
Badly machined exhaust roses
Cross threading etc etc
baz
VIP MEMBER
- Joined
- May 26, 2010
- Messages
- 8,103
Proper machinists should avert their eyes now 
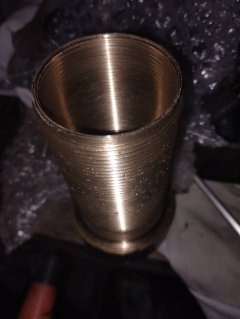
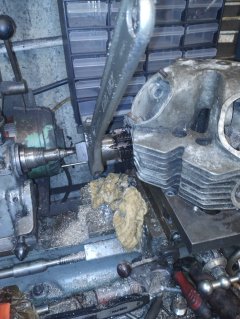
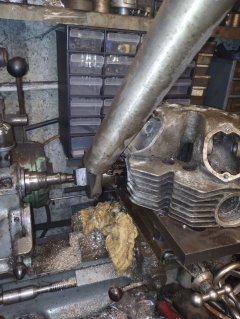
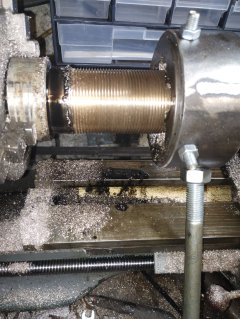
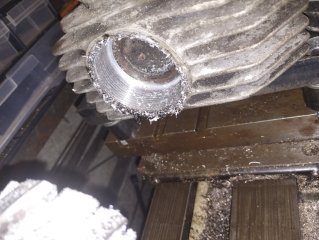
I thought I'd have a go at Norton exhaust port repair
I pressed my old myford ml7 into action and all seems well so far
I practiced on a scrap commando head
I thought I'd have a go at Norton exhaust port repair
I pressed my old myford ml7 into action and all seems well so far
I practiced on a scrap commando head
Attachments
-
 IMG_20250220_220140554.jpg197.4 KB · Views: 120
 -
 IMG_20250221_184914856.jpg362.8 KB · Views: 112
 -
 IMG_20250221_184900967.jpg385.7 KB · Views: 103
 -
 IMG_20250221_190622973.jpg343.8 KB · Views: 95
 -
 IMG_20250221_185610633.jpg378 KB · Views: 91
 -
 IMG_20250220_214703660.jpg449.4 KB · Views: 92
 -
 IMG_20250221_183152766.jpg319.3 KB · Views: 97
 -
 IMG_20250220_193907530.jpg313.8 KB · Views: 117
- Joined
- May 7, 2005
- Messages
- 7,238
The bronze insert I had an issue with had a smooth OD and was an interference fit into the bored out exhaust port. The inference fit was either wrongly sized or changed over time and the insert started to turn and finally came out. Mick Hemmings welded one of his aluminium inserts in to repair it and that has lasted 3 decades.
baz
VIP MEMBER
- Joined
- May 26, 2010
- Messages
- 8,103
I set the die to give a tight threadThe bronze insert I had an issue with had a smooth OD and was an interference fit into the bored out exhaust port. The inference fit was either wrongly sized or changed over time and the instart started to turn and finally came out. Mick Hemmings welded one of his aluminium inserts in to repair it and that has lasted 3 decades.
It'll only screw in about half way cold
So when I do it for real ill have to heat the head to fit
Fast Eddie
VIP MEMBER
- Joined
- Oct 4, 2013
- Messages
- 21,854
Was it scrap before or after your practice ??Proper machinists should avert their eyes now
I thought I'd have a go at Norton exhaust port repair
I pressed my old myford ml7 into action and all seems well so far
I practiced on a scrap commando head
baz
VIP MEMBER
- Joined
- May 26, 2010
- Messages
- 8,103
It's a hemmings big valve 850 head that's ported out and skimmedWas it scrap before or after your practice ??
Unfortunately both the inlet guide bores are cracked
And sometime in the past a top hat sleeve was fitted to the right hand guide,this came loose and left a ragged hole
So when it came to me I welded the hole,this was many years ago with a view to re machining it to a 750 size guide but another head came up and I never bothered
Since then Lazer welding has become available so it could be saved, there's also some fins missing but you can grow new ones with a Tig
And the thread I cut went well so never say never!
Fast Eddie
VIP MEMBER
- Joined
- Oct 4, 2013
- Messages
- 21,854
That don’t sound like scrap to me.It's a hemmings big valve 850 head that's ported out and skimmed
Unfortunately both the inlet guide bores are cracked
And sometime in the past a top hat sleeve was fitted to the right hand guide,this came loose and left a ragged hole
So when it came to me I welded the hole,this was many years ago with a view to re machining it to a 750 size guide but another head came up and I never bothered
Since then Lazer welding has become available so it could be saved, there's also some fins missing but you can grow new ones with a Tig
And the thread I cut went well so never say never!
That sounds like ‘in need of some TLC’ or ‘ideal winter project’ !!
On a serious note, I’d wager that laser welding could indeed fix it.
baz
VIP MEMBER
- Joined
- May 26, 2010
- Messages
- 8,103
It won't be binnedThat don’t sound like scrap to me.
That sounds like ‘in need of some TLC’ or ‘ideal winter project’ !!
On a serious note, I’d wager that laser welding could indeed fix it.
As said earlier the new thread I cut in this head went well so at least I haven't buggered it further!
I have several heads with dodgy threads that I now feel confident to tackle
I'd really like to know if people that do this work use any heat proof sealant on the insert ?
I think maybe a bit of exhaust paste would lock it in tight?
Deets55
VIP MEMBER
- Joined
- Oct 3, 2013
- Messages
- 1,593
It won't be binned
As said earlier the new thread I cut in this head went well so at least I haven't buggered it further!
I have several heads with dodgy threads that I now feel confident to tackle
I'd really like to know if people that do this work use any heat proof sealant on the insert ?
I think maybe a bit of exhaust paste would lock it in tight?
Jim Comstock's procedure. IIRC he uses JB weld when fitting the insert
baz
VIP MEMBER
- Joined
- May 26, 2010
- Messages
- 8,103
Jim Comstock's procedure. IIRC he uses JB weld when fitting the insert
Wow
I wish I had some equipment like that
And knew how to use it !!

Deets55
VIP MEMBER
- Joined
- Oct 3, 2013
- Messages
- 1,593
Baz,Wow
I wish I had some equipment like that
And knew how to use it !!
If memory serves me correctly, Jim started with a Bridgeport style mill and converted it into a 4 axis with DRO readouts. That doesn’t count all the other crazy stuff in his shop. I’m sure I speak for a lot of people when I say he is missed on this site. I had the opportunity to meet him at a couple of Rally’s, he is one of the nicest, down to earth guys you could ever meet.
baz
VIP MEMBER
- Joined
- May 26, 2010
- Messages
- 8,103
I really miss him being on this siteBaz,
If memory serves me correctly, Jim started with a Bridgeport style mill and converted it into a 4 axis with DRO readouts. That doesn’t count all the other crazy stuff in his shop. I’m sure I speak for a lot of people when I say he is missed on this site. I had the opportunity to meet him at a couple of Rally’s, he is one of the nicest, down to earth guys you could ever meet.
I'd love to have just some of his skills
marshg246
VIP MEMBER
- Joined
- Jul 12, 2015
- Messages
- 5,084
I consider myself to be a busy guy - Jim is a REALLY busy guy. He seems to have enough sense to not spend his time here! I keep telling myself to get to work and not spend so much time here - I seem to just ignore myself lately - here I sit not getting projects done!I really miss him being on this site
OK, I really am going to the shop now - BTW, I have a bridge for sale.
I use high Temp red Loctite.Has anyone done this conversion?
I'm considering using exhaust assembly paste on the bronze insert to ensure it doesn't unscrew from the head when the exhaust rose is removed
What thread are people using for the OD of the port repair sleeve ?
In this video he uses a 2"1/8" UNF
I was wondering if a 1"3/4" bspp would what?
With the ID tapped to 1"15/16" x14 UNF ?
I custom cut the Aluminum / Bronze OD threads to match the threads that had to be cut in the cylinder head. Locked in place with high temperature RED loctite.
Similar threads
- Replies
- 24
- Views
- 2,153