TW wrecks a perfectly good Commando etc.

Hi TN
Enclosed my head steady. It's taken a long time to get to this stage. Never knew how hard it was to hacksaw 4mm steel. How Ludwig cut holes & shapes in his I will never know.
Keep posting you work I love it.
Chris
 

Attachments

  • TW wrecks a perfectly good Commando etc.
    20210519_235642.webp
    135.5 KB · Views: 277
Hi TN
Enclosed my head steady. It's taken a long time to get to this stage. Never knew how hard it was to hacksaw 4mm steel. How Ludwig cut holes & shapes in his I will never know.
Keep posting you work I love it.
Chris

Fantastic job Chris but never easy when truly hand made.
I had considered making a replica (After asking Ludwig/J ) but elected to take the easy route using available machine tools.

It reminds me of when I lived in Darwin where there were for the most part only basic hand tools when I picked up a OEM 2001 GSXR1000 muffler (Titanium internals that year) for my DR650 and had to do it boilermaker style.
The taper was done by cutting a wedge, hose clamps and some dollying.
The flange made from some plate found out the back.

TW wrecks a perfectly good Commando etc.


TW wrecks a perfectly good Commando etc.


TW wrecks a perfectly good Commando etc.


TW wrecks a perfectly good Commando etc.


A central hole added later.

TW wrecks a perfectly good Commando etc.


TW wrecks a perfectly good Commando etc.


I used the same methods in the Grindo Lathe to reduce the OD of the front sprocket retainer to suit a smaller 14T.

TW wrecks a perfectly good Commando etc.


TW wrecks a perfectly good Commando etc.


TW wrecks a perfectly good Commando etc.
 
Later on 4000 kms from home, what nut jobs would be on the Creb track after it rained at night time (Kiwi's)

TW wrecks a perfectly good Commando etc.
 
As usual fascinating work. The offroading looks fun if a tad tiring. Well just thinking about the old legs riding off road is enough.
 
The most expensive and time consuming head steady in the history of the Commando gets closer to completion (Will it work is unknown)
It should have its titanium (6AL-4V) spindle, cap screws and Teflon slider pucks this week.

zz88 (1).jpg
 
'Let the good times roll, not only is the titanium bar due for delivery tomorrow but so are the Ken C push rods all the way from the USA.

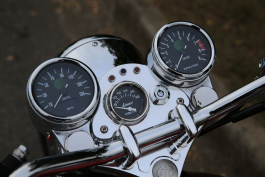
I like that Old Britts oil pressure gauge location but the handle bars dictate the height of the gauge, I had an occurrence that if I clamped the top triple clamp and bars (The originals perhaps) in the rotary table I could mill a 40 mm diameter relief in the bars maybe to the half tube depth to lower the gauge.
The bars could be tickled up with the Lincoln T.I.G to make sure they did not produce some from of future steering calamity.
Put it on the list.

I have another Marlin's gauge for the Norton same as I used on the Moto Guzzi which needed a mount bracket, acetyl housing, sandwich plate for a take off and custom fittings including a M12 - 1.5 to NPT banjo bolt made.
The triple clamp location and hose off the bottom on the Norton would make for a very tidy installation.


m2.jpg m4.jpg

m5.jpg m7.jpg

m8.jpg m9.jpg

m10.jpg m11.jpg
 
I like my CBS guage. No issues using the anemic fork lock in a pinch. Simple install.

The whole hanging off the side thing never did it for me.

TW wrecks a perfectly good Commando etc.
 
The 5/16" Allen clamp screws don't go all the way through the top yoke and the holes are tapped all the way, so if the guage isn't too deep it may be possible to bolt it on the bottom of the yoke with a couple of short bolts & spacers the clear the ridge. That's what I'm thinking of doing with the ignition switch on mine.
 
Cliffa, that was my thought a while back so the gauge sat low at the front centre with the option of running the oil through the mount so the hose take off was at the rear away from the headlight.

The Gortnipper/ D man type would be the most logical for ease of making.
The Moto Guzzi with single gauge police dash was more limited unlike the Norton. The mount clamped around the steering head but of course the gauge stays stationary so no movement of the oil line, it was there or mounted on the crash bar top tube.

The force is strong to go where no sensible person would with the Norton (Clean look and easy to see)
 
I assume you have seen this?

TW wrecks a perfectly good Commando etc.


Yes, saw them but this is a stock bike, even the seat foam probably has British air molecules from 1974 so nothing to obvious as far as add on's.

TW wrecks a perfectly good Commando etc.
 
Last edited:
I don't think this one will be in the CNW catalogue.

gag.jpg


Excuse the patina-ed patina if you will.
 
TW wrecks a perfectly good Commando etc.


Press in ring 2 mm deep, M2 radius inside and outside. One gauge recessed into the handlebars.

TW wrecks a perfectly good Commando etc.
 
Last edited:
Some dodgy machined titanium will go nicely with the milled handle bar tube.

ti.jpg


I am very happy with the $2.95 worth of Acetyl gauge bezel and look forward to any future FB poster commenting on the machined recess (Radius @ 22 mm and 13.5 mm deep) in the bars. :)
My Marlin's facia must be left hand drive.

gag6.jpg
 
Last edited:
I remember some years ago now ( I was mainly doing pipe spooling and welding for thermal oil heaters and pressure vessels on contract) the company owner says some guys were coming to the shop, they need a couple of cradles for their boats. Just the job for you.


Another time, it was some guys are coming to the shop, they have an idea and need some attachments made to attach a platform.
Just the job for you.

 
I like it, one head steady spindle.
Cost AU$14 for the titanium.
1-15/16 long.
9/16 UNF threads done on the lathe with the power off.

TW wrecks a perfectly good Commando etc.


How much if you walked into a commercial machine shop with a drawing to make one of.
 
I like it, one head steady spindle.
Cost AU$14 for the titanium.
1-15/16 long.
9/16 UNF threads done on the lathe with the power off.

View attachment 80497

How much if you walked into a commercial machine shop with a drawing to make one of.

Now that's my kind of crazy, Les. Back when I was dealing with the head steady on my Restomod MK3, I couldn't resist making up a Ti spring pin to replace that heavy stock item. Must have saved at least a couple of ounces. :rolleyes:

TW wrecks a perfectly good Commando etc.


Ken
 
Back
Top