TW wrecks a perfectly good Commando etc.

I forget what pictures / gibberish has been posted in the past.

A la @Jeandr

TW wrecks a perfectly good Commando etc.
 
Thanks, for the DR650 (new caliper, new take off Showa forks)
At the time I could not find an off the shelf bracket.

I have a new Brembo rear caliper and master cylinder to fit but at this stage it is not doable with spoke clash at the rear side of the caliper.
With work this nice, why not a radial caliper? ;-)
 

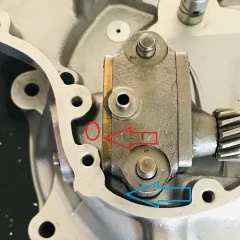
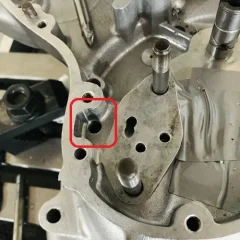
Yes I had seen that and did pretty much the same but put the relocated lower drain hole higher between the oil inlet and oil return passage inside the casting.
I couldn't find a plug for the stock vent location so made a special stepped version.

Had thought about a radial caliper but already having that new Brembo (USeBay) from long ago which should stop a 150 kg bike well enough (especially if I get a Brembo 15RCS later on)

3.jpg

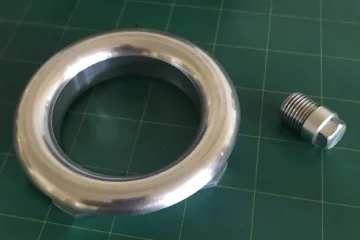
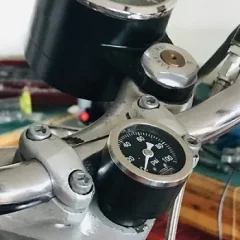
Back to the (finally) Old Britts tribute recessed into the handle bar oil gauge stand off pipe.
I had made one already some time ago from aluminieium but decided to make another from stainless steel.

TW wrecks a perfectly good Commando etc.
 
Last edited:
A good discussion

 
Had thought about a radial caliper
I looked at Radial brakes and based on my research the radial caliper does not add much other than being easier to adjust for different disc sizes but the radial master cylinder does add to braking function.
 
u.jpg


The drain hole I drilled is somewhere around the projected location (lowered) of a vertical Atlas engine tilted forward (18 degree's ?) like a Commando to retain that original level.
Of course there might be a good reason why I have never seen one placed in that location before.
I recall (and it took a bit of set up) the OD of the new hole is 2.5 mm away (top and bottom) from the OD of the internal oil passages mentioned to and from the oil tank.

As per Page Two.

cs.jpg TW wrecks a perfectly good Commando etc. cm.jpg

I had a picture with the projected new level line but my laptop with pictures died the other day (only 6 + years old) so no access at this time (Back on the PC now)
 
Last edited:
Replying to my own post here, but the guy in question is Dave Sundquist. You can see his idea @ 16:45


(thanks 74ok)

TW wrecks a perfectly good Commando etc.
 
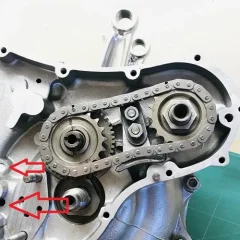
Not sure what the crank case links are for having done that eons ago and to a spec that I have not seen to date as far as the revised timing side oil return/level passage.
The link to that butchered Commando is bad enough.

I will cut a M 15.3 mm 1 mm pitch thread tomorrow.

TW wrecks a perfectly good Commando etc.
 
Thanks, for the DR650 (new caliper, new take off Showa forks)
At the time I could not find an off the shelf bracket.

I have a new Brembo rear caliper and master cylinder to fit but at this stage it is not doable with spoke clash at the rear side of the caliper.
I have the same front brake brembo upgrade on my XS650 and had to file the back side of the caliper to clear the spokes.

It was more painful painting the caliper x3 because I failed to prep it properly.


Last edited:
I would have machined an angled relief on the caliper rear but it would be into the piston so might move the rotor outward.

Dual billet trumpets.
trp.jpg


Some thread bodging for the morning.

1mm.jpg
thd.jpg
 
Last edited:
A ride for 5/16 BSF taps on Monday for the stand pipe feed.

nut.jpg
nt2.jpg


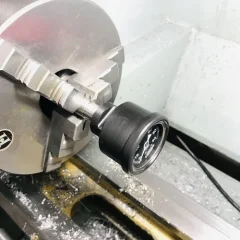
Machine flats for tightening the banjo, modify Acetyl gauge pod for a removable access drop out.
The stand pipe is shortened now and allows the nut 1 mm of back off rotation, the drop out for access to the top flats will have a 0.5 mm tall locating shoulder.

The stand pipe and gauge will drop down through the top pod and the banjo tightened (The top flats held with a suitable tool) at the bottom.
The drop out put in place at the top of the steering stem then the recessed nut at the bottom wound up that 1 mm to seat things.
The separate radiused inner ring then pushes into the top of the pod against the gauge face.
You couldn't make this stuff up (including without a small mill or lathe)

c2.jpg
c1.jpg


c6.jpg


c3.jpg


TW wrecks a perfectly good Commando etc.


TW wrecks a perfectly good Commando etc.
 
Last edited:
They no longer have the rear fitment 100/90/19, only fronts and the 110/85/19 rear was never imported.
The rear fitment looks all but a front with the arrow reversed (same thread depth)

If they wear out (excellent wear mileage so far :D ) I will consider two front Bridgestone BT46's in 100/90/19 with the rear reversed.
It was suggested they are better than the Continental radial.

The oil gauge pod now has the top turned off with an inner bevel so the gauge upper rim is exposed to look a little more like the main instruments / cups.

s0.jpg

If it looks like it is recessed into the handle bar tube near half way depth wise, that would be correct.
 
Last edited:
Five pieces with central taper, purge welded.
Not as much fun as mill whittling but less mess to clean up.

TW wrecks a perfectly good Commando etc.
 
Today is buy a new battery, a MotoBatt MB9U. ($124)

I have that brand in the Moto Guzzi ($250) and will do the same in regards to the terminals and make another pair of brass terminal blocks with multiple take offs.
The Smart Fire ignition and cylinder head will be directly earthed to the battery.

bt8.jpg


I would have liked to use a relay to power the ignition coil directly from the battery (its actuation from the ignition switch ) but not sure that would work or be a good idea on this $500+ Pazon system.
It was was a viable modification on the TL1000 but its ECU triggers the coils via the earth.
 
Back
Top