Tools You Have Made to Maintain your Norton

I have never had any problems using the shorten allen key that came in the tool bag, only one side in the middle take a little bit of fiddling but once one carb is off the other is easy, but then I have easy access with the Featherbed frame.

Ashley
 
While I had may carbs off, I filed a notch in the top of each manifold so you can get a straight run on the socket screws. I also removed the unused inner tickler casting on each carb to improve access to the nuts. (it is solid ;) )


Good idea about getting better access to the carb nuts - I should do that as well!
 
Cobbled together this die for crimping ferrules. I want to eliminate the sloppy looking hose clamps on the oil lines . However I may need to change the lies as well as the ferrules will not go over the lines when the lines are in place and if I put the ferrules on first the lines will not go over the tubes . Need something with a slightly thinner wall thickness.
Tools You Have Made to Maintain your Norton

Tools You Have Made to Maintain your Norton
 
I like these. Neat, strong, easy.

The ‘special tool’ aspect is: I blunted a pair of pincers so I can clamp ‘em tight without fear of cutting ‘em !

I bought a good quality pair of long handles pincers which makes removal easy too (you cut them off and fit new each time).

But I still use worn drive on pipes that are regularly removed or inaccessible with the pincers.

 
I changed to these 18 months ago - very good and don't damage the hose (thanks @concours )
Only extra I do is add a ss nyloc nut ( M4 I think ) - to be sure, to be sure.
Cheers
 
I like these. Neat, strong, easy.

The ‘special tool’ aspect is: I blunted a pair of pincers so I can clamp ‘em tight without fear of cutting ‘em !

I bought a good quality pair of long handles pincers which makes removal easy too (you cut them off and fit new each time).

But I still use worn drive on pipes that are regularly removed or inaccessible with the pincers.

These look really good
I think I'll give them a try 👍
 
Not really a tool, but an easy way to check chain tension:
Yesterday I put a new chain on my N15.
I first compress the suspension so that the sprockets are in line, and then set the chain to minimum play.
When I release the load, the chain becomes much looser.
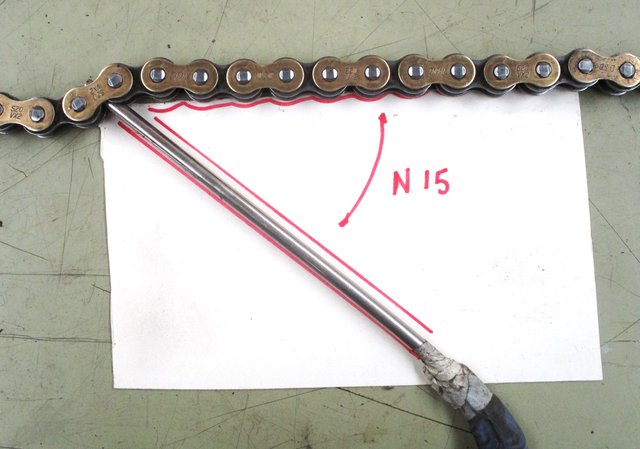
Then I tighten it again with a 5 mm rod in a link on the lower run ( any link will do) and mark the angle of the rod to the chain on a piece of cardboard.
I keep the cardboard for reference when I later have to adjust the chain.
It's pretty accurate and keeps your fingers clean.

Hard to photograph on the bike, but I hope this is clear :
Tools You Have Made to Maintain your Norton
Instead of measuring up-down movement, I just look at the angle.
 
Last edited:
Not really a tool, but an easy way to check chain tension:
Yesterday I put a new chain on my N15.
I first compress the suspension so that the sprockets are in line, and then set the chain to minimum play.
When I release the load, the chain becomes much looser.
Then I tighten it again with a 5 mm rod in a link on the lower run ( any link will do) and mark the angle of the rod to the chain on a piece of cardboard.
I keep the cardboard for reference when I later have to adjust the chain.
It's pretty accurate and keeps your fingers clean.

Hard to photograph on the bike, but I hope this is clear :

Tools You Have Made to Maintain your Norton
Instead of measuring up-down movement, I just look at the angle.
Jan,
I hope this isn’t a stupid question but how does compressing the suspension align the sprockets?Are you sitting on the bike to get to this point?
Thanks,
Mike
 
Jan,
I hope this isn’t a stupid question but how does compressing the suspension align the sprockets?Are you sitting on the bike to get to this point?
Thanks,
Mike
No such think as a stupid question, just stupid answers.
And here's one. With the bike on its main stand, uncouple the bottom of the rear shocks and swing them out of the way. Using a strap of whatever that wont damage the seat etc lift the rear wheel up to the require level and strap.
 
No such think as a stupid question, just stupid answers.
And here's one. With the bike on its main stand, uncouple the bottom of the rear shocks and swing them out of the way. Using a strap of whatever that wont damage the seat etc lift the rear wheel up to the require level and strap.
I put the bike on the ramp with the front wheel in the chock.

Then I put a small cheapo scissor lift under the bottom frame rails on the bike, jack it up until there’s no load on the shocks and disconnect the shocks. I then lower the scissor lift (thus lowering the bike) until the centre of the clutch adjuster, swinging arm spindle, and rear wheel spindle are all in line.

Thats the longest and tightest point. I use that to create a reference for what good tension looks like. I’ve never used Ludwig’s angle method as a reference though, which is kinda genius !
 
Last edited:
I am lucky to have a car lift.
I put the bike on a pit stand under the lift, remove the seat, put a support on the frame rails and compress the suspension with a scissor jack against a cross member of the lift.
Centre stand won't do, because the rear wheel must be free of the ground.
( funny thing: the lift is an old 4 post 3.5 T Koni, the same company that used to make motorcycle shocks)
I only do this when replacing the chain and sprockets.
Like FE said, it is to have a reference for optimal chain tension.
 
Last edited:
I put the bike on the ramp with the front wheel in the cock.

Then I put a small cheapo scissor lift under the bike, jack it up until there’s no load on the shocks and disconnect the shocks. I then lower the scissor lift until the centre of the clutch adjuster, swinging arm spindle, and rear wheel spindle are all in line.

Thats the longest and tightest point. I use that to create a reference for what good tension looks like. I’ve never used Ludwig’s angle method as a reference though, which is kinda genius put the bike on the ramp with the front wheel in the cock.

I put the bike on the ramp with the front wheel in the cock.

Then I put a small cheapo scissor lift under the bike, jack it up until there’s no load on the shocks and disconnect the shocks. I then lower the scissor lift until the centre of the clutch adjuster, swinging arm spindle, and rear wheel spindle are all in line.

Thats the longest and tightest point. I use that to create a reference for what good tension looks like. I’ve never used Ludwig’s angle method as a reference though, which is kinda genius !
"I put the bike on the ramp with the front wheel in the cock."

Isn't that rather painful? 🤣
 
I put the bike on the ramp with the front wheel in the chock.

Then I put a small cheapo scissor lift under the bottom frame rails on the bike, jack it up until there’s no load on the shocks and disconnect the shocks. I then lower the scissor lift (thus lowering the bike) until the centre of the clutch adjuster, swinging arm spindle, and rear wheel spindle are all in line.

Thats the longest and tightest point. I use that to create a reference for what good tension looks like. I’ve never used Ludwig’s angle method as a reference though, which is kinda genius !
Nigel,
When you say “I put the bike on the ramp” does that mean on your lift?
Thanks,
Mike
 
Wow! Drive Chain Rocket Science!

Why not figure out the correct adjustment, measure the chain deflection with the bike on the center stand, write it down, and use that going forward?

Similar to the Triumph way (most owner's manuals):
View attachment 117100
Yessir, that’ll work too !

However, you do have to get a little bit rocket sciencey if you’ve got sumthin none standard.
 
Manuals are great for ’monkey see monkey do’ mechanics.
No need to think for yourself, or even consider a better way of doing things..
 
Last edited:
Back
Top