You are using an out of date browser. It may not display this or other websites correctly.
You should upgrade or use an alternative browser.
You should upgrade or use an alternative browser.
Exhaust thread repair failed
- Thread starter TRV8
- Start date
- Joined
- Nov 11, 2013
- Messages
- 5,411
Yep I did too. I thought Steve was out north a bit - Marysville or Bothel or such? I know Russ moved out that ways.OT: Loved Dewey's and Poke's as well down the street. Steve G is now down in Arizona if I recall correctly. Marsha was quite a character - had a real menthol accent to her voice.
Marsha was great. I would go see her in Georgetown when I had move to W. Seattle and she was sick. She would have a cigarette hanging out her mouth with the nose tube for the O2, and the bottle in tow.
I used to live in a loft on 12th, right near Dewey's between Pike and Pine.
Last edited:
If the head is considered a throwaway, you might consider this method of repair.
Definitely not for purists, but neither is a welded in insert. As with a welded in insert, the fastenings tend to hide behind the collar.
About 15 years ago the head was sent off to a machinist who was all setup for Norton exhaust thread repairs and had done many of them.
It came back looking lovely but the inserts were steel that had been shrunk in.
I wondered if it would hold, the machinist said never a problem. A few years later one of the inserts pulled part way out on a return trip. I was able to nurse it home by tapping it back in a few times.
With great difficulty I had finally achieved agood head seal and did not want to pull the head again to mess with that (+ those weak threads!)
An Al. Insert and weld was considered, but I side with Jim Comstock on this. Welding on the head is best avoided if possible. The warpage on the alloy cylinder I recently worked on was quite substantial and required a complete remachine of the sealing surfaces. I can't see why a head wouldn't also warp from the uneven welding heat. Not only is there the head joint to consider, there are also the valve guides etc.
This repair avoided all that and put the bike back in use.
No special tools or skills required, just make some kind of stop for the drill bit to avoid overdrilling!
Ok for a rider, not for a show bike. Only one person ( a longtime Norton owner and fussbudget) has ever noticed the fasteners.
They have been in there for 11 years now.
Glen
Last edited:
baz
VIP MEMBER
- Joined
- May 26, 2010
- Messages
- 8,558
I gave up with threaded exhaust rings over 40 years ago
I hook up to the cylinder head bolts
I've actually changed the shape of the retaining plates to smaller oval ones since this photo because I now have a balanced exhaust system fitted
I hook up to the cylinder head bolts
I've actually changed the shape of the retaining plates to smaller oval ones since this photo because I now have a balanced exhaust system fitted
Attachments
lcrken
VIP MEMBER
- Joined
- Mar 15, 2009
- Messages
- 5,064
Clever solution, baz. Never seen that one before. If it was me, I'd include some fins to try to make the retaining plate look similar to the original. I'm so used to the look of the finned originals that it just doesn't look right to me without them. But that's just a personal preference, and nothing to do with functionality, just cosmetics.
Ken
Ken
baz
VIP MEMBER
- Joined
- May 26, 2010
- Messages
- 8,558
The first time I did it was with the finned type roses on my 850 in about 1980Clever solution, baz. Never seen that one before. If it was me, I'd include some fins to try to make the retaining plate look similar to the original. I'm so used to the look of the finned originals that it just doesn't look right to me without them. But that's just a personal preference, and nothing to do with functionality, just cosmetics.
Ken
It was a quick repair on one port because it was my only form of transport and I was going away on the bike
I was blown away by how well it worked
The ones in the photo on my 750 and they were on for around 20 years
Now I have changed to smaller oval stainless steel ones
None of my bikes are standard so it doesn't really matter to me what they look like
I would say without reservation this setup is 100% better than the standard one
But it's dosent look as pretty
I wish I could do it on my r100 rs
- Joined
- Sep 11, 2009
- Messages
- 231
One issue I wonder about, particularly with pressed in sleeves, is whether the sleeve is a simple threaded tube, or one with a lipped inner that the exhaust seals against. If it's a simple threaded tube, with the exhaust pipe face sitting against the exhaust port face then the act of tightening the exhaust rose would surely act like a puller and work to push the sleeve outwards. This wouldn't happen if the insert had a inner lip that the exhaust seals against. My point can be better understood if you look at the Seager Engineering threaded repair referenced above by Kommando. If you look at the picture you can see that the exhaust pipe face seals directly (via a sealing washer) against the original exhaust port face, so the act of tightening the exhaust rose puts an outward pressure on the insert.
cliffa
VIP MEMBER
- Joined
- May 26, 2013
- Messages
- 4,428
A valid concern, however the Seager inserts are threaded inside and out, as are Jim Comstock’s.One issue I wonder about, particularly with pressed in sleeves, is whether the sleeve is a simple threaded tube, or one with a lipped inner that the exhaust seals against. If it's a simple threaded tube, with the exhaust pipe face sitting against the exhaust port face then the act of tightening the exhaust rose would surely act like a puller and work to push the sleeve outwards. This wouldn't happen if the insert had a inner lip that the exhaust seals against. My point can be better understood if you look at the Seager Engineering threaded repair referenced above by Kommando. If you look at the picture you can see that the exhaust pipe face seals directly (via a sealing washer) against the original exhaust port face, so the act of tightening the exhaust rose puts an outward pressure on the insert.
Quote from Seager’s EBay ad…
NORTON TWIN EXHAUST
THREAD REPAIR SERVICE
Using our own CNC Milling machine we helical interpolate a new thread into the exhaust port to accept one of our CNC MACHINED bronze inserts. The new thread is then CNC milled inside to fit the new rose nut exactly. Because of the nature of CNC machining the external and internal threads are machined coincidentaly( both thread starting in the same position with one thread inside the other) giving a very strong insert. These bronze inserts are threaded and locked in and WILL NOT jack out
we have instock 3 sizes of bronze repair inserts to cope with previous repairs but in the last resort we can weld the port to fill in any poor attempts at previous repairs. (please note this can be charged as an extra)
Included in the price is a pair of our standard stainless steel rose nuts and CNC machined Alloy engraved spanner.
- Joined
- May 7, 2005
- Messages
- 7,629
The Bronze insert that failed in the 80's on mine was shrunk fit to the port and not threaded into the port, that did get pulled out when the rose nut was tightened, the Seager one would not pull out due to the external threading as their website confirms.A valid concern, however the Seager inserts are threaded inside and out, as are Jim Comstock’s.
Quote from Seager’s EBay ad…
NORTON TWIN EXHAUST
THREAD REPAIR SERVICE
Using our own CNC Milling machine we helical interpolate a new thread into the exhaust port to accept one of our CNC MACHINED bronze inserts. The new thread is then CNC milled inside to fit the new rose nut exactly. Because of the nature of CNC machining the external and internal threads are machined coincidentaly( both thread starting in the same position with one thread inside the other) giving a very strong insert. These bronze inserts are threaded and locked in and WILL NOT jack out
we have instock 3 sizes of bronze repair inserts to cope with previous repairs but in the last resort we can weld the port to fill in any poor attempts at previous repairs. (please note this can be charged as an extra)
Included in the price is a pair of our standard stainless steel rose nuts and CNC machined Alloy engraved spanner.
- Joined
- Aug 20, 2021
- Messages
- 10
bsabossOne issue I wonder about, particularly with pressed in sleeves, is whether the sleeve is a simple threaded tube, or one with a lipped inner that the exhaust seals against. If it's a simple threaded tube, with the exhaust pipe face sitting against the exhaust port face then the act of tightening the exhaust rose would surely act like a puller and work to push the sleeve outwards. This wouldn't happen if the insert had a inner lip that the exhaust seals against. My point can be better understood if you look at the Seager Engineering threaded repair referenced above by Kommando. If you look at the picture you can see that the exhaust pipe face seals directly (via a sealing washer) against the original exhaust port face, so the act of tightening the exhaust rose puts an outward pressure on the insert.
" insert could have a inner lip that the exhaust seals against"
Good point. It seems so obvious to me now.
I'm thinking of modifying my failed aluminum insert by welding an lipped inner surface then reinstalling it in the head, securing it with weld or a circle of anchor screws as worntorn did with his.
Ken
- Joined
- Sep 11, 2009
- Messages
- 231
My concern was/is principally with the shrunk or pressed in inserts with a smooth outside (exactly as shown in concourse picture), but if I had the skills and was starting from scratch making a threaded insert I'd still make it with an inner lip, so there'd be no outward pushing pressure on the insert once the threads were tightened and the whole lot was subjected to numerous heating/cooling cycles and vibration. That said and given the low mileage most of our bikes will ever do I'm sure Jim's and Seager's inserts will see most people out without issue.
- Joined
- Aug 10, 2014
- Messages
- 2,260
Last edited:
- Joined
- Nov 11, 2013
- Messages
- 5,411
Yep. Just to reference the RH10 has not been in service the full time since the repair.
- Joined
- Jul 25, 2010
- Messages
- 5,947
ow need freds


- Joined
- Aug 20, 2021
- Messages
- 10
Repair complete. I'm confident the threads are secure.
Thanks to bsaboss for his suggestion of providing an "inner seat" to the insert.
Also thanks to worntorn for sharing his repair using the set screws installed from the front.
I added my own idea, which was to install set screws in from the side, through the fins.
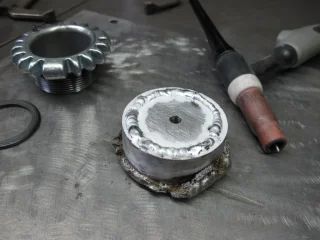
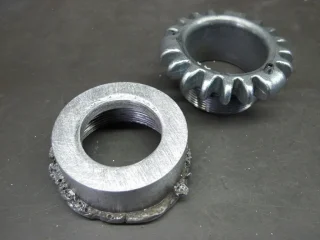
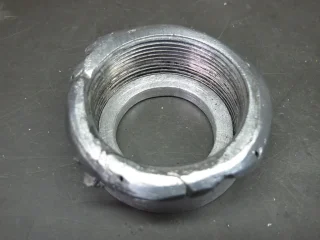
The first step was to add the inner seat to my salvaged aluminum insert.
Tig welded:
For the front set screws, I used an old exhaust nut to make a drill guide for my 10/32 tap drill.
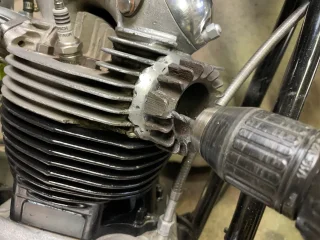
This hole was to intersect between the insert and the cylinder head.
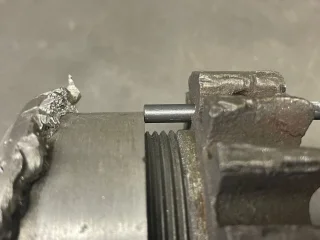
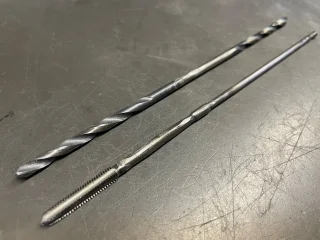
The set screws coming in from the sides were positioned to pass through the insert and the added inner seat. These threads were 2" long, so I had to fabricate a longer tap drill. I also had to modify a tap to be longer and grind away the shaft material beyond the thread cutting length for it to cut that deep.
Right side, inserting the set screw.
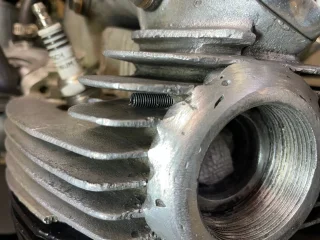
Photo showing all four threaded holes. The two in from the side required two 10/32 set screws, end for end.

I added an auxiliary support for the exhaust pipe, coming off the engine mounting plate.
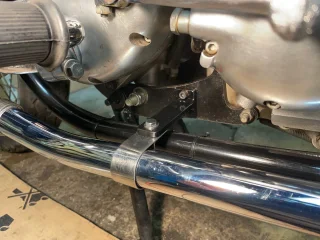
Assembled and running.

Thanks to bsaboss for his suggestion of providing an "inner seat" to the insert.
Also thanks to worntorn for sharing his repair using the set screws installed from the front.
I added my own idea, which was to install set screws in from the side, through the fins.
The first step was to add the inner seat to my salvaged aluminum insert.
Tig welded:


For the front set screws, I used an old exhaust nut to make a drill guide for my 10/32 tap drill.

This hole was to intersect between the insert and the cylinder head.

The set screws coming in from the sides were positioned to pass through the insert and the added inner seat. These threads were 2" long, so I had to fabricate a longer tap drill. I also had to modify a tap to be longer and grind away the shaft material beyond the thread cutting length for it to cut that deep.

Right side, inserting the set screw.

Photo showing all four threaded holes. The two in from the side required two 10/32 set screws, end for end.
I added an auxiliary support for the exhaust pipe, coming off the engine mounting plate.

Assembled and running.
- Joined
- Jan 6, 2018
- Messages
- 4
I do not like welding on the anyway porous heads. Placed on the lathe, we cut a bigger thread, insert an bronce or aluminium ring with outer thread and then cut the new inner thread.
Similar threads
- Replies
- 15
- Views
- 2,588
- Replies
- 1
- Views
- 853
- Replies
- 1
- Views
- 1,254
- Replies
- 22
- Views
- 4,838
- Replies
- 8
- Views
- 1,676

