Fuel Tank Fun.

Draft Front Boss Replacement Procedure
Okay - I think I've come up with a version of @dobba99 's fix that anyone with a vise/hacksaw/file can do.
I've elected to use brass, as its good in fuels and also free machining (easy to work)

Get a length of brass threaded rod (I've chosen M20 x 1.5 because I can't get 3/4" UNF - they both have similar pitch) and cut a 25mm piece and flatten the ends
Get 2 thin locknuts to suit
Get a short 5/16 UNF grub screw (preferably brass but doesn't matter if its steel)
Get 2 thin M20 copper washers (annealed) - just to cherry red and quench or not,

Next drill and tap 5/16 UNF down the centre of the 25mm piece (you can do a blind hole if you like but a through-hole is easier and cleaner).
File one of the lock nuts down to, say, 5mm thick.

Now to assemble, using loctite (567, 569 or 577), wind the thick nut onto the piece so that there is about 7mm of thread projecting from one end.
Again with loctite put the grub screw in the other end so that there is 17mm thread depth (existing boss number) for the OEM stud (only 10mm needed).

After the loctite has gone off - say 30 minutes - you're ready to fit to the tank.
First, ensure that the "boss hole" is a clean 20mm diameter and the threaded rod will slide through. Also that it's reasonably flat.
Put a copper washer onto the 7mm threaded projection
Next, snugly thread the OEM stud into the new threaded boss, having first locked 2 nuts together near the other tip.
Tie some braided (50-80ib) fishing line firmly near the tip (above the nuts) of the OEM stud and use a stick/wire (?) to poke the other end of the line through the fuel cap and through the boss hole.
Turn the tank upside-down, put some loctite on the copper washer and thread. (it is now important the job is finished within 5-10 minutes)
Pull the tip of the stud through the boss hole and use the the stud/nuts to pull the new boss into place.
Put the second copper washer and the "thinned" locknut onto the 7mm projection, with some loctite (i'd be liberal here), and tighten the locknut using the 5/16 nuts to counter the torque. Have not come up with a torque value yet - but schnisentite!

I am yet to get my bits but will report back after fitment.

Many thanks to Peter for his great idea!
Cheers ...and sorry if I've bored you all to death! (idle minds and devils you know!)
Well, here I sit disappointed, shattered even!
After contacting all the reputable fastener vendors I know of in Australia in the quest for brass threaded rod in either 3/4 UNF or M20 x 1.5 I have come to a stone wall. Couldn't even get them in stainless. "We've checked with all our suppliers and... yadyadayada"

So, 10 minutes on eBay and several Chinese vendors there are now supplying:
1. M20 x 1.5 304 SS threaded rod 250mm long
2. 10 thin 304 SS locknuts to suit
3. 10 M20 26OD 1.5 thick copper washers.
...all for the princely sum of $90 AUD including shipping. But that's more than enough to do two tanks using my "trial" method above.

Shipping won't be fast but I'll keep you posted.
Cheers
 
 
McMaster Carr do not ship to UK, doubt they would be any different to Australia.

I used them for a couple of years using a US drop off point but they found out I was in UK and my account was blocked.
 
Just a thought, but couldn't you get two wide brimmed brass "Top Hat" bushes machined that are a tight fit into the remaining holes in the tank, and then solder them in place?

Excuse the basic artwork...

Fuel Tank Fun.
 
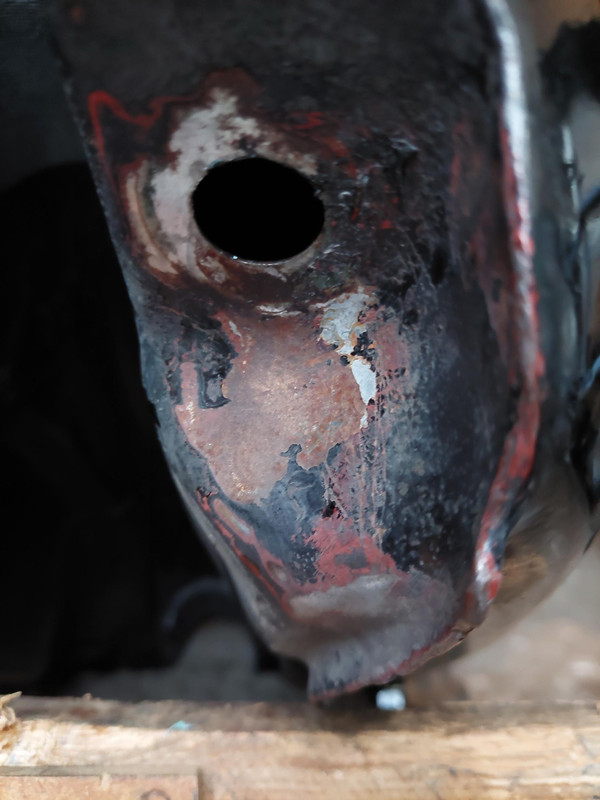
Whilst removing the Interstate tank today, I noticed that the front left hand 5/16" Nyloc stud nut was drawing the fixing stud out with it.

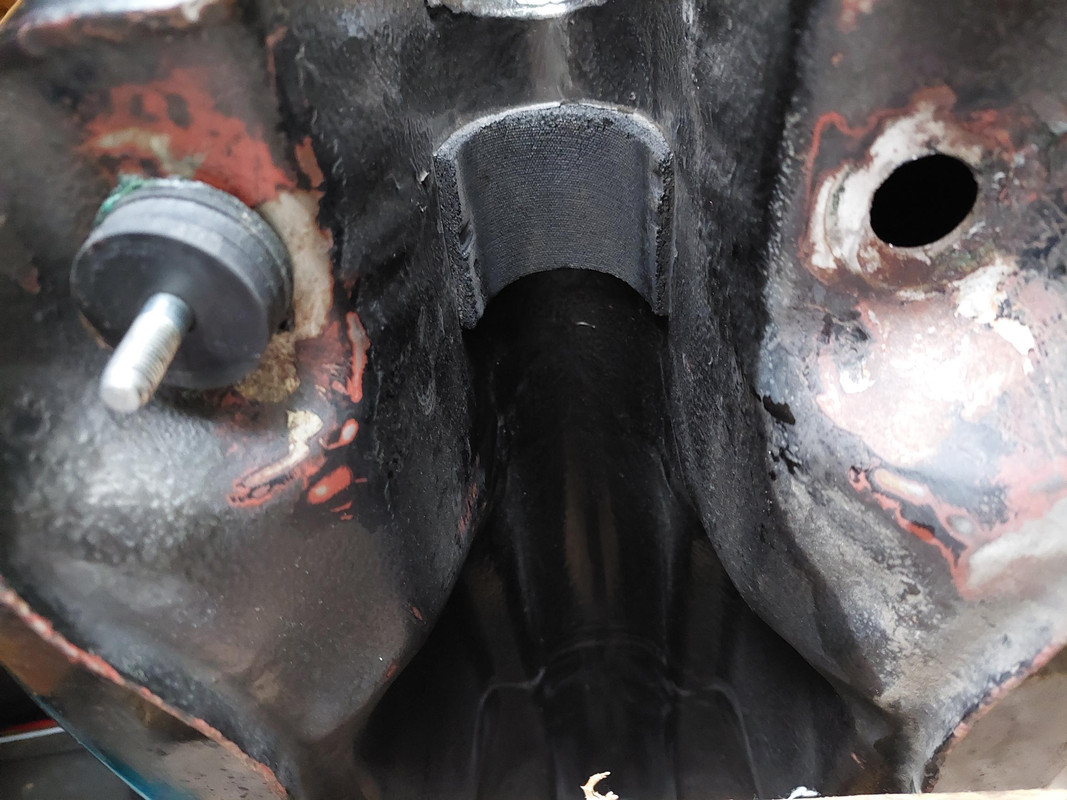
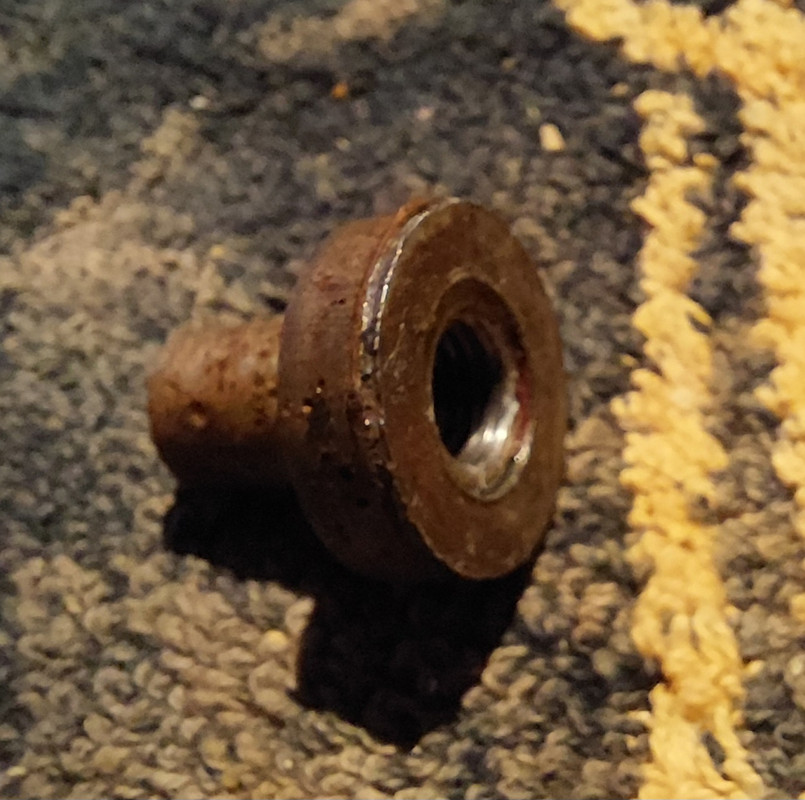
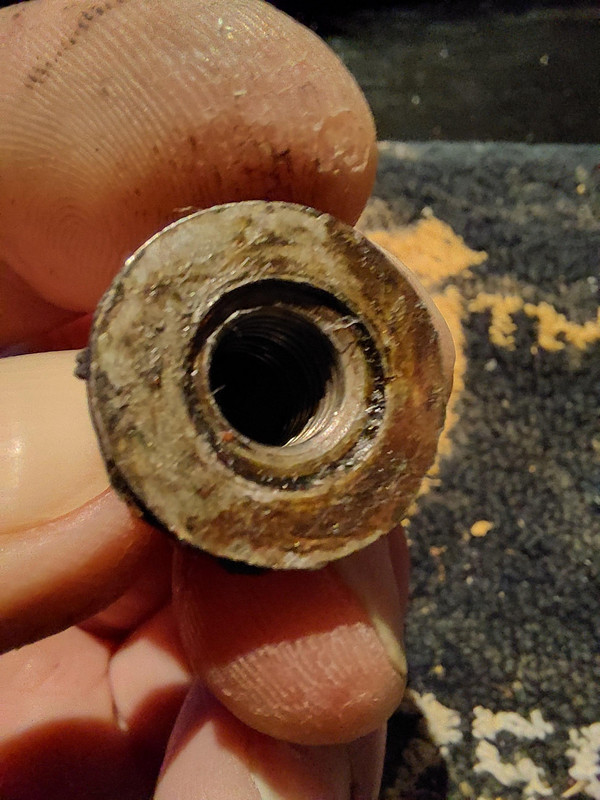
Long story short - it was weeping fuel and sure enough when I tried to insert the stud again the internal 'mount' pulled free with the stud, leaving a nice round hole in the bottom of the tank. I fished it out via the filler cap with a flexible magnet.

Fuel Tank Fun.

Fuel Tank Fun.

Fuel Tank Fun.

So, any suggestions as to how I can fix this?

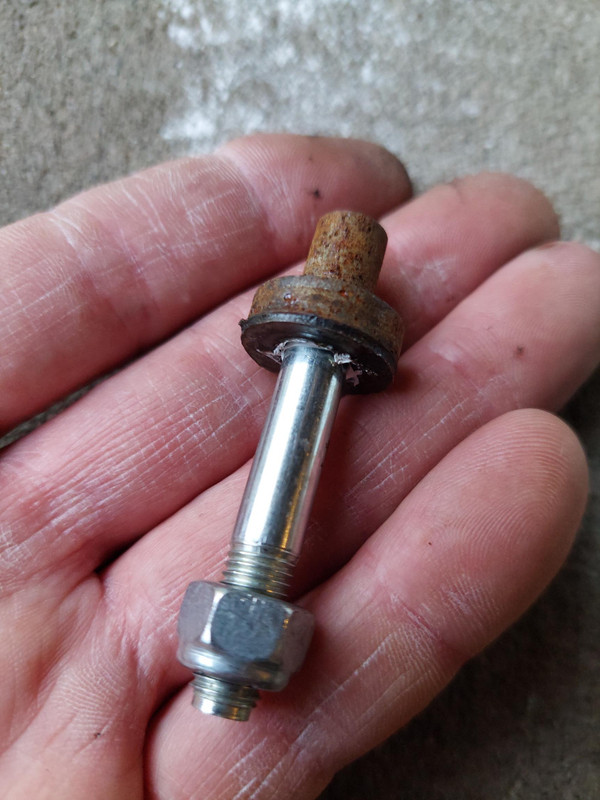
I need to put, this...

Fuel Tank Fun.

in here...

Fuel Tank Fun.

..securely, and without leaking fuel 🤔
That is an easy weld repair for a talented weldor. (And not destroy the paint).

You need to find the right person.
 
I didn't like the mounting configuration original design. Four small points supporting/attaching/transmitting a tank full of fuel with all that vibration and weight shifting around may hold for a while but in some cases the laws of physics show up.
I found an alternative to mounting the fuel tank that has worked out really well for me.
I wrapped the spine of the frame with 3/8 thick closed cell neoprene running the length of the tank. I overlapped the layers on the side of the frame spine and put it all in place with simples cable ties.
I cut up an old wet suit my wife not longer needs for the material required but you can find this kind of neoprene anywhere.

The tank slips over this "covering" with a very snug fit and slips into place securely.
This configuration relieves the stress/support needs from the four mounting points while the entire length of the tank is supported evenly side to side and from underneath by the frame spine.
The four mounting points now hold the tank in place without any torque or pull down required. Just simple adjusting to eliminate any play in the final mounting position.
I use nylock nuts and rubber backed fender washers to maintain the final tank positioning on the spine.
My total investment for this adaptation is the cost of five cable ties. The neoprene if you need to buy it, runs about 12 bucks.

L1090216.jpg
 
Last edited:
Okay - got all the bits together and have done most of the work.
Last bit is to tap the (304 SS) M20 x 1.5 - has to be 5/16 UNF to match the OEM stud.
Tapping drill size is meant to be 6.9mm - don't have that. Don't have 7mm either (not in "normal" sets).
What's the best workable "normal" alternative?
Cheers
6.8 would be the normal tapping size for 8mm thread using a second tap
5/16 unf isn't far off 8mm
If you are using a tapered tap you could probably get a start with a 1/4" drill
 
Ready to assemble so bought a new tube of Loctite 577, which is a petrol-proof thread locker & sealant.
Thought some members might like this info from the back of the pack.
Cheers
Fuel Tank Fun.
Fuel Tank Fun.
 
...and a question to knowledgable members.
I was going to do the whole assembly with this loctite but noticed something I have seen before.
Is there something about copper, or it's alloys, that rapidly accelerates the setting process of some loctites?
I recall 243 (blue) showing this on brass fittings and have noticed it on the copper washers of this assembly.
I immediately removed and cleaned those washers.

Nothing on the pack warns of this.

Any guidance from members?
Cheers
 
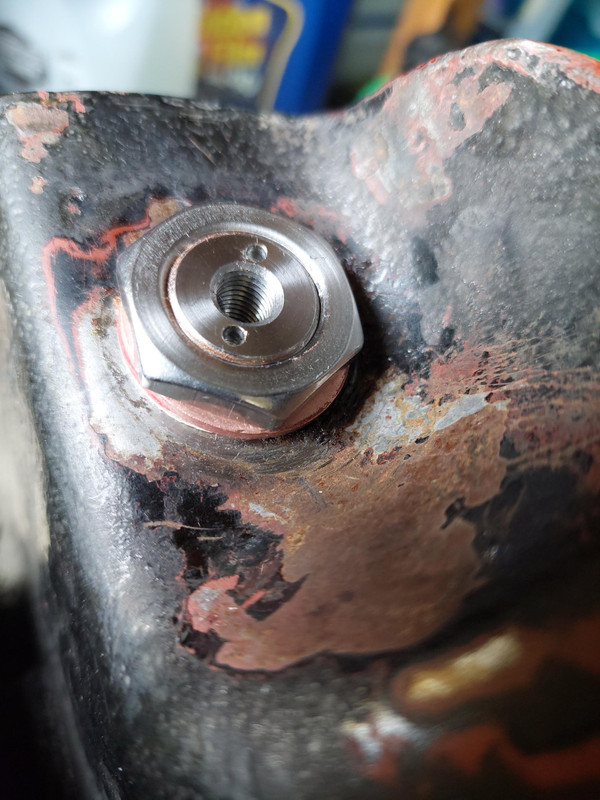
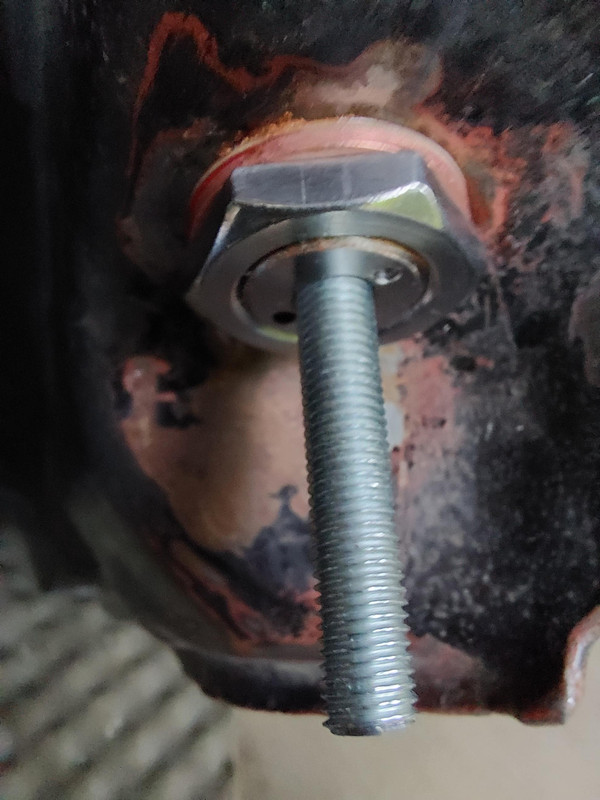
Well, we today tried, tested, and happily, fixed my tank stud issue.

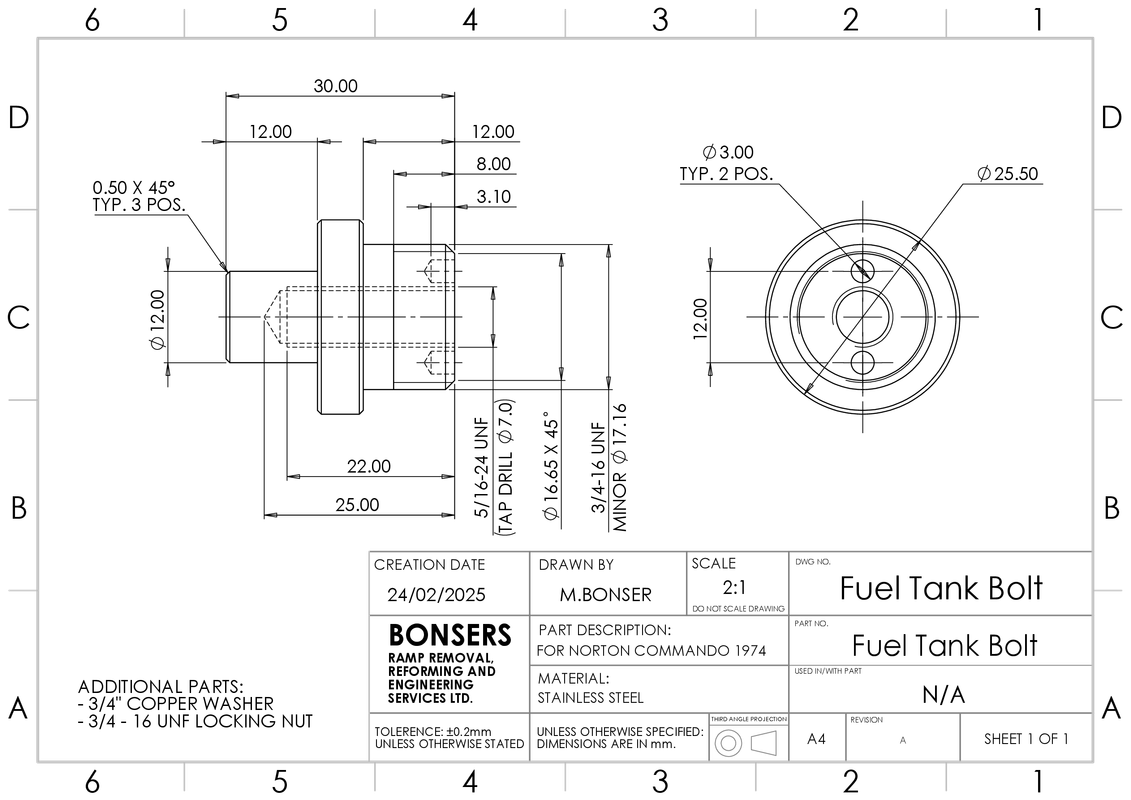
Our youngest lad works at an aerospace engineering company and I asked for his input based closely on the 'dobba99 Fix' with the hope that he would be able to draw up a diagram to work with. "I'll make something for you Dad, no problem!", was his response.

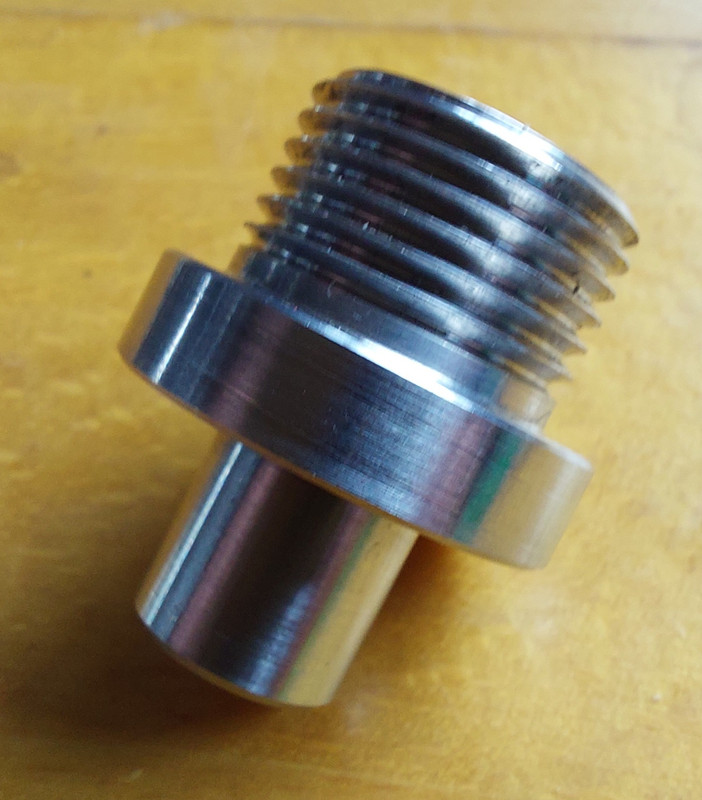
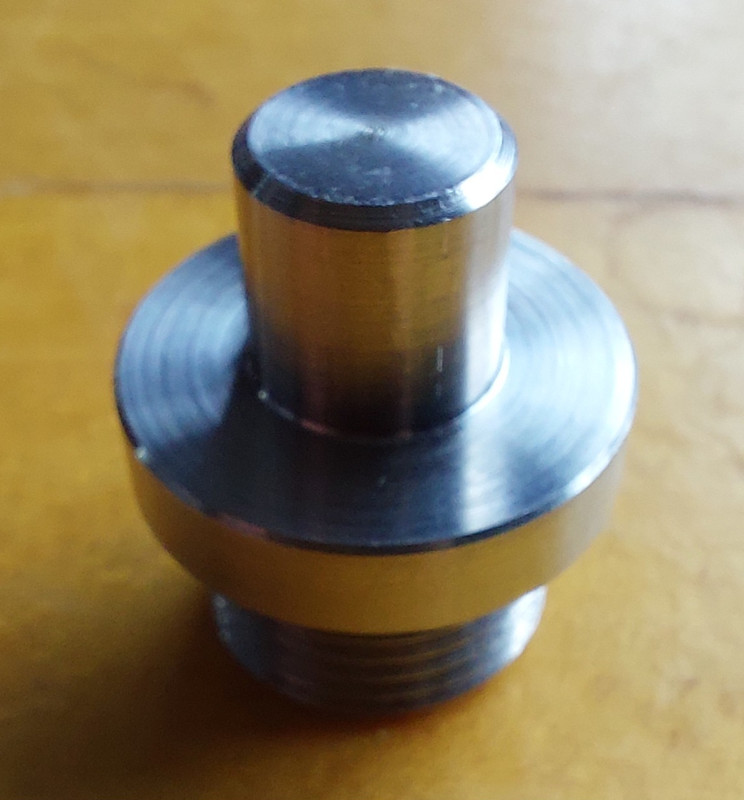
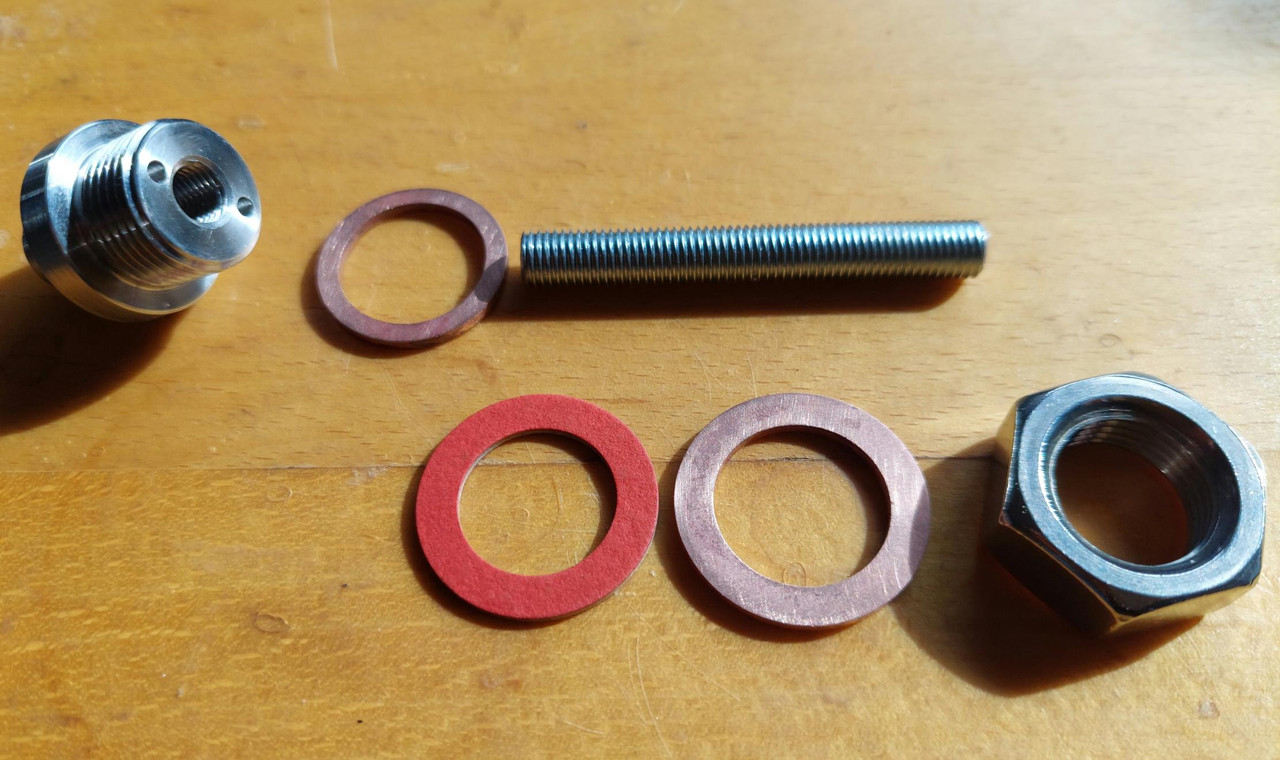
This is what we he came up with...

Fuel Tank Fun.

Fuel Tank Fun.

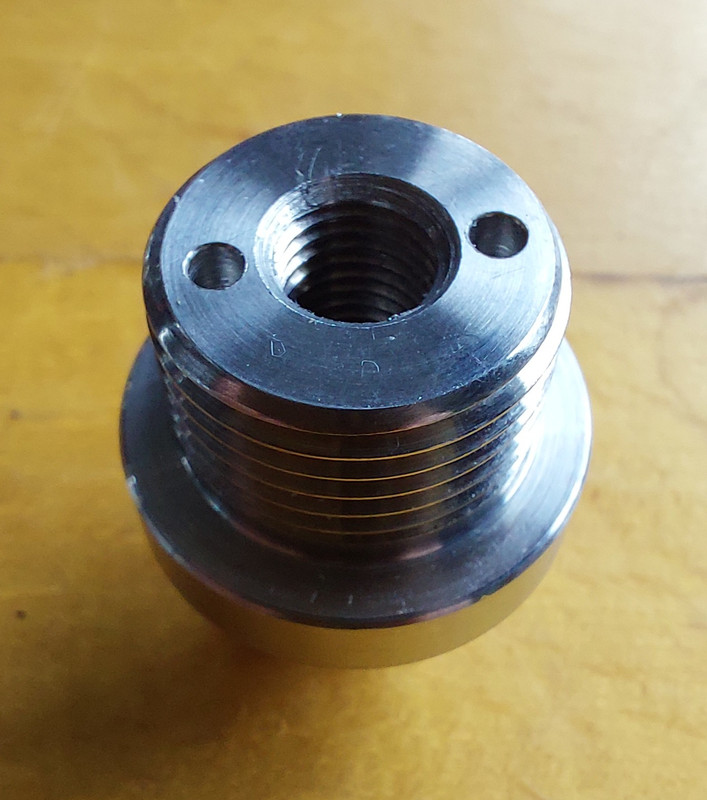
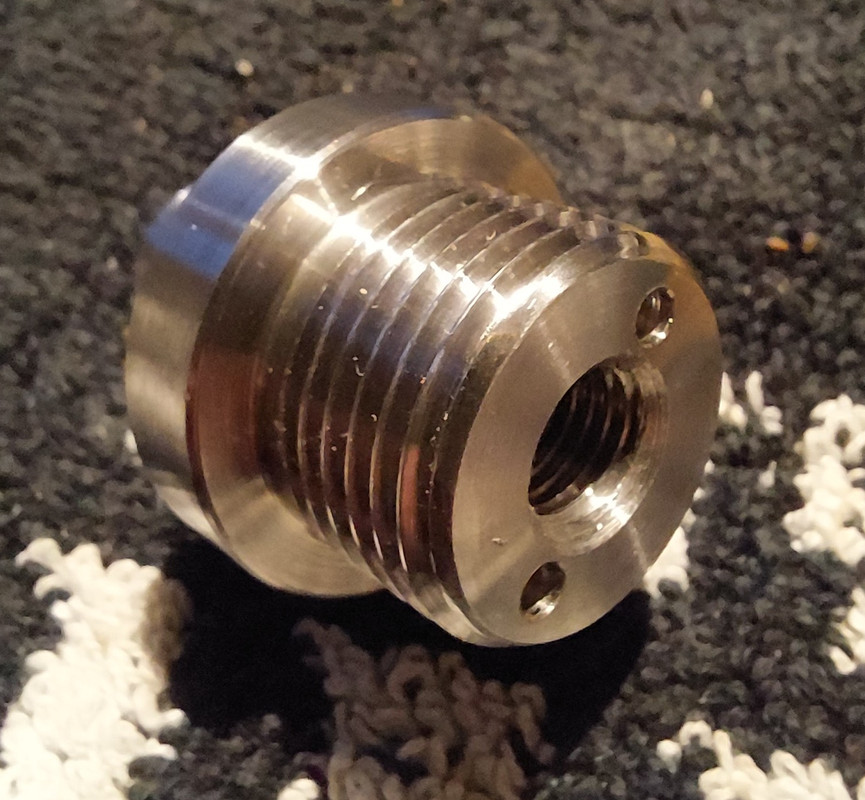
The first attempt failed as the boss started to spin on itself, and so he took it away again and drilled in a couple of holes to enable a pair of circlip pliers to grip the boss when the nut was tightened up against it...

Fuel Tank Fun.

Fuel Tank Fun.

Continued...
 
Last edited:
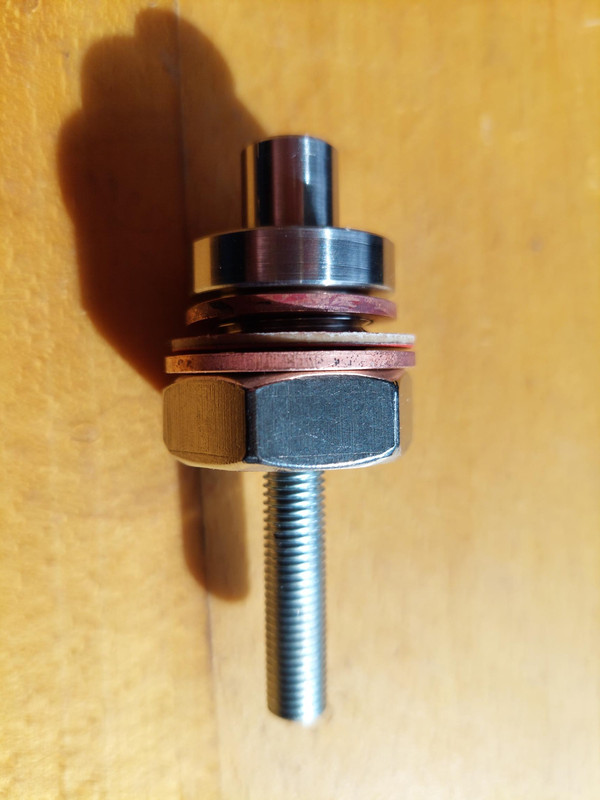
I got a few bits & pieces together (a length of 5/16 UNF stud, washers etc.) while he was doing the work and he trimmed the rod down to the appropriate length...

Fuel Tank Fun.

Fuel Tank Fun.

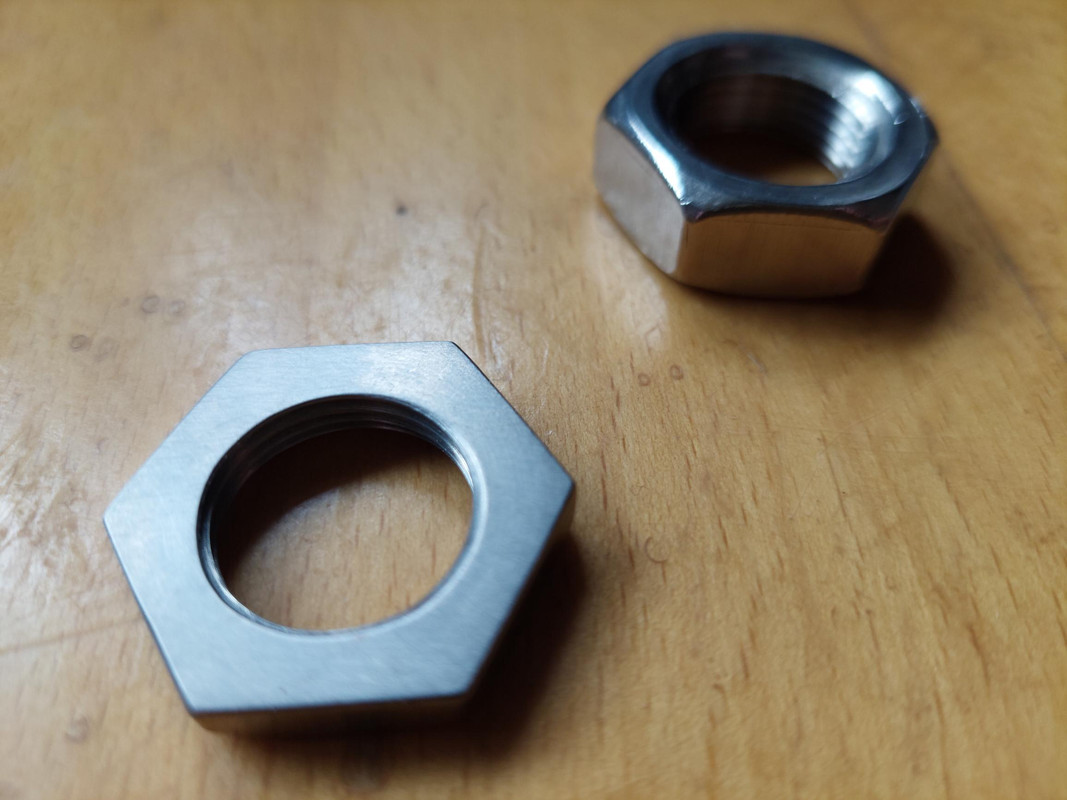
And right at the end, we decided that the 3/4 - 16 UNF half nut was taking up valuable space under the tank, and so he turned it down a little...

Fuel Tank Fun.
 
I'm very happy to report that it works a treat! It doesn't leak and is much stronger than the original design. He also made me another one for the other side if/when that shits itself 👌

Fuel Tank Fun.

Fuel Tank Fun.

Many thanks to @dobba99 for the idea for this and I hope he doesn't mind us pinching it ;), and although he probably won't ever read this, a massive thanks to our baby Michael who really got involved in the project, thought of engineering solutions and just loves - and has always loved, helping his old man.

This is his diagram. (The 'Ramp Removal' title is a family joke about when the pair of us used an unwanted ramp and manipulated it to fit his grandma's bungalow when she needed a wheelchair).

Fuel Tank Fun.

Proud Dad ❤️
 
Last edited:
I'm very happy to report that it works a treat! It doesn't leak and is much stronger than the original design. He also made me another one for the other side if/when that shits itself 👌

Fuel Tank Fun.

Fuel Tank Fun.

Many thanks to @dobba99 for the idea for this and I hope he doesn't mind us pinching it ;), and although he probably won't ever read this, a massive thanks to our baby Michael who really got involved in the project, thought of engineering solutions and just loves - and has always loved, helping his old man.

This is his diagram. (The 'Ramp Removal' title is a family joke about when the pair of us used an unwanted ramp and manipulated it to fit his grandma's bungalow when she needed a wheelchair).

Fuel Tank Fun.

Proud Dad ❤️
You should be proud, that’s a really nice job!!
I have to ask though, how did you get the insert (and washer) in through the hole?
 
I'm very happy to report that it works a treat! It doesn't leak and is much stronger than the original design. He also made me another one for the other side if/when that shits itself 👌

Fuel Tank Fun.

Fuel Tank Fun.

Many thanks to @dobba99 for the idea for this and I hope he doesn't mind us pinching it ;), and although he probably won't ever read this, a massive thanks to our baby Michael who really got involved in the project, thought of engineering solutions and just loves - and has always loved, helping his old man.

This is his diagram. (The 'Ramp Removal' title is a family joke about when the pair of us used an unwanted ramp and manipulated it to fit his grandma's bungalow when she needed a wheelchair).

Fuel Tank Fun.

Proud Dad ❤️
Are the two small holes for torque resistance when tightening?
If so, what too did you use - and angle grinder spanner? (sorry - hadn't seen your post #52)
Cheers
 
I'm very happy to report that it works a treat! It doesn't leak and is much stronger than the original design. He also made me another one for the other side if/when that shits itself 👌

Fuel Tank Fun.

Fuel Tank Fun.

Many thanks to @dobba99 for the idea for this and I hope he doesn't mind us pinching it ;), and although he probably won't ever read this, a massive thanks to our baby Michael who really got involved in the project, thought of engineering solutions and just loves - and has always loved, helping his old man.

This is his diagram. (The 'Ramp Removal' title is a family joke about when the pair of us used an unwanted ramp and manipulated it to fit his grandma's bungalow when she needed a wheelchair).

Fuel Tank Fun.

Proud Dad ❤️
Its a very nice feeling when your children start doing things for themselves. And then one day you realise they can do things you never could.

👍👍👍👍
 
You should be proud, that’s a really nice job!!
I have to ask though, how did you get the insert (and washer) in through the hole?

Cheers Cliff - yeah, he's dead chuffed that it worked too. He's done a couple of little things like that for me, like grinding down the non threaded parts of the rotor studs to give me a bit of clearance. He's also doing me a few spare rotor woodruff keys in a softer alloy as an option for when the Alton goes in (as recommended by a good mate ;)) . I dare say he'd comfortably knock off an Yves fix too, if I asked him. It's also cool that his boss allows him to do these things (in their own time) as he feels they're learning sound engineering solutions.

The insert & washer went in no problem (that's about the only thing I bought to the party! 🤣). I ran a length of copper wire through the stud hole up to the tank filler, screwed in one of the original mount studs with a couple of nuts on into the insert clamping the wire, and pulled in back through - whilst being held by a flexible magnet for guidance. Jobs a good 'un 💥
 
Are the two small holes for torque resistance when tightening?
If so, what too did you use - and angle grinder spanner? (sorry - hadn't seen your post #52)
Cheers

Howdy Rob.

I sort of had a feeling we'd come across this before we tried the MK1 version, but it was worth a go. We found that we got the 3/4 UNF nut pretty tight, but it needed another 1/8 turn, and as soon as we did that the whole lot just started turning on the nut. I even optimistically popped some fuel in to test, but sure enough it leaked.

Unfazed, he took it back with him, to have a think and later messaged me asking if I'd got a pair of circlip pliers. Mk2 (drilled) allowed us to grip the insert whilst tightening the nut against it.

Hope that makes sense??
 
Its a very nice feeling when your children start doing things for themselves. And then one day you realise they can do things you never could.

👍👍👍👍

He's always been the same actually. I remember when he was really tiny and I asked him to crawl into the tiniest of spaces in our attic to stuff some insulation in there - actually, quite a big job. I can see him now, he was sweating like a pig up there - really grafting, and he wouldn't stop until it was dead right. Getting quite emotional thinking about that now actually.

Yep, proud indeed.
 
Back
Top