Oil pump rebuild

Status
Not open for further replies.

BERT

VIP MEMBER
Joined
Nov 23, 2020
Messages
607
Country flag
I have disassembled the oil pump off the 72. Each of the oil pump cover screws were double staked. I will lap the body surfaces as described in the shop manual. The threads in the brass plate should be chased. Does anyone know the thread size for the correct tap? Thanks guys.
 
The threads are 3/16 - 32 tpi whatever that is.
Personally I would only chase them as a last resort.

I did a pump not long ago and lapped the gears lightly (3) , the body and both the bronze end plate and drive spindle body mating surface.
 
The threads are 3/16 - 32 tpi whatever that is.
Personally I would only chase them as a last resort.

I did a pump not long ago and lapped the gears lightly (3) , the body and both the bronze end plate and drive spindle body mating surface.
Thanks for the good advice. All 4 screws are free all the way thru with T.L.C. . I agree not a good idea unless neccessary to chase with a tap as brass damages so easily. How is the spindle separated from the front plate? I would like to lap the plate as well.
Oil pump rebuild
 
Last edited:
How is the spindle separated from the front plate? I would like to lap the plate as well.

I want to say I machined a gear holder but all I did was put two pieces of soft grade alloy flat bar in my mill machine vice and nipped them onto the spindle shaft oil pump gear.
The nut (R/H thread) undid easily. (The shoulder the drive gear seats against is very small so no surprise)
 
I want to say I machined a gear holder but all I did was put two pieces of soft grade alloy flat bar in my mill machine vice and nipped them onto the spindle shaft oil pump gear.
The nut (R/H thread) undid easily. (The shoulder the drive gear seats against is very small so no surprise)
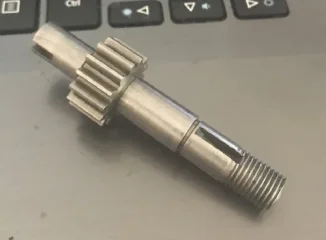
Thank you time warp. I removed the drive gear but can't figure out how to separate the spindle from the front plate. Is the spindle one piece? I attached a picture with my last post.
 
I have owned my Norton for over 45 years now was a every day rider for 38 of those years and to be honest I have never touched my oil pump except for priming when installing it after a few pull downs, the plates have never been lapped, when I have the pump out I fill with oil and turn slowly to listen to it sucking noise, my Norton has only wet sumped 2x after sitting for over 6 months and it has clocked up over 160K miles, maybe I have a freak bike as I have never had the problems with it as what others have had, its been a reliable bike all it life from new, I only remove my timing cover off when its been pulled down 3x now, I run a auto adjust timing chain, I don't run a oil pressure gauge or low oil warning light and oil returns to the oil tank is always flowing back, maybe I just been bless with all my bikes, maybe its because I pat them on the tank and thank them for a great day out on them and do all my own regular services with good oil, I also put STP in with my oil and have done so most of its life.

Ashley
 
Thank you time warp. I removed the drive gear but can't figure out how to separate the spindle from the front plate. Is the spindle one piece? I attached a picture with my last post.

Yes one piece, it should slide out.

sht.jpg
 
I have owned my Norton for over 45 years now was a every day rider for 38 of those years and to be honest I have never touched my oil pump except for priming when installing it after a few pull downs, the plates have never been lapped, when I have the pump out I fill with oil and turn slowly to listen to it sucking noise, my Norton has only wet sumped 2x after sitting for over 6 months and it has clocked up over 160K miles, maybe I have a freak bike as I have never had the problems with it as what others have had, its been a reliable bike all it life from new, I only remove my timing cover off when its been pulled down 3x now, I run a auto adjust timing chain, I don't run a oil pressure gauge or low oil warning light and oil returns to the oil tank is always flowing back, maybe I just been bless with all my bikes, maybe its because I pat them on the tank and thank them for a great day out on them and do all my own regular services with good oil, I also put STP in with my oil and have done so most of its life.

Ashley
Thanks for sharing that. It's nice to know what these machines are capable of in the right hands.
 

I have a vintage STP sticker my mate gave me on my toolbox. Never in my motors.

"196 lbs load, reduced about 20 lbs. from test without STP"


"In my case the STP/oil mix was used for prelube as the head was assembled. It siezed in less than 5 miles.
So 2 new valves and one new guide all fitted at the same clearance as before but lubed with engine oil only and the bike is running very happily. Jim"

 
Well STP works on my Norton 45+ years, everyday rider most of its life with over 160k miles and I am still running the original valves , 1 complete rebuild and 1 rebuild to replace crack crank case, the first 4 years of its life I flogged the sh.t out of it, yes young and silly has only had one rebore, ran straight 50 Pennzoil with STP mix for over 30 years of its life and a oil cooler without a themo all its life., my con rods bearing are still standard size, so I think the STP has worked for me, all my bearings and cam were pre lubed with oil/STP mix on rebuild but didn't use oil/STP on the new guides and just normal cheap oil for run in, after run in back to oil/STP mix.
How many have rebuilt their Norton motors with low mileage on them as well my Norton don't wet sump like most on here, only 2x in its whole life, so maybe the STP has helped there.

Ashley
 
Back in the 70:s STP was the thing you used, I never had any problems related to it. Blew the engine up once but that was totally on me....
 
Yes one piece, it should slide out.

View attachment 21983
Timewarp, thank you. The spindle tapped out with persuasion. I think the drive gear tightened against that tiny shoulder created a rolled lip. I miked it at .407" and the spindle at .404" . I removed the lip and now it is a loose fit. I wonder how much clearance there should be? Also I have the luxury of a depth mike to measure the gear to pump body clearance, so there is not so much trial and error assembly to put wear and tear on those brass threads. What would be the ideal clearance? Upon taking the pump apart, I found 3 pieces of non magnetic metal squished between the large gear cogs. I could feel something in there before disassembly thinking it may have been paper gasket, as there was some discovered in the oil gallery behind the pump. I hope the pump isn't pooched. Thanks guys for all your input and help. Dave.
 
I read in the NOC newsletter that when lapping the faces down , the non driven spindle could become longer than the body and not allow the brass plate to be flush .
 
Last edited:
The spindle does not become longer, the pump body becomes shorter (thinner). You could end up with gears that are thicker than the internal depth of the body. But then you should keep checking as you go. I suppose you could lap the gears back to the fit you needed. This is not a bad approach:

The workings of the oil pump​

Look at the little gears in the pump and liken them to the paddles on a paddle wheel steamer; the gear teeth work the same as the paddles on those big wheels by pushing oil around, they can't do this successfully if the clearances on both sides of those lttle gears are excessive: meaning, the internal body side and the external end plate side.

Run a straight edge over the pump body and eyeball how much clearance there is between the body face and gear face; they should be almost flush with each other. Flatting down one face of the pump body is only solving half the problem, you've got to check the end float on the pinion shaft as excessive free play causes the gouging of the end plate in the first place.

To do the job properly you have got to completely dismantle the whole pump, separating gears from shafts. Square up the pinion side end plate first, reassemble the shafts and gears to this plate (the scavenge gears I think), put the body back in place, leave out the second set of gears, replace the end plate, tighten up and check to see if there is any binding. There should be slight resistance to turning the pinion with thumb and finger and no discernable end play.

The next step is to disassemble, leave out the first set of gears, pop the body on the pinion end plate and put the second set of gears in place. Replace the end plate, tighten up and check for perceptible end play and a slight resistance to turning. The body can be flatted down to correct any excess clearance between gear face and body face; you can fart about with feeler gauges if you must but it's just as easy to hold it up to the light and check for a tiny amount of light between the straight edge and the gear face. A bees dick or a poofteenth is plenty. Be very careful about how much you flatten the end plate as the holes are threaded (BA if memory serves) and are very fine.

If the threads are buggered, you can buy longer bolts and nuts from model engineering suppliers or do as I did, go down to your hardware suppliers buy suitable metric stainless bolts and enough nuts to be able to 'double-nut' with Loctite fluid. Four years and 18,000 km down the track I have had no problems (touch wood) and still have 40 p.s.i. hot oil pressure at 3000 r.p.m. (my oil gauge is teed off the rocker supply so must truly read a lot higher).

Be aware also that the oil pump to crankcase seals are different for the Mk.lll and earlier machines. The Mk.lll is a conical shape whereas the earlier ones are flat. The same could possibly apply to the crank oil seal as well; the Mk.lll one has the wire coil assister fitted and the lip face looks different as well.​

Max Heazelwood (motomax@tas.webnet.com.au) on NOC-L 24th. Jun 1999
Stephen, thank you very much for your input. You are very thorough with the procedure for a proper job and I appreciate the time you spent to post it.
 
Status
Not open for further replies.
Back
Top