
What Did You Do With Your Commando Today?
- Thread starter Starvingphotog
- Start date


- Joined
- Nov 11, 2013
- Messages
- 5,402
Nice. I would like to see a pic of that when installed.I did what I normally do, remove things, make things.
Another part done, the Pazon ignition unit that fits above and below the fuel tank wings.
View attachment 84805 View attachment 84806
- Joined
- Oct 10, 2016
- Messages
- 139
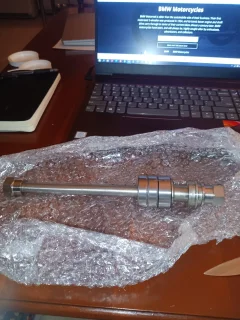
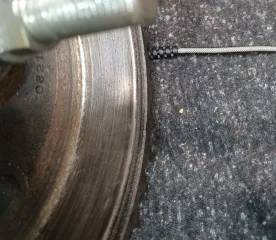
My new axle and bearings just arrived from Don Madass Pender. The brake drum had stress cracks and the sprocket teeth were showing wear, so I decided to replace it too. As soon as the new one arrives I'll put the back wheel back on.
Attachments
Lineslinger
VIP MEMBER
- Joined
- Feb 26, 2017
- Messages
- 1,864
Lineslinger
VIP MEMBER
- Joined
- Feb 26, 2017
- Messages
- 1,864
- Joined
- Nov 11, 2013
- Messages
- 5,402
It's a beautiful kit isn't it? When I had finished installing mine, I thought I must have dome something wrong. It had gone without a hitch.
Starvingphotog
VIP MEMBER
- Joined
- Jan 1, 2021
- Messages
- 389
Damn! LAB has one hell of a good eye. You should be an auditor!That's a good spot! No, the speedo cable was within the headlight bracket. The tacho needs to go outside for the straightest run. Both gauges are non original, non NVT versions. So, I'm hoping an Andover Norton cable will fit the speedo. I looked at trying to bring the tacho within the light bracket when I changed the fork oil, but it didn't run as straight, no matter how I tweaked the tacho's mounting bracket. Possibly I over tightened the knurled nut after I greased the cable.
ashman
VIP MEMBER
- Joined
- Jul 11, 2010
- Messages
- 6,140
Nice bit of kit, now to just win the lotto, I fired up my Norton yesterday been awhile after putting the old Amals back on after they been off the Norton for 10 years, but been so busy doing other stuff, it fired up first kick then died, note to one self, put fuel in the tank, wasn't much in the tank no wonder it took so long to tickle lol.
Starvingphotog
VIP MEMBER
- Joined
- Jan 1, 2021
- Messages
- 389
That is a really sexy looking kit. I'm thinking the general consensus with you fellas is that the belt drive is the way to go in the primary. I will contact Matt and ask if he sells this separate from the starter. I might go for it.It's a beautiful kit isn't it? When I had finished installing mine, I thought I must have dome something wrong. It had gone without a hitch.
Starvingphotog
VIP MEMBER
- Joined
- Jan 1, 2021
- Messages
- 389
That is beautiful TW! Could you make one of those for me? I have a Pazon and it's dangling there between the two coils with old velcro like an old man's nut sack.I did what I normally do, remove things, make things.
Another part done, the Pazon ignition unit that fits above and below the fuel tank wings.
View attachment 84805 View attachment 84806
- Joined
- Nov 11, 2013
- Messages
- 5,402
He does.That is a really sexy looking kit. I'm thinking the general consensus with you fellas is that the belt drive is the way to go in the primary. I will contact Matt and ask if he sells this separate from the starter. I might go for it.
Colorado Norton Works cNw - Norton Commando Primary and final drive Custom Norton Motorcycles
cNw - Norton Commando Primary and final drive
 coloradonortonworks.net
Starvingphotog
VIP MEMBER
- Joined
- Jan 1, 2021
- Messages
- 389
Beautiful! I must look into this. Besides the quieter function and no need for oil and leaking, anything else you guys notice (pluses and minuses) with the belt drive? I guess I have to convince myself, and my wife, that this is a good upgrade")
- Joined
- Dec 3, 2012
- Messages
- 3,727
Nice. I would like to see a pic of that when installed.
Will do but that might be a while, the bike is back to no inlet manifolds, carburetors, air box or battery tray that were in place.
I will remove/modify the manifold balance tubes and make a jig so the inlet manifolds can be mounted in the mill for truing to suit the gantry, usual story was aware but carried on.
63 in October, tick tock.
#
I had purchased a new strap for the battery hold down and then noticed (Mk2a) when in place it is in the (MB9U battery) centre/center at the rear but because of the side cover Dzus type fastener they moved the securing tab to the very front of the battery so the strap is on some weird angle across the battery top and rocks around being held insecurely.
I will machine a new tray something like the Moto Guzzi's, battery held firm with insulation top and bottom.

The Podtronics needs to go somewhere also. (Perhaps at the rear of the battery)
Tray done.

Last edited:
cliffa
VIP MEMBER
- Joined
- May 26, 2013
- Messages
- 4,225
Not actually today, as it took longer way than expected (surprise). I decided to change oil & filter, remove and flush the oil tank and clean all the strainers. All oil drained, filter removed then on to remove the oil tank. Challenge 1, - with the interstate tank difficult to access the front oil tank mount, and when I do the whole thing spins with the nyloc - arghh!!. So after faffing around for too long, off with the (of course) full fuel tank. Both upper mounts disconnected, move on to the lower and amazingly using a long 3/8 extension bar it comes out easily. Then challenge 2 - the screw heads on the return pipe hose clips ( there are two on each pipe) are pointing straight at the mudguard. Thankfully they have hex heads, so I can use a 1/4 o/e spanners and undo them a few degrees at a time. Eventually out with the tank, and pleased to find the bottom has been reinforced, but a puny bit of rubber has been put in which is thinner than the spigot, so of no real value. I thoroughly cleaned out the tank and remounted it using a piece of a flip-flop under the bottom, with a longer 1/4" bolt and spacer to locate it rather than rigidly bolt it in place.
Nice clean tank...

I noticed that the dipstick really was loose on the rivet holding it to the cap, so I decided to dismantle the cap and fix it. What a mistake that was. I removed the sealing washer, then tried to get the spring loaded inner part out. Again I faffed around for ages trying to remove it, but it's not a lot thicker than a bean can so inevitably the flange where the sealing washer sits got bent so I had to continue. I forced out the inner, then flattened it on a steel block and filed a flat on each side so I could get it back in the cap without bending it again. It was while I was doing this that I thought the dipstick seems incredibly long @ 6". I remembered that there was a recent post about dipsticks and eventually found it. Mine was waaayyy too long and the markings were in completely the wrong place. I wondered how I could re mark it. After sleeping on it, I decided to solder a strip of brass over the existing marking and redo them in the right place. That went well (on the second attempt) and I put saw marks in the right places. Never content, I wanted to mark them H & L in case I got confused . I don't have any letter punches, so I thought "I'll have a go at engraving" VERY many minutes later using a piece of broken hacksaw blade and a small hammer it doesn't look too bad if I say so myself.

I could have bought a new one from AN for £25, but this is mine ! (I wouldn't want to do the world cup though).
Nice clean tank...
I noticed that the dipstick really was loose on the rivet holding it to the cap, so I decided to dismantle the cap and fix it. What a mistake that was. I removed the sealing washer, then tried to get the spring loaded inner part out. Again I faffed around for ages trying to remove it, but it's not a lot thicker than a bean can so inevitably the flange where the sealing washer sits got bent so I had to continue. I forced out the inner, then flattened it on a steel block and filed a flat on each side so I could get it back in the cap without bending it again. It was while I was doing this that I thought the dipstick seems incredibly long @ 6". I remembered that there was a recent post about dipsticks and eventually found it. Mine was waaayyy too long and the markings were in completely the wrong place. I wondered how I could re mark it. After sleeping on it, I decided to solder a strip of brass over the existing marking and redo them in the right place. That went well (on the second attempt) and I put saw marks in the right places. Never content, I wanted to mark them H & L in case I got confused
. I don't have any letter punches, so I thought "I'll have a go at engraving" VERY many minutes later using a piece of broken hacksaw blade and a small hammer it doesn't look too bad if I say so myself.I could have bought a new one from AN for £25, but this is mine ! (I wouldn't want to do the world cup though).
Last edited:
BERT
VIP MEMBER
- Joined
- Nov 23, 2020
- Messages
- 716
I tore it all to bits for frame painting. It's been fun up until now. Now it's just seems like too much time spent looking at my own cooking!
I enjoy the multiple use option of a woodworking shop also.
Starvingphotog
VIP MEMBER
- Joined
- Jan 1, 2021
- Messages
- 389
Damn! That is a gorgeous workshop! I wish I had all that space. I wish I had a space like that to call my own!
Lineslinger
VIP MEMBER
- Joined
- Feb 26, 2017
- Messages
- 1,864
I tore it all to bits for frame painting. It's been fun up until now. Now it's just seems like too much time spent looking at my own cooking!
What Starving Photog said...great work area...really nice having the room you have to stretch out your projects.
Last edited:
Starvingphotog
VIP MEMBER
- Joined
- Jan 1, 2021
- Messages
- 389
Well, I replaced my US style higher wider bar with a lower narrower euro style bar on my 850 over the weekend. This replacement bar is the same bar that I can see that is on my Combat and that's what I was looking for. Sitting on the Combat I felt that the bike fit me more than sitting on the 850. I figured everything else being the same, the bar must be it (same rear shocks and shock height 11.9" Emgos, same '74 frame, same Corbin saddle), and sure enough the feel was much different. Time will tell with these new bars this coming riding season. These ones have me sitting a little more forward and lower, and my arms are more inside and closer to the bike. I'm curious how much it will differ from the wider and higher bars I was riding with last season.
Similar threads
- Replies
- 46
- Views
- 1,893
- Replies
- 10
- Views
- 717
- Locked
- Replies
- 93
- Views
- 9,327
V
- Replies
- 67
- Views
- 5,928