Stephen_Spencer
VIP MEMBER
- Joined
- May 31, 2017
- Messages
- 2,816
Thanks Tony - much easier to get hold of than the Threebond product over here for some reason.


Not a sealer it turns out Voodoo, I misrepresented it - felt like I could dig my nail in it. It’s actually just the machined flat, unpainted surface of the nylon tank.Interesting.
Neither of my stock tanks had that sealer and I only used the original pump o-ring seal on my aluminum tanks.
Are the TAB tanks not made with a machined fuel pump mounting pad?


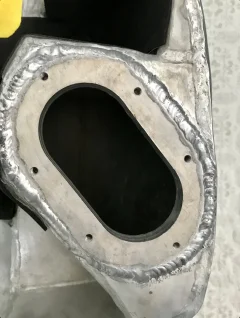
Tape the pump opening closed from the inside, and run a file flat across the mounting surface to knock down any high spots.Couple of mounting hole periphery areas of the pump over the top of weld run off (incorrect term), but pump is sat up on the O-Ring. Should be good when secured with a bit of 518 gasket sealant.
View attachment 109165
The reason to use a sealant is to fill any imperfections in the mating surface. Manual says 9 nm torque on the fuel pump bolts.Tape the pump opening closed from the inside, and run a file flat across the mounting surface to knock down any high spots.
I’m still not sure why you need the use of sealer? Are the screw holes not blind? (They go all the way through?)
I understand, but I recall seeing anything mentioning sealant when I installed my aluminum tanks.The reason to use a sealant is to fill any imperfections in the mating surface. Manual says 9 nm torque on the fuel pump bolts.


Euro 4 manual , 6 nm should work too.Tony (where did 9 Nm come from?)
I personally wound not use sealer. It’s up to you, that o-ring is all that is needed. You have a machined aluminum plate. The plastic tank is no where near as flat as the aluminum.Thank Guys,
Ally tank holes are blind. No sealer on the original tank surface however the Service Manual states to use 1344E Threebond on the ally tank. Just a light application to my mind on what is a pretty well machined surface - and to the O-ring.
There is a bit of weld protrusion on mine but it’s very minimal and does not reach the O-ring, which is of quite substantial thickness.
Service Manual states 6Nm for the mounting bolts Tony (where did 9 Nm come from?) - should be no different between Nylon and Ally tanks. Bolts felt little more than hand tight to remove.
Getting decals fitted currently. I’ll put a few litres of fuel in it and let it rest for a couple of days before I fit it - any leaks should show up. Not in any hurry - off dirt bike riding this weekend.
Cheers for the input.
View attachment 109181View attachment 109180
The surface looks pretty good Voodooo, less a bit of weld run off that I don’t believe will interfere.I personally wound not use sealer. It’s up to you, that o-ring is all that is needed. You have a machined aluminum plate. The plastic tank is no where near as flat as the aluminum.
Have you put a straight edge on the aluminum tank flange and check for flatness? It could be warped from welding heat.
If you have a flat true block, you could blue the surface and run a solid flat block with 400 grit sand paper to see if it’s flat or has any high or low spots.
Or run a flat file across its surface.
.,It was hard to tell in this pic, so the fuel pump pad is slightly raised and the one area has a slightly higher weld?The surface looks pretty good Voodooo, less a bit of weld run off that I don’t believe will interfere.
The raised weld section around the pad precludes using a straight edge. I don’t have a block of any type - don’t think there is any reason to assume that it is anything but true though. The picture @ #144 just shows it sat up on the O-ring.
I’ll try bolting it down with just the O-ring as you suggest and check it out - should be all good.
Thanks for the tips
Picture doesn’t really show it well but there are sections of the main weld that are proud of the pad, were other parts dip below it along with the profile of the tank. Should be all good.It was hard to tell in this pic, so the fuel pump pad is slightly raised and the one area has a slightly higher weld?


I just used a new o-ring and had no issues.Can I ask what you guys used on your ally tanks to seal the fuel pump?
I've been meaning to ask. How are these tanks venting? I see no provision for that
Through Cap .
Its all we used at the factory too.Not sure what you guys are using but after trying multiple products on the TAB tank, this is head and shoulders above the rest - even Autosol, which surprised me!
Smooth on, easy off, high shine, no smears. I like it so much, I‘ve stated spreading it on my toast in the morning! Beats Vegimite hands down!
View attachment 109228