P11, P11A, 750 Ranger Engine thread

p400, regarding your initial query, did you determine the cause why your pistons showed different heights when crank was rotated to TDC?

On another note, have you checked your barrel for bore straightness? I remember Comnoz wrote about his findings that the 750 barrels had to be bored using a torque plate due to cylinders distorting otherwise. This will not explain your piston height difference though.

-Knut
I do not remember what I did about this .005" mismatch. I will see what this new assembly measures.
The bore work was performed by a specifically vintage Norton machine shop Colemans, Linthicum MD.
This P11 ran great for 3000 miles, then lost compression.

A couple years have past and I am not up to speed on Norton P11 yet.
 
Last edited:
My last technique to assemble cylinders on piston/rings was to insert the pistons in to the cylinders from the top (Ring compressor), push them down until the pin holes were visible, suspend the cyl using wood spacers, bring the rods up insert pins/clips.

This time I am purchasing ring compressors, cutting wood block/plywood (below) and inserting from below.

P11, P11A, 750 Ranger Engine thread


P11, P11A, 750 Ranger Engine thread
 
Last edited:
Following Jim Schmidt video, for the cylinder/piston install -


I don't use the cam followers.
 
found a piece of scrap plywood.
cut a tool.
waiting for piston ring clamps, ebay


P11, P11A, 750 Ranger Engine thread
 
Received 70-75mm piston ring clamps today.
The ring clamps appear nicer than the Ebay sales photo.
and also upgrade Norton gaskets direct from JS Motorsports.

P11, P11A, 750 Ranger Engine thread
 
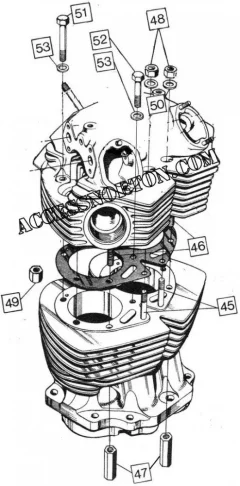
Well, I have lost track of my nuts. I haven't looked at them for a couple years. Is there a damn diagram to show where what goes where? Washers too.

Somebody offer a nice zinc plated set of nuts, bolts, washers all ready to go?
P11, P11A, 750 Ranger Engine thread
 
Classicbike.biz has an engine diagram with more detail than yours, but it does not show all bolts and washers either.

I just put the head on my Atlas, and I think I have all my nuts together! Bolts that go down from the top, have flat washers, nuts that go on studs from below, are sans washers.

Comnoz sent me 4 cupped washers with instructions to put 2 on each of the 5/16 studs that are up front by the pushrod tunnels, convex side up. These are to help stabilize the torque on those buggers. After doing so, I found the studs to be a little short and the nuts were about 1 thread from 100% engagement, so I torqued them to 18 ft lb, rather than the specified 20..... you might say I chickened out at 18.

I do not know of a pre commando head bolt set ready to go. Per Comnoz, there are no "waisted" sets for pre commando.

Slick
 
I didn't have enough nuts showing, in IPBs, to satisfy me . I cleaned up a Commando IPB, I found online, and now have a better layout of nuts, washers and studs relating to P11 head fastening. I wanted to have a clear understanding of the nut design/size as well as the washers. Whether or not a nut was used with a washer or not...etc.

So, does this IPB represent the P11 head fastener layout?

I am now sorting thru OEM washers.

P11, P11A, 750 Ranger Engine thread
 
Last edited:
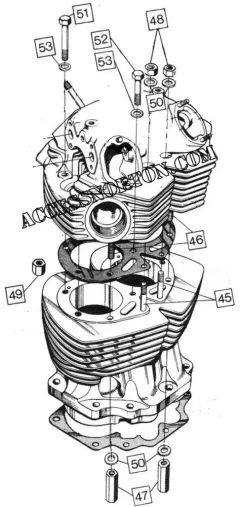
Your diagram looks good. Only exception to what I said above is washer Item 50 on the tall nuts..... I do not believe my Atlas ever had them ..... I cannot believe I lost them in previous head removals.

Uh oh! Just noticed washers, Item 50 are used on both tall nuts, Item 47 and on studs Item 45. Item 45 is 5/16 stud, tall nuts go on 3/8 studs ...... cannot be same washer! I think washer Item 50 on tall nuts does not belong.

Another possibility is Item 53 should be used under nuts 48, and not Item 50. This possibility leaves open the issue of any washer belonging on the tall nuts.

Notice also, the nut Item 49, is without washer. This would suggest no washer on tall nuts.

Slick
 
Last edited:
Thanks Slick, You are correct, the IPB is not correct with those washers #50 on the upward tall nuts.
So IPB reissued without washers.

P11, P11A, 750 Ranger Engine thread
 
Last edited:
Since you said your diagram originated with a Commando diagram, the washers 53 and 50 ought to be different since Cdo head bolts 51 are 3/8, rather than 5/16 for pre commando.

I am thinking my washers for the 5/16 studs near the pushrods tunnels were different from the head bolt washers, if only because of plating, I am not sure on this. The washers that recently came off my head were different, but I cannot testify they were as original.

Thanks for putting up the "cleaned up" diagram.

Slick
 
Yup , I am now actually looking at my pieces. The 4 washers (53) under the 4ea 5/16" head bolts (51) are large OD....and they get stuck in the head recess. The one off, small OD, thick, special washer under my (52) single 3/8" head bolt is not even the same as the cyl/case stud 3/8", small OD washers. I will clean this up later, thanks.


P11, P11A, 750 Ranger Engine thread
 
Last edited:
Thanks Ron, nice kits, I should buy one, but I cant wait to assemble. I did learn something new about the two forward P11 head studs being upgraded to 3/8.

It appears the Andover revision to the 3/8" tall nuts (large diameter body) gives a better holding area to the upward installed long nuts


P11, P11A, 750 Ranger Engine thread


P11, P11A, 750 Ranger Engine thread
 
Last edited:
Do you think there is enough "meat" to upgrade existing 5/16" to 3/8? It seems to me, the head is easy, but the wall thickness at the push rod tunnels is thin, and the larger stud might break into the tunnel.

Wish I had known of this upgrade before putting on my head. I would have considered doing so.

Since your head is off, you can better assess feasibility.

Slick
 
Do you think there is enough "meat" to upgrade existing 5/16" to 3/8? It seems to me, the head is easy, but the wall thickness at the push rod tunnels is thin, and the larger stud might break into the tunnel.
Wish I had known of this upgrade before putting on my head. I would have considered doing so.
Since your head is off, you can better assess feasibility.
Slick

Slick, I am too impatient to even consider. My best bet is to retorque after xx miles, and maybe several times if it actually retorques at all.
I am now looking into cylinder wall cross hatch being acceptable.
If so, I am slathering up with Pliobond and get er done.

Just like my head/cyl nuts, I have lost track on studs and spacers for mount plates.....so retraining.
 
@p400
you said ..."Just like my head/cyl nuts, I have lost track on studs and spacers for mount plates.....so retraining."

I was browsing Baxter Cycle website a few days ago, and I noticed they had a stud/spacer kit for P11. You might check it out

Slick
 
Progress, assembled cylinder to crankcase.
No .005" piston height difference.

Ring clamps worked very well.
wood plate worked well.
had the most difficulty with installing piston pin circlips.

could have benefitted from spacers to hold cylinder at correct level to install base nuts.


P11, P11A, 750 Ranger Engine thread
 
Last edited:
Head on, torqued to 25. I am not happy with left side intake valve adjuster. The adjuster seems too far out, like the push rod maybe mispositioned. Can this condition indicate the ball end of the push rod is out of position? engine turns over and all valves operate okay.

I remembered I have a $12 boroscope for my cell phone, from ebay china, got find it.

P11, P11A, 750 Ranger Engine thread
 
Back
Top