Mk3 Primary

Status
Not open for further replies.
I suppose it can't be ruled out although my Mk3's sprag has always engaged even with a discharged or failing battery that wouldn't turn the engine over down to the point where the solenoid was chattering from the lack of voltage.


Did you do the "Testing the DC input to battery" check in the Mk3 manual, section J3 but with the Boyer Powerbox, not rectifier and Zeners?


Perhaps this recent thread at Britbike might help?
Thanks again. I am getting nothing out of the alternator.
Ignition off battery voltage, battery tender disconnected = 13.8V
Tickover = 12.8V
2,000rpm = 12.8V
3,000rpm = 12.8V
All with lights off.

Traced the alternator wires (2 sets of green/yellow) and just before the air box bracket, there are bullet connector joints for both. One of these was showing out of the rubber sheath and loose. I've pushed them together, but battery was too flat to engage sprag to check if I'm now getting output from the alternator.

I did have a few wasted starts, but not enough to prevent the battery turning the starter over healthily. Nonetheless, the sprag did not catch. It only seems to catch when the battery is fresh off the tender. Put it on the tender again and I'll retest tonight.

A saga. Hope this is of some interest / entertaining and not just irritating everyone!
You've found one of the weak spots - bullet connectors! The female ends will sometimes crack and disconnect even though the male seems fully engaged.:)
One of the best upgrades I did for my MKIII was to replace the alternator with a 3 phase type. Battery is always in tip top charge.
 
None the wiser. 13.8V ignition off. Started the bike and the voltage continually moved between 4V and 13.4V. Took the readings at the power offtake / accessory socket and thought there may be a loose connection. Tried again at an engine fin and terminal with the same results. I think this tells me I have a loose connection, but could be in my tester probes. All were fine static and danced around with the bike vibrating. Unable to do the test in the manual at the alternator, don't have a 1Ohm resistor.

My tester has probes. I need to make sure I have an undisturbed contact. I'll maybe get some crocodile clips and try again. Also realise it is not converted to negative earth, it has a pretty obvious thick black lead from the positive terminal down to a bolt on the engine case, behind the barrel, above the primary. Doh!
 
If you are using a digital meter then they can be all over the place from interference, best to use an analogue meter for engine running tests.
 
If you are using a digital meter then they can be all over the place from interference, best to use an analogue meter for engine running tests.
Doh, another beginners mistake, that makes sense... Although it works on a TR3's 3 phase alternator? Thank you. I'm packing up and going to open a beer!

Just went back to the above Old Brits forum link from LAB. The voltmeter being used was a Fluke 115, which according to Amazon, "Includes low input impedance to help prevent false readings due to ghost voltage". Guess mine doesn't. It was certainly a lot cheaper. I'll borrow a better meter and retest. I just want to rule electrics out, as only 500 miles between apparent sprag failure, might be down to another reason.

Thanks
 
Last edited:
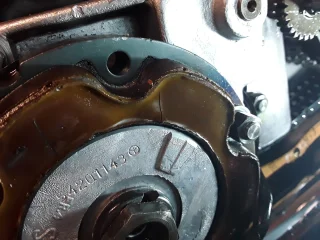
Parts have arrived and started. I have just noticed a split or fracture in the resin insulator on the stator. It doesn't appear to go the whole way across. Is it still OK?
 

Attachments

  • Mk3 Primary
    20210407_155404.webp
    219.5 KB · Views: 228
Check your clearance between rotor and stator with the crank in several positions, recommended minimum was 8 thou but 10 seems a safer bet. A crack can be a sign of the stator heating up hence the clearance check.
 
Last edited:
I'd squirt some thin cyanoacrylate in the crack and call it good (for now).
 
Thanks. A 10thou feeler guage goes round, snugly. Be pleased if I don't need to replace the stator.
 
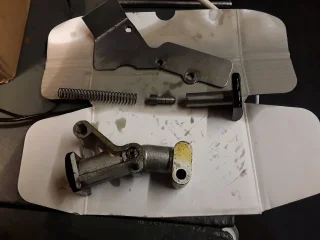
Interesting primary chain tensioner. The top piston is seized and the bottom has an interesting 'top hat' spacer, an Allen headed screw. The top piston is absolutely solid.
 

Attachments

  • Mk3 Primary
    20210408_114717.webp
    105.1 KB · Views: 203
No wonder the chain felt slack then! :)
Yes, encouraging. I'm actually hoping to find something simple behind the sprag failure. Doubt this would be it though.

Brake cleaner eased the piston. This one had a plastic top hat, but in the wrong way round. That's an understandable mistake, it looks like the thin end should be fitted into the spring. Need to find somewhere that will sell just the top hat I'm missing. Edit:£3.50, +p&p at AN. Enough for a little bit of plastic, but at least you don't have to buy the whole plunger assembly, both have cleaned up and look OK.

It was seized due to Wellseal being very enthusiastically used on the plate gasket, the ball bearing valve in the body of the tensioner was also gummed up with Wellseal.
 
Last edited:
Sorry, more questions!
1. Am I reading the manual correctly, must the gearbox shaft, where it enters the primary case, be concentric with the hole in the inner primary case casting? Mine isn't, but the shims, although offset, are clear of the case and don't touch it. The oil seal seems to have done its job, so far.
2. There is a nyloc nut inside the inner primary case, attaching the case to a stud on the engine case. There is also a nut on the stud on the other side of the case (outside the primary case), but it is loose and doing nothing. Should this be tight against the inner primary case, locking the case to the stud and the nyloc nut? Is this arrangement for adjusting the primary case to the plain set by the crankshaft oil seal. With the primary chain off, I've checked the alignment of the engine sprocket (old and new) with the clutch sprocket. They are fine. So, I'm inclined to nip that outside nut up against the primary case, before I put the clutch and engine sprocket back in, making sure I don't rotate the stud?
3. My inner clutch sprocket does have some burring from the plates. However, many of the splines also have deep wear, witness grooving, from where the clutch plates have been sitting. I have a heavy clutch. Time for a new inner clutch sprocket? Thankfully, the outer splines on the basket and the plates look OK.

Thanks
 
2. There is a nyloc nut inside the inner primary case, attaching the case to a stud on the engine case. There is also a nut on the stud on the other side of the case (outside the primary case), but it is loose and doing nothing. Should this be tight against the inner primary case, locking the case to the stud and the nyloc nut? Is this arrangement for adjusting the primary case to the plain set by the crankshaft oil seal.

Yes, the inner and outer nuts are used to set the alignment of the inner primary case (see Mk3 manual, C34. 6 and Fig. C45 inset) the stud should be fixed securely to the cradle. I suggest you apply a little gasket sealant to the stud thread.

Edit:£3.50, +p&p at AN. Enough for a little bit of plastic, but at least you don't have to buy the whole plunger assembly, both have cleaned up and look OK.

Edit:
Now priced at £3.95+VAT+ cheapest UK p&p = £10.13!
I'd have put the Allen head screw back in.
Probably works just as well. :)
 
Last edited:
Sorry, more questions!
1. Am I reading the manual correctly, must the gearbox shaft, where it enters the primary case, be concentric with the hole in the inner primary case casting? Mine isn't, but the shims, although offset, are clear of the case and don't touch it. The oil seal seems to have done its job, so far.
2. There is a nyloc nut inside the inner primary case, attaching the case to a stud on the engine case. There is also a nut on the stud on the other side of the case (outside the primary case), but it is loose and doing nothing. Should this be tight against the inner primary case, locking the case to the stud and the nyloc nut? Is this arrangement for adjusting the primary case to the plain set by the crankshaft oil seal. With the primary chain off, I've checked the alignment of the engine sprocket (old and new) with the clutch sprocket. They are fine. So, I'm inclined to nip that outside nut up against the primary case, before I put the clutch and engine sprocket back in, making sure I don't rotate the stud?
3. My inner clutch sprocket does have some burring from the plates. However, many of the splines also have deep wear, witness grooving, from where the clutch plates have been sitting. I have a heavy clutch. Time for a new inner clutch sprocket? Thankfully, the outer splines on the basket and the plates look OK.

Thanks.
My transmission shaft was not centered in the inner primary and had been a source of an oil leak. It had run that way so long (maybe from new) that when I removed the seal it was permanently offset by 1/8'". I loosened everything up and found enough wiggle room to center it up but became frustrated trying to keep it that way as I tightened things up. So I turned a little jig out of some PVC fittings, inside bore the dia of the gear shaft and outside dia the size of the inner primary hole. That held all in place while I tightened it all up.
The stud you refer to is the chaincase steady and needs to be tightened up when every thing else is tight as to not push or pull but just support the inner primary.
 
Interesting primary chain tensioner. The top piston is seized and the bottom has an interesting 'top hat' spacer, an Allen headed screw. The top piston is absolutely solid.
When my tensioner failed/seized it was the top plunger tube . The lower was fine .
 
Yes, the inner and outer nuts are used to set the alignment of the inner primary case (see Mk3 manual, C34. 6 and Fig. C45 inset) the stud should be fixed securely to the cradle. I suggest you apply a little gasket sealant to the stud thread.


Edit:
Now priced at £3.95+VAT+ cheapest UK p&p = £10.13!
I'd have put the Allen head screw back in.
Probably works just as well. :)
It would need cutting down, it was about 5mm longer than the plastic one! Anyway, ordered now and sharing the postage with the clutch hub. That was the painful one. £96+. I looked at it again and it is very notched. Tempted to leave it, but I know I'd only regret not doing it. If I find anything else, it will have to wait until next month.

The old sprag looks OK with the springs in tact and reassembled off the bike, spins freely clockwise and catches every time without slipping, anti-clockwise. The needle bearing looks fine, as does the inner race and inside of the primary sprocket. No obvious cause of the problem, I can see. As it catches at this low a force, I can't see a low battery, hence slower starter speed, being the cause either.

Today is thoroughly cleaning everything, while I wait for the delivery.

Looking at the mating surfaces of the two primary case halves, I can't see any way I'll get them oil tight. It was previously weeping onto the exhaust. It doesn't seem warped. But, quite a few notches and snags around the screw holes and the centre 1/3 of the bottom edge of the inner case is thinner than the width of the gasket. Guess that might explain the gasket sealant I'm finding in parts throughout the primary. I wouldn't want to use silicon/RTV on it, I don't fancy trying to break that seal if I need to look inside again. Grease doesn't seem very permanent. I'll go through the threads here to search for suggestions.
 
Last edited:
Looking at the mating surfaces of the two primary case halves, I can't see any way I'll get them oil tight.

But, quite a few notches and snags around the screw holes and the centre 1/3 of the bottom edge of the inner case is thinner than the width of the gasket.

The Mk3 gasket alone should seal the joint. I normally grease the gasket as it is often reusable but if the joint face is damaged then sealant could be required but perhaps only apply it to the inner case side of the gasket and grease on the outside.

The problem area as you said is the lower screw hole where the joint face of the inner case is thinner and where oil could leak along the screw thread which might require sealant on the thread.
 
Status
Not open for further replies.
Back
Top