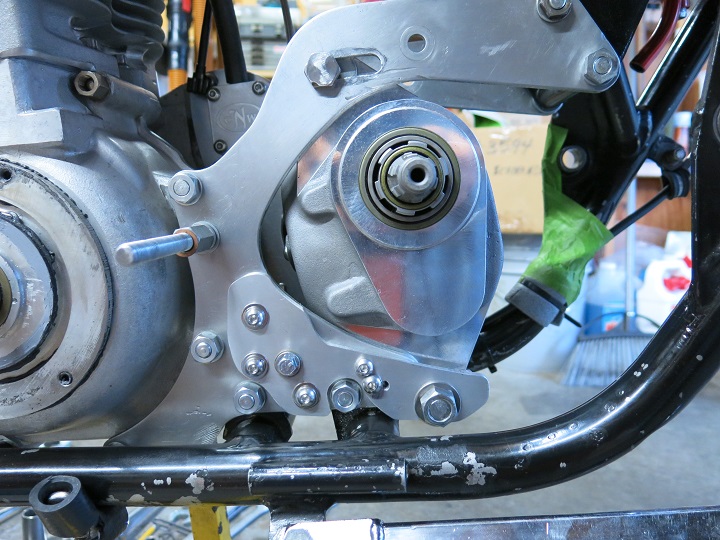
P11 AMC gearbox out, TTi 5 speed going in

Sort of important note: Ya can't remove the fake cam spindle bolts in the TTi gearbox and leave them out because the threaded hole is through drilled into the case. There would be a whole lot of gear oil on the floor. That's not how I found out the holes were through drilled. I inserted a 12" long x 1/16" round rod into the case and it went in about 6" without hitting anything. I replaced the fake bolts and washers that came in the case with thinner stainless-steel washers and button head hex/allen drive bolts for more clearance. Also used thread sealant. You can remove the fake plunger housing acorn nut and stud.
 
Last edited:
I won't be using those nice Minnovation Racing gearbox fasteners until I make new plates. Maybe next year. The Minnovation lower bolt is too short for my Shade Tree Barnyard imagineering add-on plates.

Think Simpson Strong-Tie

And Yes the frame could use repainting. Low on my priority list currently.
P11 AMC gearbox out, TTi 5 speed going in


Currently getting started modifying the oil pipes to go under that foot rest mount thing that looks like a nut and under the gearbox. The gearbox is close to the timing case in the fully forward position. Has to be that close to get the belt on easily. It will move back some when the belt is adjusted.

P11 AMC gearbox out, TTi 5 speed going in


Many an obstacle has to be worked around to do this gearbox swap and maintain a stock appearance on the drive side with a belt clutch in the primary. Need to get a smaller washer for that gearbox pivot nut. :)
 
My recommendation is not to get a 530 sprocket for the TTi gearbox to use with a P11 while keeping the short primary cover. (Not that anyone other than myself is ever going to do it.) That said, I can make it work because I'm nuts, but a 520 sprocket has far more clearance room behind the inner primary cover. Either get a 3rd party rear hub and brake laced up that allows bolt on sprockets, or have your stock rear drum sprocket turned down for use with a 520 chain. In my case with the P11, the outside face of the stock drum sprocket needs to be shaved for 520 chain.

Now I have to find a machinist that can do a cut in less than a month. Cutting motorcycle sprockets can't be a common thing machinists do. One could shave it barn yard engineer style with a grinder. ha

BTW I'd be done with this if I wasn't wasting time trial and error fitting things to make a 530 chain work. What a dumb idea that was.
 
Now I have to find a machinist that can do a cut in less than a month. Cutting motorcycle sprockets can't be a common thing machinists do. One could shave it barn yard engineer style with a grinder. ha
Grinding hardened steel is a normal thing for a machine shop. I'd guess the "proper way" to do it would be on a surface grinder, not on a milling machine, so rigging something using your bench grinder may not be too off the mark. Just go slow. I sanded a Triumph counter shaft sprocket attached to a hand drill on a wide belt sander, and it did a fine job. Hit the target within a thou or two. It was not that fun, but it's do-able.
 
With the wider flat 530 sprocket, it is the sprocket nut that hits the back of the inner primary. Correcting for it is a cascading series of moving or grinding away at this or that. You'd have to be there to enjoy the experience as it were.
 
Could always cut the case for a larger trap door, mounted to the outside of the case with screws.

Yes. The cascade of bullshit is the fun part. I'm making a new oil tank, and I had to re-machine my rearsets for a different brake light switch! How does that happen?!?
 
Cutting a relief in the 530 sprocket for the nut would also work. I don't have the machinery for doing that with adequate accuracy. Kind of late in my life cycle to start buying expensive machines for working on one toy.

Anyhow I gotta get my butt out in the garage and see if I can make a dent in the project with the 530 setup. I will graduate to 520 chain later.
 
Cutting a relief in the 530 sprocket for the nut would also work.
That's an expensive proposition. That's a carbide end mill to go in your non-existent milling machine.

If you've got room behind the pulleys and clutch, you can also put a spacer behind the inner primary case that interfaces with the crank case (with a washer behind the spacer from the engine plate as well). I put an aluminum 3/36" spacer behind my inner primary on my Triton with the Newby belt. Sheets of appropriate thickness and size can be delivered tomorrow from Mcmaster-Carr. It opens up the alternator can of worms though...
 
I don't have a long enough mainshaft to take an additional spacer on the drive side approach. I've already maxed out the spacing via spacer on the center through bolt in the primary cases. It is a fluster cluck of maxed out clearances I am playing with. I also could have reduced the thickness of the spacer behind the gearbox sprocket. I didn't want to move it any closer to the gearbox with a 530 chain width. 530 chain moves quite a bit side to side when on the gas. Chewing up the drive side of a TTi gearbox would be a sad day.

It's done and nothing is scraping. Baby steps with a Dremel tool and an aggressive long shaft cutter was how I went about making clearance paths. Took forever because I didn't want to reduce the inner case where I worked on it to aluminum foil. Also had to file a bevel for lack of a better word all the way around the clutch basket at the inside and outside edges of the pulley teeth. All my work is hidden from view for anyone not that familiar with a P11.

Gotta put oil in the oil tank tomorrow and see if my rerouting of the oil pipes under the gearbox holds oil. After that I'll prime the oil system until it returns oil to the oil tank by kicking it over with the plugs out. Then put the plugs back in and light the fire.

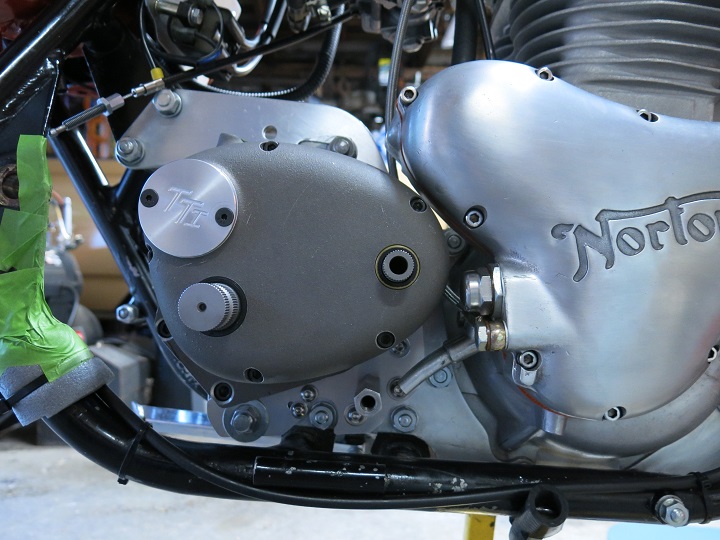
I'll post some pics later, but it really looks pretty much like the same bike, but with a Grey gearbox outer cover and a TTi clutch cable access door on the timing side.
 
Did not start it, but primed the oil system, and made some other small things that are not seen.

As I said the pics are nothing special. Looks same as it ever was to me.

Note how far back the sliding disc is in the inner cover. That location is with the gearbox nearly touching the back of the timing chest. With the belt adjusted the mainshaft goes right through that hole. Shortest belt I could use was the 890mm. All in all a crazy fit. It does work however.

The shiny bumpy part is where I had to grind off a full circle around the sliding disc area and then extend it for the RGM clutch basket. Also did a fair share of grinding on the backside, but it is extra ugly back there.

P11 AMC gearbox out, TTi 5 speed going in


I need to go over the fasteners before I ride it, but this is what the timing side looks like.
P11 AMC gearbox out, TTi 5 speed going in


TTi gearbox in the house with kickstart and shift lever.
P11 AMC gearbox out, TTi 5 speed going in


Not sure what I might do next with this bike. I'll get it on a dyno machine this summer. Don't care what opinions are about dyno machines. I just want to see a baseline from a guy that dynos primarily inline 4 race bikes that make a lot more HP than a Norton 750. I'm sure they'll get a kick out of the old thing. It always draws some attention.

For pure HP and tuning accuracy, I'm thinking maybe I need a GoPro and a dynohill of my own. 🤣

Stay frosty.
 
I like the 2nd photo best, and the first thing that came to mind was that bike is going to look great in the El Camino when it breaks down somewhere...... ;)

Other than that, looks like it came out good. Looking forward to hearing the ride report. 👍
 
Last edited:
I like the 2nd photo best, and the first thing that came to mind was that bike is going to look great in the El Camino when it breaks down somewhere...... ;)

Other than that, looks like it came out good. Looking forward to hearing the ride report. 👍
Ha

The old horse has been in the back of the El Camino for a ride back home once. Wife had to get involved. I was reminded about that episode for a couple of months.

I might take it to the local car show in the back of the El Camino. It is an interesting conversation starter. What kind of bike is that? I usually point at the emblem on the tank while saying "It's a Norton".

I should get in a short test ride today. No rain in the forecast.
 
The TTi gearbox lives up to the hype for me. Takes a minute to get accustomed to the short throw, but it is a huge improvement over the stock AMC 4 speed shift throw. I had no trouble finding Neutral gear. Just a slight movement off throttle up from 1st or down from second. The 5 speed is perfect for me. 3rd gear is a better ratio for slow riding on the street with 35mph speed limits. I did not get it on the HWY to test 4th and 5th yet, but I can't see any reason why this gearbox would disappoint. Shifts like butter and a cush hub is not necessary based on my short ride. Team Molnar doesn't have cush hubs on any of their race bikes, and they ride a lot harder than anyone riding on the street. Even harder than Ash if you can believe that. ;)
 
The more joints you have in engine plates, the more opportunity there is for vibration to do damage. I would not overlap them and bolt them together. Making engine plates is not difficult when you have the originals to give you the shape of the motor. I just trace the plate and use cardboard and scissors. I cut the aluminium with a jig saw,and use a drill and linisher. When you have done it once, you will realise how easy it is. What you have is not a difficult problem.
 
The TTi gearbox lives up to the hype for me. Takes a minute to get accustomed to the short throw, but it is a huge improvement over the stock AMC 4 speed shift throw. I had no trouble finding Neutral gear. Just a slight movement off throttle up from 1st or down from second. The 5 speed is perfect for me. 3rd gear is a better ratio for slow riding on the street with 35mph speed limits. I did not get it on the HWY to test 4th and 5th yet, but I can't see any reason why this gearbox would disappoint. Shifts like butter and a cush hub is not necessary based on my short ride. Team Molnar doesn't have cush hubs on any of their race bikes, and they ride a lot harder than anyone riding on the street. Even harder than Ash if you can believe that. ;)
I suggest you need cush somewhere in the drive train. With my bike, it is in the clutch centre. If uncontrolled impact occurs between the gear teeth inside the box it can cause the hard surface to spall - can lead to destruction.
 
The more joints you have in engine plates, the more opportunity there is for vibration to do damage. I would not overlap them and bolt them together. Making engine plates is not difficult when you have the originals to give you the shape of the motor. I just trace the plate and use cardboard and scissors. I cut the aluminium with a jig saw,and use a drill and linisher. When you have done it once, you will realise how easy it is. What you have is not a difficult problem.

If I wanted to make one-piece plates, I would have Al. Doing what I did is a template for future use. However, only a useful template for someone that wants to keep the stock P11 primary cover. Most people doing this kind of thing probably would have used a different primary cover, and not done it on a P11 to begin with. I just happen to like one-off barnyard engineered toys.

If the engine was canted forward like it is on a Commando I could have possibly gotten away with using the stock plates. I'd only need to raise the top mount a little. Water under the bridge until it all flies apart and kills me. If that happens, I won't need to worry about the structural integrity of my bolt-on plates. :)
 
Last edited:
Back
Top