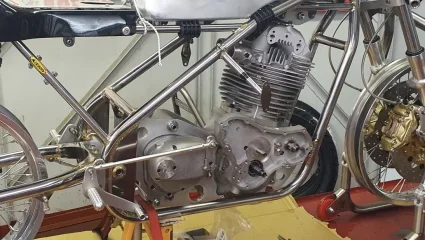
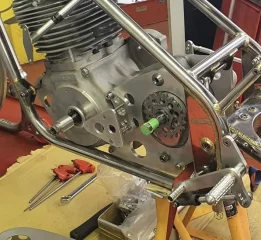
P11 AMC gearbox out, TTi 5 speed going in

I have a handle on how I'm going to do it. I won't be making new plates initially. Maybe sometime in the future if I get a bug up my arse to pull plates off the engine and do it.

The add on 1/4" plates for the lower lug idea has been on table as an option from the beginning. Plenty of large fasteners to make add-on plates strong. I do have to get the gearbox mainshaft positioned where I had the OEM box before I attach a set of add on plates. I'm close now, with only another 1/4" to go forward with the mainshaft location, but it is definitely time consuming doing most of the fit work with files putting the gearbox in and taking it out over and over again. Trial and error is part of life. Thanks for the thoughts though.

Currently wasting my time trying to work around the stock oil pipes. They are in the way no matter the orientation. Shit canning that idea and going to get one of the oil blocks that takes AN fittings.

Notes about the TTi gearbox: There are 3 fake parts screwed on the outside of the TTi gearbox. The camplate detent spring plunger housing, and the 2 camplate spindle screws with washers. The plunger housing is just a big crown nut screwed down on a stud screwed in the case. The two camplate spindle screws are also screwed into the case. None of those parts are functional. Frankly I think TTi adding them to the design is a ridiculous waste. That's just me though.
TTI added those fake parts to the design in order to qualify the gearbox for certain strict classes of vintage racing. However, why they don’t offer them without, or at least make it very clear they can be removed, is a good question.
 
The only TTI gearbox I've installed was in a Commando. It took a long time...file and fit...file and fit. Actually I used a disc grinder, quicker but I had to be super careful not to hit anything else. The TTI had a very soft engagement from first to neutral then to second. It was difficult to feel the gear change.
 
The add on 1/4" plates for the lower lug idea has been on table as an option from the beginning. Plenty of large fasteners to make add-on plates strong. I do have to get the gearbox mainshaft positioned where I had the OEM box before I attach a set of add on plates. I'm close now, with only another 1/4" to go forward with the mainshaft location, but it is definitely time consuming doing most of the fit work with files putting the gearbox in and taking it out over and over again. Trial and error is part of life. Thanks for the thoughts though.
Well, at least with the belt, you won't need to worry about tension adjustment, so no need to align the bottom mounting hole to wherever makes the upper mounting slot work. All your previous efforts paying off.
 
The only TTI gearbox I've installed was in a Commando. It took a long time...file and fit...file and fit. Actually I used a disc grinder, quicker but I had to be super careful not to hit anything else. The TTI had a very soft engagement from first to neutral then to second. It was difficult to feel the gear change.
Hi Seattle,
I just received my TTI 5 speed with kickstart from Andy. I'm curious as to how much filing, fitting etc you needed to do. I will be installing it in either my 1970 Commando or my 1971 Commando and wasn't aware that they were not a simple dropping.
Any advise will be appreciated,
Ed
 
It will require quite a bit of grinding metal away so have a good power tool for the job. I believe it was only the timing side that needed work. You will need to loosen the engine plates at the motor. I spent a few hours doing this. When you are done you might trace the final plate and send it to TTI so they can include the pattern with transmissions they send out.
 
Hi Seattle,
I just received my TTI 5 speed with kickstart from Andy. I'm curious as to how much filing, fitting etc you needed to do. I will be installing it in either my 1970 Commando or my 1971 Commando and wasn't aware that they were not a simple dropping.
Any advise will be appreciated,
Ed
Yes a lot of metal is needed to be removed from the cradle, both sides, especially if you want full range of motion on the adjuster slots.

Someone did sketch it out on here, but I can’t find it now.

To avoid re-railing this thread with Commando content, and to get answers, you’d be better off asking on the Commando page.
I'm surprised the content is even close to on topic after the 1st page filled up. :)

I don't care to be honest, but it will make my post even less useful than it already is to P11 or other model owners with the short Matchless primary covers. The amount of people likely to ever install as TTi 5 speed in a P11 is very small. Probably fairly close to 1.

I'd be done and on the road riding if I was willing to give up the idea of using the short P11 primary covers and making the design reversable so the AMC box would work without a lot of hassle.
 
Last edited:
Hi Seattle,
I just received my TTI 5 speed with kickstart from Andy. I'm curious as to how much filing, fitting etc you needed to do. I will be installing it in either my 1970 Commando or my 1971 Commando and wasn't aware that they were not a simple dropping.
Any advise will be appreciated,
Ed
I was under the mistaken impression you were going to try and install the TTi box in an N15. You have it relatively easy with a Commando. Time consuming yes, but a lot of people have done it, so there's that resource to help. Even though the basic process to install the gearbox in a P11 is similar, it's going to probably take me 2 to 3 weeks at the rate I'm going. I'm approaching it like custom inlayed finish woodwork, but with alloy parts. :)
 
The only TTI gearbox I've installed was in a Commando. It took a long time...file and fit...file and fit. Actually I used a disc grinder, quicker but I had to be super careful not to hit anything else. The TTI had a very soft engagement from first to neutral then to second. It was difficult to feel the gear change.

Everything that requires modification is made of alloy in my TTi install with a P11. Using a disc grinder would be a hard pass for my work style with alloy.

I can see how it might be easy to miss finding neutral. It is very soft engagement.
 
Schwany, I have a spare set of steel N15/G15 engine plates. If you think they'd be of any use to you let me know. I'll be in Seattle in a couple of weeks.
 
I bought a tool called an oscillating spindle sander, a cheapie at $125, but it was well worth the money. It is a woodworking tool with various diameter spindles and produces great curves in aluminum.
 
I bought a tool called an oscillating spindle sander, a cheapie at $125, but it was well worth the money. It is a woodworking tool with various diameter spindles and produces great curves in aluminum.
Sounds like a nice tool for that job. I'm just about done with the fit. Fortunately, I'm not working for anyone else but myself, so I do the rough in with files and a course dremel metal cutting bit on a 3" shaft and final finish with my fingers, sandpaper and scotch brite pads.
 
Schwany, I have a spare set of steel N15/G15 engine plates. If you think they'd be of any use to you let me know. I'll be in Seattle in a couple of weeks.
Unfortunately, those plates wouldn't work on a P11 frame. Get in touch via PM and stop by to view the beast if you have the time.
 
I just about have the gearbox positioning where I want it. Currently the clutch spins freely inside the closed up primary. I need to get a little more adjustment forward so I can get a belt on easier. I will be using a 25mm 890 length AT10 belt initially. To get a 880 on, which I prefer, would put the gearbox really close to the timing case. It's already too close to run the oil lines over the top. Still may pursue the shorter belt in the future.

The major plate reshaping work was done on the timing side plate and on the shift side of the gearbox case. I did all the work using baby steps so I didn't hog out anything and make it weaker. I have no issues with modifying the gearbox case for those that think is is a bad idea. The case is very thick where the shaping modifications need to be made. The other modification is lengthening the top adjustment slots in the plates in the forward direction.

Once I get gearbox where I want it, I'll make up the add on plates for the lower gearbox mount. Probably finish up next week.

Something else that makes moving the gearbox in and out of the frame dozens of times is taking some material off the top and bottom of the lugs to shorten the overall length of the gearbox a little.

The TTi gearbox really fits nice by the way. The Manx mainshaft length is correct for a P11 and a belt clutch hub and diaphragm spring basket designed for use on a pre-Commando mainshaft.

Pics later
 
My TTI box is 6 speed. In the Seeley frame there is plenty of room. The top bolt of the box is in the same place as with the AMC box - the bottom bolt is further back and down - the plates need to be drilled to suit where it ends-up. Both bolts are bigger diameter, and mine are made from titanium. Making engine plates is easy, I use cardboard, scissors, a jigsaw, linisher and a drill. Don't make it more difficult than it really is. Unbolt the rear engine plates and stand the box where it needs to be. Half of your job is already done - you have the rear engine plates to help you draw part of the cardboard template.
When I was building the Seeley 850 - where the motor and gearbox needed to go was just a big space. I was lucky - I knew where the motor needed to be from experience.
If the rear engine plates are 'full circle', the bike might handle better.
 
Last edited:
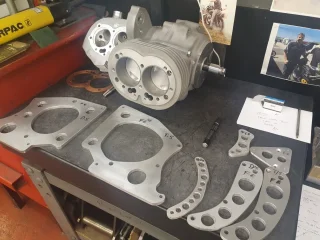
Taking the opportunity to craft ‘full circle’ gearbox plates is a good idea IMHO. Some inspiration…

P11 AMC gearbox out, TTi 5 speed going inP11 AMC gearbox out, TTi 5 speed going inP11 AMC gearbox out, TTi 5 speed going in
 
I'm trying to see if I can make the gearbox fit and still use the short P11 primary covers on a P11 first. I may have mentioned it a few times by now. Once that is done and functional I can make one-piece plates if I feel like it. If I can't make it fit in the P11 primary with what I am using to mock-up the fit, then I'll get a longer primary cover and make one-piece plates. One-piece plates alone won't make using the short P11 primary any easier than it is doing it the way I am doing it. It's not a Seeley frame. I have space limitations to work within.

I can get a 1" longer primary cover in the P11 frame, which would solve a lot of fitting issues. I'm trying to avoid having to use a flat racey primary cover on the P11.

Inspiration for me would be seeing a P11 that somebody else has put a TTi 5 speed in and still been able to use the short primary cover. That is my crazy challenge.
 
I would unbolt the plates from the back of the motor, position the box so the short primary case can be used - then make a setof rear engine plates to suit. Imagineering how to do it might be more difficult than actually doing it. My brother built an 880 JAP motor into a Velocette frame. When he was installing the gearbox, his mate said 'that will never go in there'. Then he watched as my brother lowered the box and rotated one engine plate at the same time. It fitted perfectly.
The tightest engine swap which I have done , was a Triumph 650 engine and gearbox into a BSA A10 frame with full circle rear engine plates - worked well.
 
The TTi 5 speed gearbox is where it needs to be to fit inside the P11 primary cases and work with an RGM belt clutch. I'm not going to document how I plan to finish up things. I may add a pic or two eventually.

If any P11 owners want the finer details of how I installed the gearbox "my way" using the stock engine/gearbox plates they can PM me.

I'm not too sure a one-piece full circle gearbox cradle would be practical maintenance wise in this small frame, but doesn't matter to me since I have no plans to make a set of one-piece engine/gearbox plates with a full circle around the gearbox. I might make a pair of add-on plates that hold the rear lug in place and complete a circle. There are adequate mounting locations to make that happen with plenty of strength to hold the gearbox.

No CAD engineers were injured in the making of this project. Very little over engineering and over thinking was used.
 
Back
Top