Norton Crank reassembly torque procedure

This book has been in my toolbox since my father gave it to my many years ago. Never paid much attention to it as I'm not building aircraft.
Mike, guess your father at Boeing . Original manuals from that era are invaluable…no batteries or Apps needed!!
 
Mike, guess your father at Boeing . Original manuals from that era are invaluable…no batteries or Apps needed!!
I worked there in one of the tooling shops for a while myself in the early 70s. My father started with Piasecki Helicopter Corp in the early 50s. Stayed there till 86 working in flight test.
 
I worked there in one of the tooling shops for a while myself in the early 70s. My father started with Piasecki Helicopter Corp in the early 50s. Stayed there till 86 working in flight test.
Cool stuff 👌😎. Father was with Lancasters then all the way on civil stuff inc 707. Uncle in Canada built and flew Mosquitos…got some of the old manuals…proper !

Apols to everyone else for “all our yesterdays” nostalgia 🙄
 
Cool stuff 👌😎. Father was with Lancasters then all the way on civil stuff inc 707. Uncle in Canada built and flew Mosquitos…got some of the old manuals…proper !

Apols to everyone else for “all our yesterdays” nostalgia 🙄
My dad " Jack" repaired Lancaster radar units on the landing strips , after bombing runs , England . Many were so shot up by flak he was amazed they landed at all . Patch them up , refuel , load up more bombs with a fresher crew then into the skies again . Once he climbed up to open the cockpit hatch and half an arm fell out . He said the only thing that saved his life was airsickness , so he was put on tarmac to fix radar .
 
My father learned his trade in the US 8th Air Force. Served him well at Boeing, Chinooks came off the factory floor, into his hanger and made ready for delivery to customer.
 
I've rebuilt 4 Commando engines and never found any sludge in the trap to speak of. The Commando trap is huge compared to a Triumph or BSA.
Same here. They usually have a little dirty film but nothing like a packed up Triumph.
 
Same here. They usually have a little dirty film but nothing like a packed up Triumph.
My 70 ( no filter and using oils of the time , non detergent ) I had to take a chisel to the built up hard as rock sludge in the trap .
The 3 newer others used more modern oils and oil filters . Sparkling clean traps .
 
When assembling the crank how accurate is it? - The journals are bolted together minus the flywheel to grind and then bolted back onto the flywheel - just how accurate is the positional relationship of the journals to each other? - I ask because my pistons are tipping over in the bores
 
@concours Will the 12mm and 14mm be able to fit on the Norton nuts?
 
When assembling the crank how accurate is it? - The journals are bolted together minus the flywheel to grind and then bolted back onto the flywheel - just how accurate is the positional relationship of the journals to each other? - I ask because my pistons are tipping over in the bores

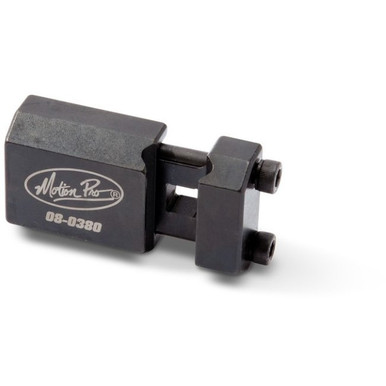
That's why I mount the crank in my lathe between aligned centres for this procedure, it's a tip passed on by Herb Becker but I'm sure it was standard practice by others. As far as torquing, this little doodad has proven to be invaluable for obscured fasteners:


58017556961002d43e316d1627401539__44270.jpg
 
@concours Will the 12mm and 14mm be able to fit on the Norton nuts?
They make a 13, which will work on the 1/2" quite well.

 
You need to hold the crank in a vice.

Then you can get clever with torque wrenches and crows foot attachments etc.

Sadly some hammer wielding Neanderthal‘s still do it as shown in the Mick Hemmings video and simply use two good wrenches (spanners).

This is not as heinous as some believe it to be, a short practice tightening up some nuts by hand, and checking the torque with a torque wrench, and you find you can be surprisingly accurate.
I don't mind being a Neanderthal, just don't call me a gorilla! BTW, using a vice or not, two wrenches (spanners) or a wrench and some sort of torque device (could be wrench with arm) are required of all humanoids! :D

Pre-MK3:
I don't use a vice. I use a wrench on one side bucked against the bench and a torque wrench on the four accessible locations and a wrench and my arm on the two that are not.

I also tighten in a specific order and small amounts at a time. This ensures that the cheeks are flat to the flywheel. The top two studs and the bottom pin locate the cheeks relative to each other. So, starting with all installed, cheeks snug against the flywheel, and all nuts finger tight: Tighten the two middle nuts first, followed by the top two and then the bottom two only going a little tightener each time until close to tight enough. Then torque them.
 
@concours Will the 12mm and 14mm be able to fit on the Norton nuts?

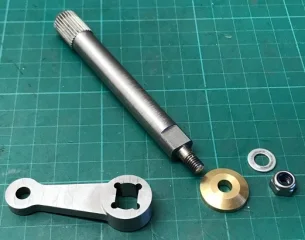
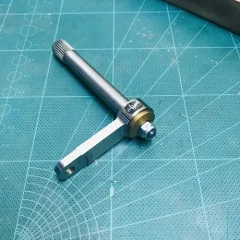
I found there was nothing available off the shelf so made this.
It gave the reach and depth to make it an easy task.

Norton Crank reassembly torque procedure


Its a simple arm with sectioned drives held in place with T.I.G weld.

In my case all of the fasteners are done with that tool in place.
 
@Time Warp I wouldn't be able to machine a piece as nice as that.......... But with with an extension to cut up, a piece of flat bar, a welder and drill press, I think I can make something usable. For various sizes of sockets too.
 
I found there was nothing available off the shelf so made this.
It gave the reach and depth to make it an easy task.

View attachment 112307 View attachment 112308

Its a simple arm with sectioned drives held in place with T.I.G weld.

In my case all of the fasteners are done with that tool in place.
I went to the trouble and made up what you have there only to find I couldn't get it in there with my smallest 1/2"socket!!

I ended up cutting a 1/2" stepped ring spanner in half and welding on a 3/8 socket to the cut off end for the drive
 
I went to the trouble and made up what you have there only to find I couldn't get it in there with my smallest 1/2"socket!!

I ended up cutting a 1/2" stepped ring spanner in half and welding on a 3/8 socket to the cut off end for the drive
Sounds like you have it done. I use a different brand, but one of these: https://a.co/d/69yvqsy

They are useful for more than the crank.
 
I went to the trouble and made up what you have there only to find I couldn't get it in there with my smallest 1/2"socket!!

I ended up cutting a 1/2" stepped ring spanner in half and welding on a 3/8 socket to the cut off end for the drive

That one is 3/8" to 1/4" drive so a thin wall 1/4" socket can be used. (and started out as a shift arm for my Moto Guzzi)

Norton Crank reassembly torque procedure

The Mk2 with a clamp worked much better.

Norton Crank reassembly torque procedure
 
Back
Top