You are using an out of date browser. It may not display this or other websites correctly.
You should upgrade or use an alternative browser.
You should upgrade or use an alternative browser.
Norton Crank reassembly torque procedure
- Thread starter p400
- Start date
Fast Eddie
VIP MEMBER
- Joined
- Oct 4, 2013
- Messages
- 20,665
You need to hold the crank in a vice.
Then you can get clever with torque wrenches and crows foot attachments etc.
Sadly some hammer wielding Neanderthal‘s still do it as shown in the Mick Hemmings video and simply use two good wrenches (spanners).
This is not as heinous as some believe it to be, a short practice tightening up some nuts by hand, and checking the torque with a torque wrench, and you find you can be surprisingly accurate.
- Joined
- May 7, 2005
- Messages
- 6,818
Proud to be a Brummagem Screwdriver wielder.Sadly some hammer wielding Neanderthal‘s still do it as shown in the Mick Hemmings video and simply use two good wrenches (spanners).
Brummagem - Wikipedia
Some blue Loctite covers a lot of sins.
worntorn
VIP MEMBER
- Joined
- Dec 22, 2006
- Messages
- 7,956
Did you find any sludge in the sludge trap?I didnt look real hard in forum, but I have a question on tools and torque on reassembling the seven studs and nuts on a Mk3 crank.
How is the crank held and exactly what tools are used .
View attachment 112190
Glen
marshg246
VIP MEMBER
- Joined
- Jul 12, 2015
- Messages
- 4,127
Yes, and most Commandos have an oil filter which helps quite a bit I think.I've rebuilt 4 Commando engines and never found any sludge in the trap to speak of. The Commando trap is huge compared to a Triumph or BSA.
SteveA
VIP MEMBER
- Joined
- Dec 20, 2011
- Messages
- 3,281
Oh dear, I am that Neanderthal!You need to hold the crank in a vice.
Then you can get clever with torque wrenches and crows foot attachments etc.
Sadly some hammer wielding Neanderthal‘s still do it as shown in the Mick Hemmings video and simply use two good wrenches (spanners).
This is not as heinous as some believe it to be, a short practice tightening up some nuts by hand, and checking the torque with a torque wrench, and you find you can be surprisingly accurate.
But I do put tape around those big ends to prevent spanner mishaps doing damage!
Fast Eddie
VIP MEMBER
- Joined
- Oct 4, 2013
- Messages
- 20,665
So am I Steve !Oh dear, I am that Neanderthal!
But I do put tape around those big ends to prevent spanner mishaps doing damage!
And I’d put good money on the fact the factory workers were too…
- Joined
- Dec 2, 2012
- Messages
- 895
Am usually a Neanderthal but not when I did my engine some time back.
Have seen Mick Hemmings video on engine rebuild I realised there was a very simple way to do the crank that would not have me worrying about it as the rev counter needle swept ever closer to the red bit of the dial.
I got Mick to do it.
Such a shame that he is no longer with us as he did a wonderful job and I never worry about bottom end no matter what the rev counter say.
MikeG
VIP MEMBER
- Joined
- May 31, 2012
- Messages
- 1,242
How many would be careful (or clever) enough to compensate torque wrench readings with the crows foot or other contortions needed to actually gat an accurate reading anyway?You need to hold the crank in a vice.
Then you can get clever with torque wrenches and crows foot attachments etc.
Sadly some hammer wielding Neanderthal‘s still do it as shown in the Mick Hemmings video and simply use two good wrenches (spanners).
This is not as heinous as some believe it to be, a short practice tightening up some nuts by hand, and checking the torque with a torque wrench, and you find you can be surprisingly accurate.
- Joined
- Dec 28, 2009
- Messages
- 5,133
Not moi , that's for sure .How many would be careful (or clever) enough to compensate torque wrench readings with the crows foot or other contortions needed to actually gat an accurate reading anyway?
concours
VIP MEMBER
- Joined
- Dec 29, 2011
- Messages
- 8,745
I didnt look real hard in forum, but I have a question on tools and torque on reassembling the seven studs and nuts on a Mk3 crank.
How is the crank held and exactly what tools are used .
View attachment 112190

Motion Pro Adjustable Torque Wrench Adapter
Motion Pro is dedicated to producing the most versatile, unique and durable products for professional and home use. Motion Pro tools are designed to be simple to use, yet durable enough to withstand the harshest conditions. One of their goals is to offer tools of convenience. Do it right the...
Amazon product ASIN B001GS0ZBY
Several choices. So easy.
Last edited:
Mart UK
VIP MEMBER
- Joined
- Mar 11, 2021
- Messages
- 1,178
If the crow's foot is at 90 degrees to the shaft of the torque wrench, then the torque setting is unchanged. Seems odd, but true.How many would be careful (or clever) enough to compensate torque wrench readings with the crows foot or other contortions needed to actually gat an accurate reading anyway?
- Joined
- Oct 28, 2009
- Messages
- 1,217
If you put two crows feet together, indexed at 180 degrees, I bet the torque reading is unchanged. 
p400
VIP MEMBER
- Joined
- Jul 14, 2014
- Messages
- 1,289
Thanks for advising here.
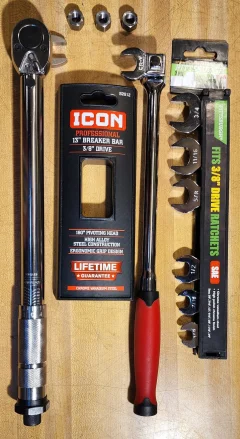
What I did to satisfy myself on torqueing the seven nutted studs with Loctite 243 was to purchase a couple of tools at Harbor freight.
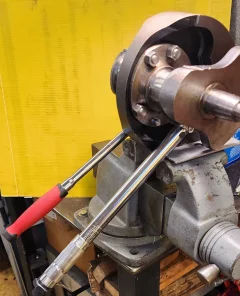
The new 3/8 breaker bar ($30) was long enough to match my torque wrench length so I could keep the crank stable in the vise.
Set of crows feet to get another 9/16" ($14)
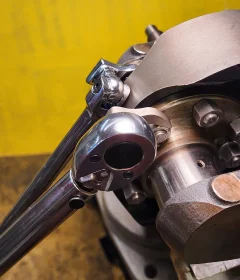
Using two crowsfeet I easily torqued the 14 nuts.


First at each nut pair you apply Loctite and tighten with standard 6" hand wrenches as tight as you can.
Then you come back with crowfeet and apply torque as required 25-30 ftlbs.
What I did to satisfy myself on torqueing the seven nutted studs with Loctite 243 was to purchase a couple of tools at Harbor freight.
The new 3/8 breaker bar ($30) was long enough to match my torque wrench length so I could keep the crank stable in the vise.
Set of crows feet to get another 9/16" ($14)
Using two crowsfeet I easily torqued the 14 nuts.


First at each nut pair you apply Loctite and tighten with standard 6" hand wrenches as tight as you can.
Then you come back with crowfeet and apply torque as required 25-30 ftlbs.
Last edited:
- Joined
- May 7, 2005
- Messages
- 6,818
Engage them at 90 degrees to the wrench and no need for adjustment.How many would be careful (or clever) enough to compensate torque wrench readings with the crows foot or other contortions needed to actually gat an accurate reading anyway?

How to Use a Torque Wrench with a Crowfoot Wrench | TEKTON
Learn how to accurately use a torque wrench with a crowfoot wrench to measure torque. Use the included Torque Conversion Calculator.
- Joined
- May 7, 2005
- Messages
- 6,818
I worked at a car assembly plant during my engineering study for 6 months every year back in the early 80's. First job was to accompany the process engineer to pick up all the newly introduced torque wrenches from the assembly line for recalibration. This was being done on a daily basis as they would not stay calibrated, after 20 odd hours the quality checks showed the bolt torques were drifting out of acceptable range.
So early on the old human arm was a better torque wrench, and that old one you have on your bench will probably have been never checked since you bought it. Hence why I have an old beam torque wrench to calibrate my newer click torque wrench's.
So early on the old human arm was a better torque wrench, and that old one you have on your bench will probably have been never checked since you bought it. Hence why I have an old beam torque wrench to calibrate my newer click torque wrench's.
