I don't really understand the need for a kill switch, whether they fail or not. Seems unlikely to 1) take a spill, and then 2) need the switch and 3) be functionally/physically capable of making use of it. That balanced against accidently hitting it while, say, passing. As for the rest, given that they would mostly be in a strange position for other uses, seems easier to just leave as is. Also more standard if anyone else ever rides the bike. But pure opinion, worth just what it costs.
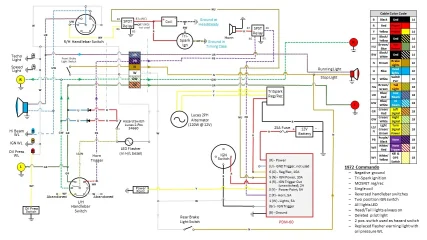
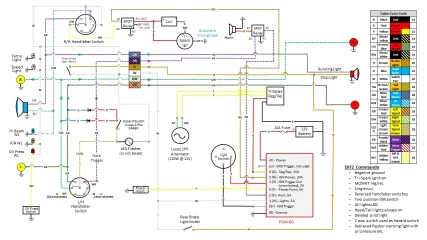
With your change to LED lighting, you will probably have enough alternator output, even with a weak rotor (which is likely after all this time). The zener voltage regulator system can work for purists, but its a balancing act between overcharging (with good rotor, cruise rpm, light elecrical load) and discharging (weak rotor, low rpm, and high load). I'd recommend you replace the zener (assuming you still have that system) with either a modern shunt or series MOSFET regulator (especially since you are going to negative ground anyway). Of these two, I greatly prefer the series type over the more common shunt type (if only on theoretical grounds), but that's a long discussion. Both are way ahead of the zener and will give you longer battery life.


")