LED bulbs for Turn Signals

Joined
Dec 1, 2015
Messages
9
Country flag
I read on this forum about installing an LED bulb for the 961 tail/stop lamp, so I installed it and it is much brighter. So I researched doing the same thing for the turn signals. The 7507 LED's are a little expensive costing U.S.$15 each. It turns out that I don't really need an in-line resistor - the turn signal LED bulbs stay lit for about half a second and flash at a normal rate, but I actually prefer this rhythm to the original incandescent bulbs which stay lit for a shorter time (more strobe-like). The LED's are noticeably brighter than the original bulbs.
The web site is: https://www.superbrightleds.com/moreinf ... ributes/16

If you like the original flashing interval, the in-line resistor can be purchased for $5 at the bottom of the web page - you need one for each bulb, but they are rather bulky. During installation of the LED bulb it's better to completely remove the reflector from the turn signal holder and disconnect the 2 wires; also handle with a soft cloth as the reflector scratches easily. When removing the original bulb, turn anti-clockwise about 10 degrees as usual, then slowly and gently wiggle the bulb to remove, as it's quite a tight fit. As with the original bulb, the LED one has a tower with pins offset by about 150 degrees rather than the usual 180, so make sure the alignment is correct - the LED goes in easier than the original bulb. The only issue is that the top of the LED bulb touches the clear plastic covering lens, but as it doesn't heat up and is only lit sporadically, I don't believe this will be a problem.
 
The flash rate of the motorcycle indicators as supplied from Norton is as specified by the governing bodies of the country of import. Please chcek your local regulations before altering these else you may be breaking the law.
 
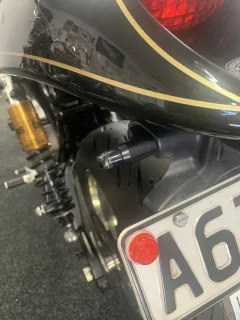
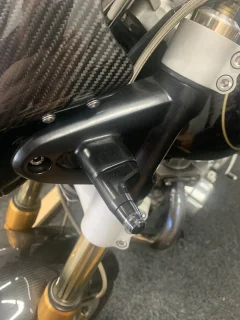
Rather than start a new thread I will add to this one. Has anyone installed LED turn signals and what problems did you encounter ? I had to turn signal relocation brackets .

LED bulbs for Turn Signals


LED bulbs for Turn Signals


LED bulbs for Turn Signals


LED bulbs for Turn Signals
 
Moto gadget with their Triumph adapters and one of their potted relays, all works a treat
.7D095069-985E-45C9-9752-2A5FD98CC517.jpeg0596460C-5227-4E85-915E-E6222B9F0666.jpeg
 
Looking to change my indicators also and love the Rizoma gear - absolutely top quality (if a tad expensive). Don’t want to stray too far from the vintage style though, They have to look like they belong on a classic bike, as opposed to the Millenium Falcon:oops:!

LED bulbs for Turn Signals
 
Looking to change my indicators also and love the Rizoma gear - absolutely top quality (if a tad expensive). Don’t want to stray too far from the vintage style though, They have to look like they belong on a classic bike, as opposed to the Millenium Falcon:oops:!

View attachment 86078View attachment 86079
Rizoma stuff is great. They do them with a multi function option too, ie the rears in a combined stop / tail / indicator function and the fronts in a combined driving light / indicator function. Certainly adds a big element of visibility and therefore safety. Only downside is more wiring work.
 
Hello Lance , Will this relay eliminate the need for my resistors I put on for the led turn signals ? That would be nice !
Yes, stock flasher work at a fixed resistance were this is adjustable so no need to add resistors. They handle 42 watts so most of the single Rizoma turn signals are 1.5 watt and the combined rear turn/brake/stop run about 3 so it handles it all easily. Rizoma also includeds 10 W resistors but I like being able to set the flash rate. Also there are multiple versions of that relay floating around if the orange color doesn't work for you.

A general word of caution. Make sure your wiring of the lights is compatible with the diodes wired into the dash indicator light or you will get feedback. Use existing wires as found and don't combine wires
 
How do you bolt them on ? On the back are you bolting from the rear ? And the front how does it bolt up ? Thanks .
I'll have to have a play and get back, it is a year since i fitted them and the memory is getting rusty.
It is just cap screws from the inside into blind holes in the adapters but i think there was a difference between front and rear.
 
@Stephen_Spencer - I completely get what you mean by preserving the vintage look.

I had these on my Thruxton and would like to see how they look on the 961:


LED bulbs for Turn Signals
 
@Stephen_Spencer - I completely get what you mean by preserving the vintage look.

I had these on my Thruxton and would like to see how they look on the 961:


View attachment 86116
I reckon that they look great - I like the combo’ of black and silver. I’m guessing the black section is platic however. Not am issue, let’s face the originals are all plastic. The Rizoma indicators are machines from billet aluminium though. For me, worth paying a little extra.
 
I like the way these mount ! You say moto gadget with their Triumph adapters ? Is the adapters what allows you to use the stock mounting bolts and location ? This is what I am looking for , Very nice.

I'll have to have a play and get back, it is a year since i fitted them and the memory is getting rusty.
It is just cap screws from the inside into blind holes in the adapters but i think there was a difference between front and rear.
Hi Tony,
'tis coming back to me, i'm pretty sure the factory mounts and the motogadget adaptors are both threaded M6.
I drilled the front mounts to do something different, didn't like that and ended up fitting the Triumph adapters. So that just has a cap screw through from the hidden side of the mount tightening into the blind threaded hole in the adapter. If i went back to the factory indicators i would need a nut on the hidden end.
The back mount isn't modified so could be returned to stock, and the front could be done this way as well. There is a cap screw which threads through the original mount from the inside, the adaptor was wound onto that, with some jiggling of the bolt and adapator you can get the adaptor to act as a lock nut (jam nut). So the cap isnt necessarily tight against the inside of the mount, it gets wound back a bit so that the adaptor is in the correct alignment when it locks both up.
Once all that is done feed the wires through etc. Best to use small connectors so that all could come apart if needed, or leave spare wire length in case the connectors need to be sacrificed.
 
Back
Top