Halfway rearsets anyone? (2020)

Status
Not open for further replies.
Okay - thought it through a bit more and...

View attachment 78691
Any helpful comments welcome!
I’m liking the look of that and is along the lines of what I’m planning. Is the foot peg bolted on? What about the left hand side? I’ve just bought a rough set of foot peg arm, cut the ends off and a mate has shot blasted the chrome off leaving a surprisingly smooth finish. The ends were roughly chopped off to save him blasting away at chrome the he didn’t need to. I’m going to make a jig and the footbed mounting parts, weld then up and road test the position before making the gear lever arrangement or modifying the brake lever. If they feel ‘right’ I’ll carry on.

Dave
Halfway rearsets anyone? (2020)
 
The picture in post #46 shows RHS
For the LHS I'm not going to cut quite as far back as you have.
I'll cut it at the front of the brake switch activation pad, That way I can keep the brake switch "as is". I'll "round" the new front of the hanger for looks.
I will keep the footpeg "stub" that I've cut off and use it, welded vertically to the top of the hanger at about the rear of the clutch inspection cover. The hanger is lower here so will need to have the footpeg raised a bit. Will "fair" the weld for looks.
I'll cut 3" from the brake pedal immediately behind the toe-pad and re-weld the toe-pad on.

I will have both new hangers bright chromed but have the brake pedal and gear-linkage parts satin chromed.
Will refit OEM 4 x rubbers and bingo! - Bernard's your Aunt!
 
Last edited:
Oh - forgot to mention something I'm doing on the RHS
Before I cut the hanger (in about half) I will heat and bend it, in an s-bend, outward by about 3/4".
This is because I will be using the tip of the kickstart which won't have the outward flare that the forward tip of the existing hanger has.
The effect will be such that the new footpeg rubber will project outward the same amount as the existing.
 
Is the foot peg bolted on?
Sorry - didn't answer your question.
The LHS will bolt on exactly as the OEM - after all, I will be reusing the existing hanger tip (see #62 above)
The RHS will use the actual kickstart steel, with a footpeg rubber replacing the kickstart rubber.
That item can be removed by undoing the top nut (see photo in #44) so, I suppose yes, it is bolted on
 
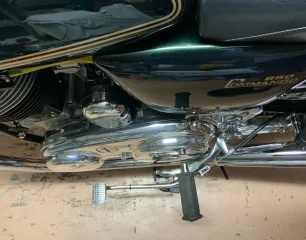
here's a couple of shots showing what my LHS will look like.
Only super-glued at the moment to check fit etc.
BTW - it's exactly 4" back from original position.
LHS 1.JPG
LHS 2.JPG
 
Last edited:
Okay - here's a bit of progress on the RHS.
I have deliberately left the old footpeg on for now to give me valuable points of reference. It'll come off later. To make this work I have ground out where the hanger interferes with the kickstart head position.
In order to have the new footpeg at the same height and outward displacement as the old one, the pivot needs to be a bit below and outside the hanger. So, I've given up on the idea of bending the hanger - I'll simply overlap the hanger and kickstart shank and substantially fill with weld.
This position makes the acorn nut fit just inside (comfortably clearing) the head of the RGM kickstart pivot bolt.
Next is coaxing my friendly neighbour into some TIG welding.
Halfway rearsets anyone? (2020)
 
Okay - here's a bit of progress on the RHS.
I have deliberately left the old footpeg on for now to give me valuable points of reference. It'll come off later. To make this work I have ground out where the hanger interferes with the kickstart head position.
In order to have the new footpeg at the same height and outward displacement as the old one, the pivot needs to be a bit below and outside the hanger. So, I've given up on the idea of bending the hanger - I'll simply overlap the hanger and kickstart shank and substantially fill with weld.
This position makes the acorn nut fit just inside (comfortably clearing) the head of the RGM kickstart pivot bolt.
Next is coaxing my friendly neighbour into some TIG welding.
View attachment 78906View attachment 78907View attachment 78908
Why have you gone for the kickstart option not a folding foot peg? I’m thinking that the pivot will wear and you won’t have an easy option to replace it. I’m looking at using a Norvil folding peg, this one https://www.norvilmotorcycle.co.uk/069967.htm

Dave
 
Why have you gone for the kickstart option not a folding foot peg? I’m thinking that the pivot will wear and you won’t have an easy option to replace it. I’m looking at using a Norvil folding peg, this one https://www.norvilmotorcycle.co.uk/069967.htm

Dave
Well, I may be proven wrong, but I believe those top pivots on OEM kickstarters put up with a lot more wear & tear than most folding footrests - so should perform well where I'm using it.
The other reason is if I want a footpeg at around the 4" rearward mark, there's not much room to play with - If, as is my crazy choice (eh Nigel??), I keep the kickstart on my bike.

Edit: ...oh, and the other (puerile) reason - nothing from LE will ever go on this bike.
 
Last edited:
I’m going to make a jig this weekend so when the welding is done everything is nicely square. Pics will follow.

Dave
Dave - just a heads up on alignment...
In my investigations into this mod I have noticed that stock footpegs are not horizontal, but turned up a bit at the ends.
How much? Not sure, but it's part of the reason I am setting the RHS peg parallel to the existing. Then will use an engineers level to duplicate that on the LHS (cut it a bit early - oops!)
 
Last edited:
BTW - you can clearly see the "oddness" in this concept while being fabricated, but I suspect it will look so "Norton normal" when complete it will not warrant a second look.
We'll see!
 
Dave - just a heads up on alignment...
In my investigations into this mod I have noticed that stock footpegs are not horizontal, but turned up a bit at the ends.
How much? Not sure, but it's part of the reason I am setting the RHS peg parallel to the existing. Then will use an engineers level to duplicate that on the LHS (cut it a bit early - oops!)
I think this may be an ergonomics thing, to support the feet (in a slightly feet splayed out to get outside the pipes/kick starter) and knees in riding position on a roadster.
 
Well, I may be proven wrong, but I believe those top pivots on OEM kickstarters put up with a lot more wear & tear than most folding footrests - so should perform well where I'm using it.
The other reason is if I want a footpeg at around the 4" rearward mark, there's not much room to play with - If, as is my crazy choice (eh Nigel??), I keep the kickstart on my bike.

Edit: ...oh, and the other (puerile) reason - nothing from LE will ever go on this bike.
Make sure you use one with the spring and ball/detent with a curved spring washer so it stays up and out of the way. Nothing worse than coming down on a footpeg when kicking the bike..
 
Make sure you use one with the spring and ball/detent with a curved spring washer so it stays up and out of the way. Nothing worse than coming down on a footpeg when kicking the bike..
Yep got one of those - plus some spare belleville spring washers - to be sure, to be sure!
 
Here's some shots of the super-glued LHS with an un-shortened brake pedal (the zippy-tie shows where the toe-piece will be)
I'm happy with the position and will proceed on this basis.
Edit: BTW, I realise this peg is bent - but will be straight when finished.
LHS 3.JPG


LHS 4.JPGLHS 5.JPGLHS 6.JPG
 
Last edited:
I originally put my foot pegs level and it felt like my feet where trying to fall of the pegs. Soon rectified that ,much more comfortable
 
Status
Not open for further replies.
Back
Top