Fuel Tank Fun.

Bonzo

VIP MEMBER
Joined
May 8, 2022
Messages
865
Country flag
Whilst removing the Interstate tank today, I noticed that the front left hand 5/16" Nyloc stud nut was drawing the fixing stud out with it.

Long story short - it was weeping fuel and sure enough when I tried to insert the stud again the internal 'mount' pulled free with the stud, leaving a nice round hole in the bottom of the tank. I fished it out via the filler cap with a flexible magnet.

Fuel Tank Fun.

Fuel Tank Fun.

Fuel Tank Fun.

So, any suggestions as to how I can fix this?

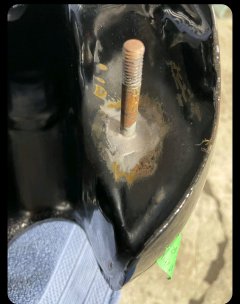
I need to put, this...

Fuel Tank Fun.

in here...

Fuel Tank Fun.

..securely, and without leaking fuel 🤔
 
Last edited:
I had that happen and cured it by turning up some stainless bosses and screwcutting a 7/8 UNF thread on them. Then wiggling the boss into the tank and fastening them in place with a copper washer on the inside and a thin nut on the outside. Saved the paint job on the tank and has been leak free since. Other than that, it is to weld repair it.. Wash the tank out first and then fill with water to just shy of the hole (tank upside down) This should minimise the damage to the paintwork
 
Yeah, I'd dearly like to keep the paintwork intact as it's original & has patina, and so if there was any way around it avoiding welding, that would be my first option.

I'm trying to get my head around your stainless boss method dobba 🤔
 
Last edited:
I had that happen and cured it by turning up some stainless bosses and screwcutting a 7/8 UNF thread on them. Then wiggling the boss into the tank and fastening them in place with a copper washer on the inside and a thin nut on the outside. Saved the paint job on the tank and has been leak free since. Other than that, it is to weld repair it.. Wash the tank out first and then fill with water to just shy of the hole (tank upside down) This should minimise the damage to the paintwork
Would you mind posting a sketch of what you've done?
My cNw (#134) original green tank has both bosses cracked and I have been unable to find anyone to do the repair without ruining the fantastic paint job.
I was just lucky I had just bought a set of tinware from our @Dellis
Your solution sounds great - I would just add some loctite 577 (I think?) - petrol proof sealant.
Cheers
Fuel Tank Fun.
 
BTW - in an effort to prevent future failures of this type, I have:
1. Put adhesive foam padding on the frame spine for more than the rear half of the tank (none in the tank tunnel). Makes it easy to inspect/maintain/ add to.
2. Put a foam washers between the front steel washers and the frame tabs - now cushions in both directions, not just downwards.
Cheers
 
Would you mind posting a sketch of what you've done?
My cNw (#134) original green tank has both bosses cracked and I have been unable to find anyone to do the repair without ruining the fantastic paint job.
I was just lucky I had just bought a set of tinware from our @Dellis
Your solution sounds great - I would just add some loctite 577 (I think?) - petrol proof sealant.
Cheers
View attachment 118496
As requested a drawing (sorry free hand!)

When fitting the tank onto the bike, make sure the tunnel is supported with the foam pads and is also sitting on the front mounts, add/remove rubber washers to achieve this, use a rubber washer under the mount as well. Don't pull the front down onto the rubber mounts, The tank Just needs holding in place, not bolting down hard. Use nyloc nuts on the stud.
 
Last edited:
The stud being screwed directly into the insert and the use of a frame mounting bracket that ends up from the factory at odd angles and positions means even with the rubber washer stack the stud is under strain and pulls on the insert with vibration making it worse.

So I follow the suggestion from an earlier post (Dynodave?) and use a Mini waisted rubber isolation buffer, note the use of a rubber washer above the buffer next to the tank so the top stud does not bottom out in the insert.

Fuel Tank Fun.


A proper Mini buffer with have the 5/16 UNF thread.
 
Last edited:
As requested a drawing (sorry free hand!)

When fitting the tank onto the bike, make sure the tunnel is supported with the foam pads and is also sitting on the front mounts, add/remove rubber washers to achieve this, use a rubber washer under the mount as well. Don't pull the front down onto the rubber mounts, The tank Just needs holding in place, not bolting down hard.


Great help thanks dobba 👍
 
The stud being screwed directly into the insert and the use of a frame mounting bracket that ends up from the factory at odd angles and positions means even with the rubber washer stack the stud is under strain and pulls on the insert with vibration making it worse.

So I follow the suggestion from an earlier post (Dynodave?) and use a Mini waisted rubber isolation buffer, note the use of a rubber washer above the buffer next to the tank so the top stud does not bottom out in the insert.

Fuel Tank Fun.


A proper Mini buffer with have the 5/16 UNF thread.

I in fact bought four of those a couple of years ago. Mini exhaust bobbins (from Wood & Pickett Ltd)...

Fuel Tank Fun.
 
As requested a drawing (sorry free hand!)

When fitting the tank onto the bike, make sure the tunnel is supported with the foam pads and is also sitting on the front mounts, add/remove rubber washers to achieve this, use a rubber washer under the mount as well. Don't pull the front down onto the rubber mounts, The tank Just needs holding in place, not bolting down hard.

Thanks Dobba - that's what I'll do.
Cheers
 
The stud being screwed directly into the insert and the use of a frame mounting bracket that ends up from the factory at odd angles and positions means even with the rubber washer stack the stud is under strain and pulls on the insert with vibration making it worse.

So I follow the suggestion from an earlier post (Dynodave?) and use a Mini waisted rubber isolation buffer, note the use of a rubber washer above the buffer next to the tank so the top stud does not bottom out in the insert.

Fuel Tank Fun.


A proper Mini buffer with have the 5/16 UNF thread.
Thanks
Is there a reason for using the foam washer instead of shortening the male thread to ensure it does not bottom?
Cheers
 
Thanks
Is there a reason for using the foam washer instead of shortening the male thread to ensure it does not bottom?
Cheers

Without measuring, perhaps shortening it wouldn't leave enough thread for the bottom nyloc washer? (and also a bit more vibration insulation?)
 
Without measuring, perhaps shortening it wouldn't leave enough thread for the bottom nyloc washer? (and also a bit more vibration insulation?)
I was suggesting that the upper threaded rod of the mount be shortened.
Would not effect the nyloc/washer(s) etc.
Just would allow the upper surface of the rib mount to seat against the tank.
 
Well with a rubber dampener between the top and bottom studs there's not much to grab onto and ending using a hacksaw leaves you needing to clean up the end and recutting the thread and losing the zinc plating, so an extra rubber washer was the best fix. The buffer is thinner and softer than the normal stack so unless your mounting bracket is too high then it works.
 
I in fact bought four of those a couple of years ago. Mini exhaust bobbins (from Wood & Pickett Ltd)...

Fuel Tank Fun.
Those look like 8mm thread. Original mini (back in the 70s, 80s were 5/16 unf)
Nothing wrong in using the rubber bobbins (even our silencer bobbins) just make sure you are still not pulling the tank down. When my tank mounts cracked i had it mounted with rubber bobbins but i had overlooked this point. I had pulled the tank down to sit on the rubber mounts, not by much maybe 2-3mm but enough to cause bother....

Yep, they're 5/16" UNF.

The nyloc nut goes on nicely - as does the bobbin into the insert 👍
 
Last edited:
I've always just made the rubbers lightly touch, rather than clamping hard. The nylock keeping the nut from backing off.


And I really like the wasted bobbin idea. 💡
 
A friend had this same issue on a Mk3 roadster tank...caught it leaking before it pulled out entirely. Took it to a bike restorer and he welded or brazed it up...not any paint damage other than immediate area around the hole, not reaching top side good stuff.
This bike and extended length studs, such that the tank sat quite high, front tunnel cut out sitting above the steering post. This likely caused this stress crack, as no other padding underneath at front to take load off the stud holes. I had owner pad it up with layers of rubber.

EDIT: The affected area around repair was hit with a black paint by owner to clean it up. Looks fine.
 

Attachments

  • Fuel Tank Fun.
    Screenshot_20250216_104223_Messenger.jpg
    189.4 KB · Views: 50
Last edited:
Back
Top