'71 750 Commando Rebuild

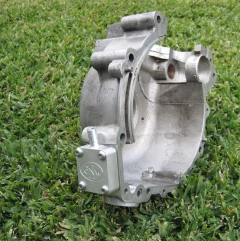
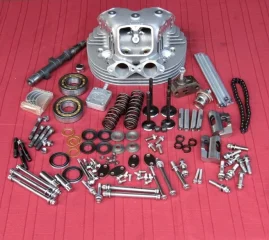
Finished the crankcase breather - thanks Matt for the kit and comnoz for the engineering know how.
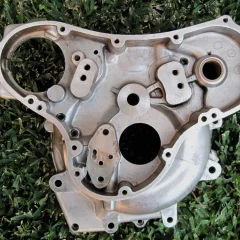
Tapped and blocked off the redundant passages into the timing side with 2 x 3/8" UNC + 1 x 1/4" UNC black socket head grub screws.
Drilled a 1/4" hole for drainage back into the crank case - bottom left side of the oil pump boss.
I'll Red Loctite the grub screws and breather screws after vapour blasting.


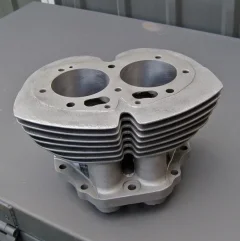
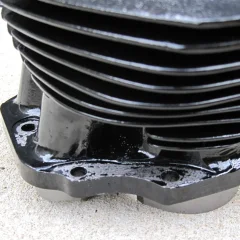
Barrels bead blasted and rebored + .020".
Yet to decide on rattle can High Temp Black or Powdercoat.
 

Attachments

  • '71 750 Commando Rebuild
    IMG_6287_2.jpeg
    432.2 KB · Views: 649
  • '71 750 Commando Rebuild
    IMG_6403.jpg
    474.4 KB · Views: 665
  • '71 750 Commando Rebuild
    IMG_6184.jpg
    188.6 KB · Views: 638
I trust red locktite a lot. But, it wouldn't be a bad idea to center punch the sides of your grub screws. Especially because those are never coming out again.
 
motorson said:
I trust red locktite a lot. But, it wouldn't be a bad idea to center punch the sides of your grub screws. Especially because those are never coming out again.
Yeah, good call motorson.
That reminds me about the crank bolts. :idea:
The top four were punched when I stripped it (bottom two studs had the locking tabs bent over).
Definitely good for peace of mind.
 
Just received my first shipment of quality "bling" from cNw.
They'd have to be the finest motorcycle products I've ever had in hand - and they came with installation instructions.
Expensive gear, but you get what you pay for.
In the past I've ended up going without altogether because of affordability issues and my reluctance to buy poor quality products.
Not this time. It's a once in a lifetime build so I'm "goin' top shelf" - even if it means recycling assets.
Obviously there are plenty of mid priced items out there that are more than adequate for a vintage motorcycle rebuild but, it seems the growing trend of setting up in Asia and bangin' out cheap shit is on the up.
 

Attachments

  • '71 750 Commando Rebuild
    IMG_6443.jpg
    311.9 KB · Views: 575
The more you get from Matt... the more impressed you will be...

As you say, you get what you pay for. On top of that, my philosophy is that if you are going to keep a bike for a long time, the extra cost of 'doing it right' is nothing when amortised over those years. Balance that with the enjoyment and pride you will have from having 'done it right' and its a no brainer...

Wives tend not to agree. But wadda they know...?!?
 
Fast Eddie said:
my philosophy is that if you are going to keep a bike for a long time, the extra cost of 'doing it right' is nothing when amortised over those years. Balance that with the enjoyment and pride you will have from having 'done it right' and its a no brainer...

Wives tend not to agree. But wadda they know...?!?

Well said Fast Eddie.

I'll drink ta that.

In fact - I am :wink:
 
Stuffed up the paint job on the barrels.
I used VHT Caliper paint - aerosol.
Their Engine paint has Engine Primer listed but not the Caliper paint - so I didn't use it.
Bad move. I should of known better.
Went to trial fit it with my new cNw / ARP barrel studs and the paint chipped off around the holes.
Scraped the flange with a screwdriver and it came off pretty easily.
As far as the prep goes I was thorough (except for the primer) :
# Scrubbed it in a bucket with HD detergent - hosed off and dried out in the sun.
# Next day hit it with compressed air, brushed it down with prepsol wax and grease remover and wiped dry with a clean rag.
# Masked it up and sprayed with contact cleaner (alcohol) - another clean rag wipe.
# Gave it the once over with a heat gun.
# Weather was sunny, 22 deg C, no wind, low humidity.
# Gave it one light coat followed by two medium coats - looked good.
# Let it dry for 3 hours in the sun, then baked it the oven for 1 hour @ 100 deg C (wifey's in the States) 8)

I definitely advise primer for anyone attempting this with VHT Caliper paint.
I just had a good read of the Barrel Coatings/Heat Dissipation thread by comnoz.
I'm goin' Powder Coat this time - I'll drop it off when I pick up the frame.
 

Attachments

  • '71 750 Commando Rebuild
    VHT.jpg
    257.1 KB · Views: 541
I used some caliper paint on some small frame pieces I needed to paint, and used primer with them. I was not happy with the results of the finish as it just looked very sloppy despite careful application, and ended up stripping it off. Rustoleum ended up looking great.
 
gortnipper said:
Rustoleum ended up looking great.
Yeah, came across this guy during my research - good for 650 deg C.
Went for the name brand.
Still, I left out a major ingredient...............PRIMER.
 

Attachments

  • '71 750 Commando Rebuild
    Rusto.jpg
    40 KB · Views: 496
I've bought nearly everything I need for the engine rebuild :
* cNw/Comstock crankcase breather.
* 2 x FAG NJ306E.M1.C3 crankshaft bearings.
* A.N. crank hardware with STD big end shells.
* Webcam # 312 camshaft.
* Emgo(JCC) pistons with Hastings rings (not pictured-at the crank balancer).
* A.N. lifters.
* A.N. rocker spindles.
* Kibblewhite pushrods/valves/valve springs.
* cNw/ARP engine fasteners (head bolts not pictured-back to cNw in exchange for waisted shank upgrade).
* A.N. oil pump.
* A.N. timing chain.
* And the crowning jewel - Fullauto Head.
My original plan was to get the motor rebuilt first.
I'm not sure it's such a good idea to have a freshly rebuilt motor sitting around for what could turn out to be - a long while, so........ I'm going to put the bits back in their boxes and tackle the frame and associated parts first.
 

Attachments

  • '71 750 Commando Rebuild
    IMG_6633.jpeg
    217.7 KB · Views: 778
grandpaul said:
Nice little stack of parts right there...
Yeah, it was good to tick those items off the list Paul.
Don't think I'll bother doin' a set shot like that again though.
Much easier gettin' 'em outa the bags, than back in :x
 
ELMZY said:
grandpaul said:
Nice little stack of parts right there...
Yeah, it was good to tick those items off the list Paul.
Don't think I'll bother doin' a set shot like that again though.
Much easier gettin' 'em outa the bags, than back in :x

No! Keep the pictures coming...!
 
Good to be at the bottom of the down hill run.
Time to hit the hill climb :shock:
 

Attachments

  • '71 750 Commando Rebuild
    IMG_6795.JPG
    160.5 KB · Views: 646
  • '71 750 Commando Rebuild
    IMG_6842.JPG
    190 KB · Views: 671
  • '71 750 Commando Rebuild
    IMG_6877.JPG
    183.6 KB · Views: 661
  • '71 750 Commando Rebuild
    IMG_6778.JPG
    148.1 KB · Views: 649
Fast Eddie said:
Gotta ask tho... Why the black battery tray?
Ah, yes............colour.
You might need a "cuppa tea 'n a lie down" after this one Fast Eddie.
I think this box belongs to Pandora.
Admittedly, that battery tray looks out of place at the moment. And it's soon to be joined by an oil tank, back in black from the cNw mod shop. But when the side covers and seat are on, only the front lugs that connect to the rear iso mount will be visible. And then they become more of a splash of black, much like a foot peg rubber or a plug lead.
I've spent way too much time thinking about colour and the influence of online imagery. Us backyarders have never had it better when it comes to "borrowing" ideas from the professionals creations, so it's pretty obvious where the silver frame look originates - in my case anyway. I did have a black with black and more black (with shiny hardware highlights) idea for a while. But it was only in my minds eye, and I didn't trust it's point of view.
So, there'll be no more black on this build.....except for the seat...........oh, and the tyres...............and the grips............ :mrgreen:
 
ELMZY said:
Fast Eddie said:
Gotta ask tho... Why the black battery tray?
Ah, yes............colour.
You might need a "cuppa tea 'n a lie down" after this one Fast Eddie.
I think this box belongs to Pandora.
Admittedly, that battery tray looks out of place at the moment. And it's soon to be joined by an oil tank, back in black from the cNw mod shop. But when the side covers and seat are on, only the front lugs that connect to the rear iso mount will be visible. And then they become more of a splash of black, much like a foot peg rubber or a plug lead.
I've spent way too much time thinking about colour and the influence of online imagery. Us backyarders have never had it better when it comes to "borrowing" ideas from the professionals creations, so it's pretty obvious where the silver frame look originates - in my case anyway. I did have a black with black and more black (with shiny hardware highlights) idea for a while. But it was only in my minds eye, and I didn't trust it's point of view.
So, there'll be no more black on this build.....except for the seat...........oh, and the tyres...............and the grips............ :mrgreen:

Oops, didn't mean to 're open the stress' on this one matey! I know what that's like for sure. Trouble is, the more details you stress over and resolve... the more you create!

Anyway, that silver frame looks stunning. If revenge makes you feel better then you'll be glad to know that despite stressing over my frame choice for ages... And deciding on black... You've now got me thinking I shudda gone for silver!

Stripping mine down again would be stupid of course... But then again... I could review the TTI question... and the FA head... not to mention Maney 920 barrels... For which, Maney cases would be nice...

Anyone know a good shrink...?
 
I must say ELMZY that I have been following along on your build thread and that I too have always thought that a silver or grey frame is the way to go. I will probably be using a POR-15 gray paint (to keep it somewhat flat or less shiny). Yours looks great though!! Thanks for posting & keep 'um coming :mrgreen:
 
Back
Top