'71 750 Commando Rebuild

Joined
Apr 21, 2016
Messages
46
Country flag
Hi everyone.
In preparation for my return to this classic motorcycle I've absorbed a lot of valuable information from this forum. With that in mind and having recently secured a project bike - it's time to contribute (first post).
I had a MK 111 850 when I was a young bloke so my original plan was to find another one (at a reasonable price) for a complete rebuild. Easier said than done here in Australia.
The search was draggin' on.
Then a 750 "barn find" U.S. import turned up locally.
Reality bit.
Now there's finally a Norton Commando in my back shed - and I'm happy.
It'll probably be a slow thread due to funding - and my bias towards shiny bits and attention to detail (too much time ogling the cNw image gallery). As far as the process goes, my mechanical expertise is limited so the heart of the matter (motor) will be rebuilt by a professional and I'll have a crack at the rest. And there will be mods. I guess that makes me more of an assembler than a rebuilder.
I'll post Day 1 photos when I figure it out.
 
Don't sell yourself short. those pinheads at Orange County Choppers (Paul and Pauler) claim to build bikes when they do little more than make tanks and fenders other than wiring and assembly. Almost all their real work is farmed out to specialists and catalog parts houses. And they have a TV show.
 
Welcome to the forum.

Plenty of excellent resources here.

You'll get on fine.
 
Thanks for the encouraging words fellas.
Here's a few pics.
'71 750 Commando Rebuild

The fibreglass tank/side covers and that strange looking seat will be discarded.

'71 750 Commando Rebuild

The back mudguard looks suspect too.

'71 750 Commando Rebuild

Sadly, this bike's been left out in the weather for some time.
Most of the frame rust is surface and should clean up ok.
The only area of concern for me is the bolt area around the rear guard bracket/plate.

'71 750 Commando Rebuild

RH side fins look ok.

'71 750 Commando Rebuild

LH side fins look ok.

'71 750 Commando Rebuild

Check out the side stand mount.
When I got her home I flicked it out and leant her over, the u-bolts rotated on the frame and she crashed into my thigh. I nearly went down on day 1 without even throwin' a leg over her.
On a more serious note - I don't like the look of those rust stains around the inspection holes.

'71 750 Commando Rebuild

Ancient rubber.

'71 750 Commando Rebuild

Apart from some of the fork internals, I'll probably only use the LH slider for the new disc front end.

'71 750 Commando Rebuild

The numbers

'71 750 Commando Rebuild

Match.

'71 750 Commando Rebuild

Someone tried to take the head off but couldn't do the pushrod shuffle.
It's a worry - because the motor's seized.
They also "misplaced" the Amals and headsteady.

'71 750 Commando Rebuild

Any Aussies out there know of an oil tank restoration/modification service here in Oz ?
Similar to what Colorado Norton Works offer ?
 
That's a 74 or 75 Commando seat and looks like with some cleaning it might be salvagable. I sure wouldn't trash it. Sell it on ebay if you don't want it or put the correct 71 cover on it.
 
Yeah, I agree htown. I won't chuck it - it's in pretty good nick.
I don't think it's off a '75 though. From memory they were a lot thicker and had a hinge on them.
In any case, it's not relevant to this build. I've got "ducks disease" - so I'll be doin' the modified Corbin Gunfighter thing.
 
Well it's definitely a 74. I have one just like it. I wasn't sure if the 75 was the same or not.
 
I managed to take the head off and it looks bad in there.
I soaked it in WD40 for a day or so and gave it a light scrub with a scotch pad .
Most off the gunk came off to reveal a badly rust pitted bore. It's no wonder the pistons won't budge.
'71 750 Commando Rebuild

Looks like whoever attempted to remove the head had trouble with a stud.

'71 750 Commando Rebuild

The left side is the worst.

'71 750 Commando Rebuild

Fugly.

Any suggestions on how to free it up and remove the barrels ?
 
Mix 50/50 automatic transmission fluid and acetone. Fill the bores with the mix, cover them and let sit for a few days.
 
This looks like a good project, things missing like exhausts and carbs you would likely be replacing anyway. If you plan to put a disc setup on it the lower legs are both different to the drum setup, they have a more oval shape and more meat on them. Why not keep the drum to begin with, RGM Motors have some new brake shoes that make these work quite well. If you do decide to convert it the drum backing plate is worth a decent amount of money on the 2nd hand market. A bit of heat from a propane torch and some kind of drift with a hammer will help to budge the pistons and remove the barrels after leaving them sitting with penetrating fluid as suggested by htown16.

A couple of special tools like a clutch compressor, clutch holder and crank pinion puller might come in handy.

Good luck with this, you will enjoy the journey.
 
htown16 :
Thanks for the heads up on the ATF/acetone mix.
It wasn't as bad as I thought. After a few more days with the WD40 I decided to give the pistons a wack with a rubber mallet and they moved about 20mm - so no rust below. I couldn't kick them up back past the rust though, so I knocked them back down and hand honed the top of the bores with 240 wet/dry and Inox and up she came.
There's no discernible lip at the top of the bores so, with good contact onto the walls, I took a few preliminary measurements (estimates) with a vernier caliper (don't have a proper bore gauge) and highest estimate was 72.92mm.
The pistons are stamped STD so it looks like a stock bore (73mm?). Hard to believe on a 45yo bike.
Anyway, it gives me hope that a rebore will take out the rust pits.
dave M :
Thanks for the reminder about the fork slider differences - I remember reading about that on this forum a few years back (debby).
I'm pretty keen for the disc front end so it's lookin' like 2 more sliders.
 
Dismantling process has been slow.
Seems life has it's way of interfering with hobbies and other selfish pursuits.
Some assessments:
The rear axle was rusted into the hub bearing spacer and difficult to remove (yes, it was disconnected from the stub axle).
Instead of using some kind of mechanical extractor I decided to short cut it and use vice grips and a hammer.
I measured the process consistently and achieved 2-3 mm increments until it was out.
Further inspection revealed that I MAY have inadvertently damaged the swingarm in the process.
The drive side axle slot/lug is bent and the torque stop slot is out of shape.
I didn't check/notice it before so I'll take the rap for it.
On a positive note - the bike gets a new, stronger, gusseted swingarm upgrade.

'71 750 Commando Rebuild


'71 750 Commando Rebuild
 
There's been a few shots on this forum of a modification to the upper rear corner of the gearbox cradle opening (kickstart side) to allow gearbox removal without undoing any engine mount bolts.
There are those that believe it may compromise the structural integrity of that area of the framework.
And there are some reputable rebuilders that do the mod with no apparent problems.
I like the idea so I decided to do a dummy run with the bottom end of the motor in place during disassembly, to see what I was up for.

'71 750 Commando Rebuild

The gearbox needs to be rotated about a quarter turn anticlockwise to position the bottom mount in the bottom righthand corner of the opening and up against the back of the crankcase (above).
This puts the top mount diagonally opposite and reveals the need for at least a 15mm cutout to clear the top mount (below).
'71 750 Commando Rebuild


No problem thus far, until I factor in another mod I've had in mind - the cNw/Comstock crankcase breather.
With it mounted on the rear of the crankcase, the gearbox will be pushed back a bit further and the chunk out of the cradle will be a bit bigger.
Anyone out there have both mods ?
Any info in this area would be greatly appreciated.
 
I bought a new "Hybrid" gearbox/engine cradle from AN.
'71 750 Commando Rebuild


It has the Mark 111 cotter pin swing arm spindle fix housings (above).
And pre drilled oil filter mount holes (below) - absent on the '71.
'71 750 Commando Rebuild

'71 750 Commando Rebuild

I finished the gearbox removal mod (above)
The piece of 12mm ply wood, bottom right, is to simulate a cNw/Comstock crankcase breather.
And the cut out, top left, for the top gearbox mount - with 5 or 6 mm to spare.
I also drilled another hole for a double sided primary chain/belt adjuster (below).
'71 750 Commando Rebuild
 
Engine Trouble.
'71 750 Commando Rebuild

This original slotted piston may not of "flipped it's lid" as some are reported to have done (above).
But it did drop a piece of skirt (below).
The importer drained the crank for transport so I was surprised to find it - in the timing case.
There aren't many passages into the '71 timing side so the odds were pretty high.
'71 750 Commando Rebuild


'71 750 Commando Rebuild


'71 750 Commando Rebuild

Evidence of a few rough revs around the crank (above).
I'm guessing this breakdown was a long time ago by the 13,000 miles on the speedo.
And the condition of the crank journals (below).
They've held their shape and are within spec for a new set of standard bearing shells - and new crank hardware.
'71 750 Commando Rebuild


'71 750 Commando Rebuild

Some black cheese in the sludge trap (above).
I was expecting more, considering it ran without an oil filter.
 
Photo links are screwy.

There is no way to get piston debris bigger than about 1/4" into the timing case, unless it involved tools and fingers.
 
"There is no way to get piston debris bigger than about 1/4" into the timing case, unless it involved tools and fingers."

Tools and fingers ? WTF ?

That negative inference surprises me more than that piece of metal I FOUND down near the oil pump.

But thanks for the heads up on my choice of Image format.
It seemed like such a good idea at the time.
 
I'm just saying that any metal in the timing chest would have to fit through the transfer hole(s) which measure around 1/4" (3/8"?)

Nothing implied or inferred.
 
Last few frame mods before a visit to the powder coater.

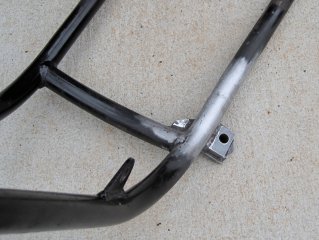
Had the later model side stand lug welded on (Old Britts Tech Article).
Still a couple of crimp marks on top of the tube where the PO had the double U bolt aftermarket lug attached.
The worst ones were underneath so I got the welder to fill them in.

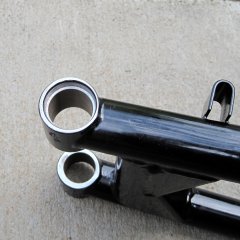
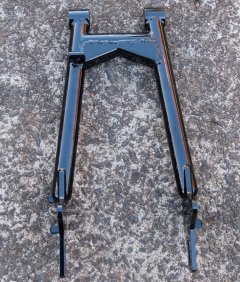
Bought a new swing arm with the gusseted cross member from AN, and had the plug housings machined a little deeper to suit the MK 111 shorter bushes and lube disc/welch plug set up (Old Britts Tech Article).
 

Attachments

  • '71 750 Commando Rebuild
    IMG_6150.jpeg
    196.7 KB · Views: 687
  • '71 750 Commando Rebuild
    IMG_5973.jpeg
    469.9 KB · Views: 675
  • '71 750 Commando Rebuild
    IMG_6138.jpeg
    419.3 KB · Views: 685
Back
Top