
You are using an out of date browser. It may not display this or other websites correctly.
You should upgrade or use an alternative browser.
You should upgrade or use an alternative browser.
'71 750 Commando Rebuild
- Thread starter ELMZY
- Start date
ELMZY
VIP MEMBER
- Joined
- Apr 21, 2016
- Messages
- 48
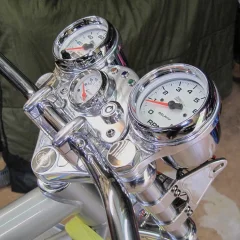
A few more deliveries from the northern hemisphere.
cNw : Electronic Gauges, Headlight Ears, Fork Seal Retainers, Top Fork Nuts, Engine Replacement Jig, Oil Tank Mod.
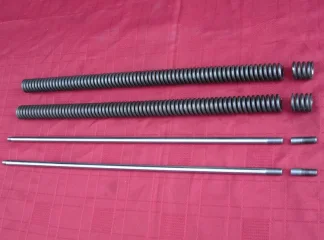
A.N. : Fork Stanchions, Fork Sliders, Fork springs, Fork Rebuild Kit.
RGM : Alloy Fork Damper and Cap, Long Top Bushes.
The only negative I can recall from the '75 Commando I had in the late 70's was the seat height. Only getting one foot on the ground was a nuisance - especially with a pillion passenger. I moved on to a Shovelhead Harley and although getting both feet flat was great, I found the ground clearance a handling compromise. In 15 years and a lot of miles across Australia I ground through 2 Primary covers on that bike. Great on the highways not so good on the bends.
In an effort to find some middle ground I've decided to lower this one 1.3" and use a custom Corbin seat.
I bought Atlas Stanchions which are 1 1/4 inches shorter than Commandos, then cut 1.3" off a set of standard springs and cut 1.3" off the top of my original rods and rethreaded them. I put Ikon 7610-1307 shocks on the back. They're 11.8" eye to eye compared to 12.9" for standard shocks. Any other shortarses out there interested - there's a thread on this forum in which Matt from cNw details his experiences lowering Commandos.
cNw : Electronic Gauges, Headlight Ears, Fork Seal Retainers, Top Fork Nuts, Engine Replacement Jig, Oil Tank Mod.
A.N. : Fork Stanchions, Fork Sliders, Fork springs, Fork Rebuild Kit.
RGM : Alloy Fork Damper and Cap, Long Top Bushes.
The only negative I can recall from the '75 Commando I had in the late 70's was the seat height. Only getting one foot on the ground was a nuisance - especially with a pillion passenger. I moved on to a Shovelhead Harley and although getting both feet flat was great, I found the ground clearance a handling compromise. In 15 years and a lot of miles across Australia I ground through 2 Primary covers on that bike. Great on the highways not so good on the bends.
In an effort to find some middle ground I've decided to lower this one 1.3" and use a custom Corbin seat.
I bought Atlas Stanchions which are 1 1/4 inches shorter than Commandos, then cut 1.3" off a set of standard springs and cut 1.3" off the top of my original rods and rethreaded them. I put Ikon 7610-1307 shocks on the back. They're 11.8" eye to eye compared to 12.9" for standard shocks. Any other shortarses out there interested - there's a thread on this forum in which Matt from cNw details his experiences lowering Commandos.
Attachments
Fast Eddie
VIP MEMBER
- Joined
- Oct 4, 2013
- Messages
- 21,854
Excellent work there ELMZY, you continue to impress. Please keep the updates coming.
About the only thing you didn't explain fully was... the handle bars. What are they exactly?
What's the paintwork plans for the tinware?
About the only thing you didn't explain fully was... the handle bars. What are they exactly?
What's the paintwork plans for the tinware?
ELMZY
VIP MEMBER
- Joined
- Apr 21, 2016
- Messages
- 48
Thanks FE.Fast Eddie said:Excellent work there ELMZY, you continue to impress. Please keep the updates coming.
About the only thing you didn't explain fully was... the handle bars. What are they exactly?
What's the paintwork plans for the tinware?
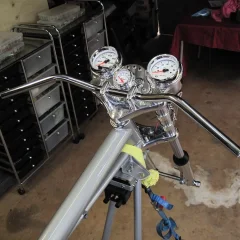
I bought the bars locally. Genuine A.N. 06-4132, UK or EU Interstate I think.
They were 31 1/2" wide, 2 1/2 rise, 5" pull back.
Too wide for me - especially if I use bar end mirrors.
So, I cut 2" off each end and they're just under 28" total width now.
It's all about triangulation for me. Wide bars tend to open me up too much - and get uncomfortable on a long ride.
Paint work, hmmm - I haven't been drinking this time so hopefully it won't come across as a ramble.
I used to be an Auto Spraypainter back in another life so I'll be brushing the cobwebs off and hitting it with 2 pack basecoat and clear - when the time comes.
I'll be making my own stencils for the logos (on a vinyl cutter). I'll stick them on a silver base, spray with either Gunmetal Grey Met or Graphite, peel the decals off and Topcoat Clear the lot.
No colour on this one - 50 shades of Grey so to speak.
- Joined
- Nov 11, 2013
- Messages
- 5,403
I love the many shades of grey. I used to do a lot of BW photography when I had my mk3 and I still over the play of monochrome light.
Fast Eddie
VIP MEMBER
- Joined
- Oct 4, 2013
- Messages
- 21,854
ELMZY said:Thanks FE.Fast Eddie said:Excellent work there ELMZY, you continue to impress. Please keep the updates coming.
About the only thing you didn't explain fully was... the handle bars. What are they exactly?
What's the paintwork plans for the tinware?
I bought the bars locally. Genuine A.N. 06-4132, UK or EU Interstate I think.
They were 31 1/2" wide, 2 1/2 rise, 5" pull back.
Too wide for me - especially if I use bar end mirrors.
So, I cut 2" off each end and they're just under 28" total width now.
It's all about triangulation for me. Wide bars tend to open me up too much - and get uncomfortable on a long ride.
Paint work, hmmm - I haven't been drinking this time so hopefully it won't come across as a ramble.
I used to be an Auto Spraypainter back in another life so I'll be brushing the cobwebs off and hitting it with 2 pack basecoat and clear - when the time comes.
I'll be making my own stencils for the logos (on a vinyl cutter). I'll stick them on a silver base, spray with either Gunmetal Grey Met or Graphite, peel the decals off and Topcoat Clear the lot.
No colour on this one - 50 shades of Grey so to speak.
Thanks.
You do know that Matt supplies stencils for his very subtly modified / neat version of the logo's ?
ELMZY
VIP MEMBER
- Joined
- Apr 21, 2016
- Messages
- 48
No I didn't know that he sells them. I'm trying hard to do as much as I can myself on this build - if I'm capable and the quality is good.Fast Eddie said:You do know that Matt supplies stencils for his very subtly modified / neat version of the logo's ?
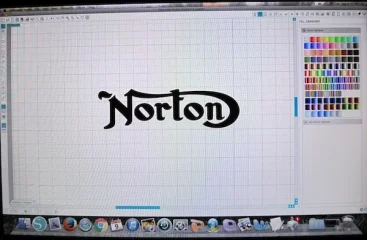
Although, I am following his lead and modifying my own early version of the logo and scaling it down to 5".
I agree the later versions are a little chunky and oversized for a Roadster tank.
I'm using Silhouette Studio Software.
Attachments
Fast Eddie
VIP MEMBER
- Joined
- Oct 4, 2013
- Messages
- 21,854
ELMZY said:No I didn't know that he sells them. I'm trying hard to do as much as I can myself on this build - if I'm capable and the quality is good.Fast Eddie said:You do know that Matt supplies stencils for his very subtly modified / neat version of the logo's ?
Although, I am following his lead and modifying my own early version of the logo and scaling it down to 5".
I agree the later versions are a little chunky and oversized for a Roadster tank.
I'm using Silhouette Studio Software.
Fairy Nuff mate.
If you've got the skills for something, do it.
Stuff like that would take me months. And still look like sh*t !
- Joined
- Nov 11, 2013
- Messages
- 5,403
You can also get vinyl transfers on your side of the ditch - http://norton-decals.letsfixit.info/index.html
I got some for my restomod and although I havent tried them yet, they seem pretty nice.
I got some for my restomod and although I havent tried them yet, they seem pretty nice.
ELMZY
VIP MEMBER
- Joined
- Apr 21, 2016
- Messages
- 48
Thanks for the link gortnipper.gortnipper said:You can also get vinyl transfers on your side of the ditch - http://norton-decals.letsfixit.info/index.html
I got some for my restomod and although I havent tried them yet, they seem pretty nice.
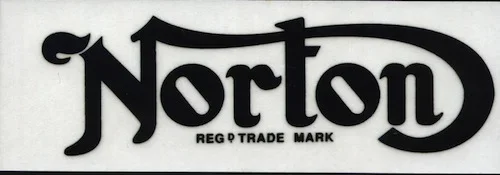
I've already purchased the one I like from them. I scanned it, then imported it into the vinyl cutter program for tweaking.
Here's the info that came with it - off their website :
Part No. 028650 (A2/865), 4 5/8", Black on clear vinyl. For Fuel Tank on Models 1, 16H, 18, ES2, 30, 40, 30M, 40M.
Attachments
Fast Eddie
VIP MEMBER
- Joined
- Oct 4, 2013
- Messages
- 21,854
ELMZY... you've gone quiet... wassapnin with the build... no slacking man...!
ELMZY
VIP MEMBER
- Joined
- Apr 21, 2016
- Messages
- 48
A change in circumstances FE.Fast Eddie said:ELMZY... you've gone quiet... wassapnin with the build... no slacking man...!
Prioritising cash flow - gunna be lean Christmas.
"Such is Life".
Unlike the Irish/Aussie battler that coined that phrase - I'll live on ........ long enough to get the bike going hopefully.
I'm in the process of "recycling" assets so I should have a few shekels for the Norton by early 2017.
Fast Eddie
VIP MEMBER
- Joined
- Oct 4, 2013
- Messages
- 21,854
ELMZY said:A change in circumstances FE.Fast Eddie said:ELMZY... you've gone quiet... wassapnin with the build... no slacking man...!
Prioritising cash flow - gunna be lean Christmas.
"Such is Life".
Unlike the Irish/Aussie battler that coined that phrase - I'll live on ........ long enough to get the bike going hopefully.
I'm in the process of "recycling" assets so I should have a few shekels for the Norton by early 2017.
Sorry to hear that mate, as you say though, that's life!
Wrap it up and put it out of sight and resist the temptation to liquidate it Elmzy. Hope things improve ASAP.
Just read your whole build thread, really hope things turn around for you so you can continue it I was really enjoying it. I get sidetracked and little things that should be done in a week drag on for months but you don't seem to have that problem so you've one more than half of the battle already. Hope your troubles are just Financial because money is just money & it comes and goes. Not to downplay the stress involved. Hope to see your project continuing soon.
ELMZY
VIP MEMBER
- Joined
- Apr 21, 2016
- Messages
- 48
Well.......how time flies.
8 years since my last post and my build thread still exists - great job Access Norton !
I've since changed houses, states, jobs and partners, and spent way too much time and money customising American V-twins - but I've still got the Norton.
I put the Fullauto head(original) on Ebay a while back(which would've been the beginning of the end) and the Mrs(a Triumph rider) said "I don't think that's a good idea. You should finish it".
So..... it's back on - probably at a snale's pace because I'll need to sell another bike for finance.
I'm still keen to continue with the CNW look so I got back in touch with Matt and ordered an X-ring chain conversion kit - he's as amicable as ever.
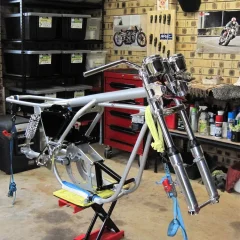
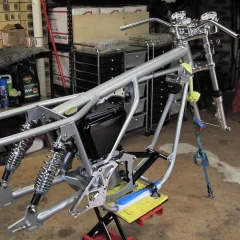
Hopefully I'll get some wheels built in the new year but until then, considering I stuffed up the image uploads at the beginning of this thread, here's a few reminder shots of where I started.


8 years since my last post and my build thread still exists - great job Access Norton !
I've since changed houses, states, jobs and partners, and spent way too much time and money customising American V-twins - but I've still got the Norton.
I put the Fullauto head(original) on Ebay a while back(which would've been the beginning of the end) and the Mrs(a Triumph rider) said "I don't think that's a good idea. You should finish it".
So..... it's back on - probably at a snale's pace because I'll need to sell another bike for finance.
I'm still keen to continue with the CNW look so I got back in touch with Matt and ordered an X-ring chain conversion kit - he's as amicable as ever.
Hopefully I'll get some wheels built in the new year but until then, considering I stuffed up the image uploads at the beginning of this thread, here's a few reminder shots of where I started.
Fast Eddie
VIP MEMBER
- Joined
- Oct 4, 2013
- Messages
- 21,854
@ ELMZY … check your PM mate… you got mail…
grandpaul
VIP MEMBER
- Joined
- Jan 15, 2008
- Messages
- 13,651
That'll be a great "before" photo!... here's a few reminder shots of where I started.
View attachment 117192
Some of my early posts also suffer from the "defunct photo host" syndrome, sadly...
ELMZY
VIP MEMBER
- Joined
- Apr 21, 2016
- Messages
- 48
Dismantled the gearbox and it looks like most of the big ticket items are in good order.... so they got a good clean and can sit in an oil bath for a while :

The bearings and bushes came out fairly easily with the help of a 2,000 watt heat gun and the appropriate sized drifts/sockets.
Except for the kicker shaft bush - it needed an 18mm tap - and some persuasion whilst locked in a vice :

A heap of items to be replaced :

Had the cNw Transmission Seal Upgrade done a while back - comes with a good clean and polish job :

And your initials inside :

The bearings and bushes came out fairly easily with the help of a 2,000 watt heat gun and the appropriate sized drifts/sockets.
Except for the kicker shaft bush - it needed an 18mm tap - and some persuasion whilst locked in a vice :
A heap of items to be replaced :
Had the cNw Transmission Seal Upgrade done a while back - comes with a good clean and polish job :
And your initials inside :
Last edited:
Similar threads
- Replies
- 7
- Views
- 343
- Replies
- 5
- Views
- 1,389
- Replies
- 6
- Views
- 819
A
- Replies
- 7
- Views
- 2,415