Ok I know its been covered a few times but I was wondering what is the most practical way of achieving reliable clearance.
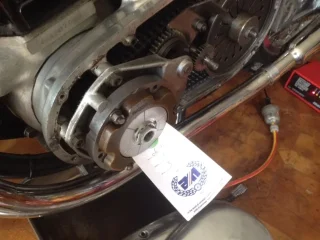
I run a belt drive so no oil. A Wassell stator lasted 4-5k miles. The replacement Sparx 21k and the most recent (July 2015) 'Lucas/Wassell' 2k. All inevitably (it seems) crack around the poles, the encapsulation swells and the rotor contacts the stator in the swollen areas. My feeling is that that increased friction causes the stator to overheat further. The first Wassell ran in oil but with an overvoltage zener, and later the belt. The Sparx ran with an electronic reg and needed a bit of extra clearancing to stop the encapsulation picking up on the rotor. Stupidly I didn't do this with the 'Lucas' as it had lots of clearance all round, not the same round 360 degrees but plenty. Its not total toast but cant handle more than ignition load. Its well on its way. It has picked up slightly on two poles, only a bit but enough. I measured the stator, bore, rotor od and checked clearance side to side. Its only 018" total on the inside but 033" on the inner edge (feeler guage). Thats with the rotor sitting in the stator and pulled to one side.
So back to the question.....to do the job properly should I try bending the studs? or ease out the mounting holes in one plane. Basically it needs to move forwards at 09.00. Whats the consensus gents? BTW the mains haven't gone and the rotor is a good fit on the crank. Its also round and concentric with no magnets lifting (11/96 date code). Alternatively use a flap wheel to achieve same at 8 to 10 o'clock?
Would like to fix this one for good, always been an issue but seems to have been managed ok till the recent replacement (although obviously the Sparx was not happy). It sort of makes me wonder if the Sparx had better class wire insulation than the Lucas allowing it to survive under less than ideal conditions.
I worked for Lucas and a US DC motor manufacturer for 35 years and to save a few pennies we always used Class A 105C wire on the windings when possible. 155C Class F was for special cases but those motors rarely burnt out if applied correctly. Thanks as always in anticipation of helpful responses") .
.
I run a belt drive so no oil. A Wassell stator lasted 4-5k miles. The replacement Sparx 21k and the most recent (July 2015) 'Lucas/Wassell' 2k. All inevitably (it seems) crack around the poles, the encapsulation swells and the rotor contacts the stator in the swollen areas. My feeling is that that increased friction causes the stator to overheat further. The first Wassell ran in oil but with an overvoltage zener, and later the belt. The Sparx ran with an electronic reg and needed a bit of extra clearancing to stop the encapsulation picking up on the rotor. Stupidly I didn't do this with the 'Lucas' as it had lots of clearance all round, not the same round 360 degrees but plenty. Its not total toast but cant handle more than ignition load. Its well on its way. It has picked up slightly on two poles, only a bit but enough. I measured the stator, bore, rotor od and checked clearance side to side. Its only 018" total on the inside but 033" on the inner edge (feeler guage). Thats with the rotor sitting in the stator and pulled to one side.
So back to the question.....to do the job properly should I try bending the studs? or ease out the mounting holes in one plane. Basically it needs to move forwards at 09.00. Whats the consensus gents? BTW the mains haven't gone and the rotor is a good fit on the crank. Its also round and concentric with no magnets lifting (11/96 date code). Alternatively use a flap wheel to achieve same at 8 to 10 o'clock?
Would like to fix this one for good, always been an issue but seems to have been managed ok till the recent replacement (although obviously the Sparx was not happy). It sort of makes me wonder if the Sparx had better class wire insulation than the Lucas allowing it to survive under less than ideal conditions.
I worked for Lucas and a US DC motor manufacturer for 35 years and to save a few pennies we always used Class A 105C wire on the windings when possible. 155C Class F was for special cases but those motors rarely burnt out if applied correctly. Thanks as always in anticipation of helpful responses
.