Rebuilding Lucas Handlebar Switches

Status
Not open for further replies.
Joined
Apr 15, 2009
Messages
11,525
Country flag
I couldn't find any good information on the web about this but I know people must do it. Hopefully this will help someone in the future.

Rebuilding Lucas Handlebar Switches

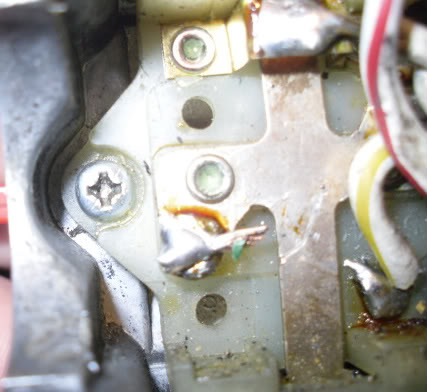
The plastic bases are held to the alloy (I have a feeling these are made from the same substance as the Amals...) covers with rivets. I drilled them out carefully. Actually I drilled until most of the rivet head was gone and then went in with a Dremal and a small grinding stone. This was to prevent any more damage to the plastic.

Be sure to catch all the parts when they come flying out. There is two small springs under each of the buttons. And a ball bearing under the switch.

Rebuilding Lucas Handlebar Switches

What surprised me is that the rivet is actually threaded into the alloy cover. I have no idea what thread it is. I'm tempted to tap it larger and screw it back together.

Rebuilding Lucas Handlebar Switches

Here you can see the "better" cover and the rivets removed. I had a second cover all nice and clean but unfortunately it was broken in shipping. :(

Next I need to gather up the parts to finish this up. Luckily a guy in the local club may have the missing parts. Stay tuned.
 
One of the places epoxy and magnetic control come to mind
and low temp solder
but must ask yourself how much time and bodges
to recover a crapped out item vs just getting another
and get on with the show.
I've switched out broken paddles and buttons and
cleaned up contacts and made better connections.
But is outter shells are crap too, oh well.

hobot
 
Those "rivets" are actually Posidriv screws, which somebody had obviously chewed away the screwdriver slots whilst attempting to loosen them (probably with a Phillips screwdriver)?
 
hobot said:
One of the places epoxy and magnetic control come to mind
and low temp solder
but must ask yourself how much time and bodges
to recover a crapped out item vs just getting another
and get on with the show.
I've switched out broken paddles and buttons and
cleaned up contacts and made better connections.
But is outter shells are crap too, oh well.

hobot

My "hobot" translator isn't working at the moment, do you mean to epoxy the plastic base to the metal housing?

With the Sparx repos at a reasonable cost it's not really worth the effort to rebuild these.

Used Lucas ones aren't that expensive either, although taking them apart and cleaning them isn't a bad idea.
 
L.A.B. said:
Those "rivets" are actually Posidriv screws, which somebody had obviously chewed away the screwdriver slots whilst attempting to loosen them (probably with a Phillips screwdriver)?

You know, I don't know why these were drilled out then. I think I may have started to drill them out many, many years ago. Maybe the screw heads were so corroded you couldn't even tell they were screws anymore? Good to know. Hopefully then I can get the right screws and this won't be as bad as I thought.
 
I've had mine in and out any number of time using a Phillips screwdriver.... :oops:
 
Watchout with the Sparx ones, the wires are thinner and may not be the correct rating for the current.
 
BrianK said:
I've had mine in and out any number of time using a Phillips screwdriver.... :oops:

If you saw the extremely poor condition of the housings you'd see why I didn't think they were screws. I think better looking stuff come up from the Titanic. :mrgreen:
 
I recently worked on mine. Discovered a couple of things. First Hobots comment about low temp solder is not unwarranted. I found my right turn indicator was not working because somebody had resoldered the connection and over heated the plastic causing the contact to be below the surface of the surrounding plastic. I used a butane soldering iron with a needle tip and heated that contact from the back until I could push it forward in the plastic so contact was possible. I also discovered that the legendary kill switch was not only filthy and corroded but that the white-yellow wire was hanging on by one stand of wire. This was most likely caused by it being bent out of the way to get at the screw behind the bundle. (Yeah I know, use a relay and get rid of that part of the ignition nightmare). Then last but not least I used some good sticky grease to hold the ball bearing in place on the end of its spring so that I could get it put back together, but if you use that idea, go real light on the ammount cuz when it warms up and runs it will cover the kill switch!

Russ
 
rvich said:
I recently worked on mine. Discovered a couple of things. First Hobots comment about low temp solder is not unwarranted. I found my right turn indicator was not working because somebody had resoldered the connection and over heated the plastic causing the contact to be below the surface of the surrounding plastic. I used a butane soldering iron with a needle tip and heated that contact from the back until I could push it forward in the plastic so contact was possible. I also discovered that the legendary kill switch was not only filthy and corroded but that the white-yellow wire was hanging on by one stand of wire. This was most likely caused by it being bent out of the way to get at the screw behind the bundle. (Yeah I know, use a relay and get rid of that part of the ignition nightmare). Then last but not least I used some good sticky grease to hold the ball bearing in place on the end of its spring so that I could get it put back together, but if you use that idea, go real light on the ammount cuz when it warms up and runs it will cover the kill switch!

Russ

Would dielectric grease work better?
 
Re dielectric...yes I think so, that is basically what I used. I used some stuff called Thread-Eze Ultra made by Chemsearch.
It doesn't melt but remains as a paste and has a temp rating to 2300f.

Here is a link to info:

http://www.chemsearch.com/productDetail ... ltra%0D%0A

I don't have a clue as to where you buy it, but I will be trying to find more.

Russ
 
rvich said:
Re dielectric...yes I think so, that is basically what I used. I used some stuff called Thread-Eze Ultra made by Chemsearch.
It doesn't melt but remains as a paste and has a temp rating to 2300f.

Here is a link to info:

http://www.chemsearch.com/productDetail ... ltra%0D%0A

I don't have a clue as to where you buy it, but I will be trying to find more.

Russ

Isn't that just an anti-sieze? Not sure if I'd use that in a switch.
 
Geoffrey Chapman said:
Why bother when you can get 2nd hand Kawasaki parts for next to nothing, and which work much better than the originals.

Because it takes away a bit of the British "charm". Besides you'd miss the fun of having those up/down blades break on you. :roll: BTW, where can one find replacement blades!? (for less than the $25 a piece with shipping from the eBay seller down under).
 
BTW, where can one find replacement blades!? (for less than the $25 a piece with shipping from the eBay seller down under).

There's not a lot of choice. There's this kit of buttons, blades and springs

http://cgi.ebay.com/ebaymotors/NEW-...0167550QQptZMotorcyclesQ5fPartsQ5fAccessories

Since you have a '71 in your signature, I assume you are looking for the short blades. Those are easier to find than the long blades for '73-''74 as they were also found on Triumphs and BSA's. Do you need the high beam blade or the turn signal blade or both? I might have a good used one out in the shop.
 
Ron L said:
Do you need the high beam blade or the turn signal blade or both? I might have a good used one out in the shop.

Ron, thanks just the early turn signal blade otherwise I'd get the kit. If you've got one I can paypal some $.
 
Geoffrey Chapman said:
Why bother when you can get 2nd hand Kawasaki parts for next to nothing, and which work much better than the originals.

Rebuilding Lucas Handlebar Switches

Uh, because some of us are using the stock master cylinder and clutch.
 
swooshdave said:
Geoffrey Chapman said:
Why bother when you can get 2nd hand Kawasaki parts for next to nothing, and which work much better than the originals.

Rebuilding Lucas Handlebar Switches

Uh, because some of us are using the stock master cylinder and clutch.

Nice lookin' bike...I would have a hard time putting Kawa parts on my Norton tho. Just one of my prejudices.

As for the Thread-Eze Ultra just being anti-seize...Dude! Have a little faith! I am willing to bet a round of pints that if you tried some of it you would start reaching for it a lot. :wink:
 
Status
Not open for further replies.
Back
Top