How to trace execessive oil consumption 850 MK2

Status
Not open for further replies.
Ok thanks for reply. Carb is not issue, but beside the compression and better compression on that side where the oil consumption appears it make sense to lift also cylinder once I have lift the head? I will do and check the rings
Black smoke means it's running rich this will carburetor or air filter causing this
Are you sure the smoke wasn't blue?
 
Hi Robin.
Which size the ring spanner must have? Will order two of them before weekend for a grinding session! I assume strait ring spanner
Hi Lorenz,

I have a collection from owning more than one Commando but I think this should do it:

1/4"W box spanner or the socket.
1/4"W flat ring spanner.
3/8"W or 7/16"AF ring/open ended.

1 - Deep ones between the rockers: A 1/4" Whitworth box spanner. (Alternatively, the very slim 1/4"W 'King Dick' socket - so for a 3/8" extension bar).

2 - The rear stud: A 1/4"W ring spanner, flat is fine. Mine is open ended the other end. You may be lucky and find it fits - a Norton dealer will supply one that does. If not, grind it to fit as I did with my first one.

3 - The two front sleeve nuts: 3/16"W works on these. (A 7/16"AF also works).

4 - Cylinder base nuts: As above - but the rear two need open ended. (I have an 850 so also have the socket headed cylinder through bolts. Not sure if the size though - 5/16" or 3/8"?)


To be fair it is also possible that a metric spanner might happen to fit one of these but I am not aware of a table showing that.

The manual lists torque settings and the head loosening and tightening sequence with the front and rear studs the key to getting the head down without warping it. For the cylinder base nuts access is poor but I have never had any problems just doing those by feel.
 
Black smoke means it's running rich this will carburetor or air filter causing this
Are you sure the smoke wasn't blue?
Yes, smoke wasn't blue. I ask again after I read this. Right side Cylinder I have a nice brown color at the spark, left side with better comprssion I do have black color like a to rich set up of carb. Friends who followed me told me bike stinks horrible, smoke was dark and sooty.
 
Check your enrichener for good seating. Since it is off to one side on a single Mikuni, one cylinder can be more adversely affected if it's allowing too much fuel to pass (bad seat? or needle seal). It may be washing that cylinder leading to the oil consumption.
 
When you lift the head and barrel try feeling the edge of the piston rings
If they are sharp the mixture has been too rich and it's washed the oil off the bores
If you examine the bores there may be a slight spiraling effect in them
A sure sign of costly richness
 
Start by pulling the head. Rebuild the head with new seals . Give it to a good machine shop who will measure valve guide wear and help. It's not that hard to pull the barrels at this time to to inspect the pistons and cam.
 
Today I have lifted the head. What a job!:confused:
Unfortunately the surface of the barrel is totally worn out.
Head is the next part I will dismantle
How to trace execessive oil consumption 850 MK2

How to trace execessive oil consumption 850 MK2
 
Last edited:
Yesterday I measured the barrel by a calliper which shows a diameter of 76.8mm. By checking manual and internet I found a bore of 77mm for standard cylinder.
Furthermore the cam shows a light wear track. I will also mak some pictures and share the link.
Would be graet to hera your comments.
Cylinder head is the next part I will disassemble this week.
Hopefully I just have to spend a new pair of pistons for enjoy ths rest of summer.
 
Today I have lifted the head. What a job!:confused:
Unfortunately the surface of the barrel is totally worn out.
Head is the next part I will dismantle
https://photos.google.com/photo/AF1QipP_geG5G5zSRL4aLgrE31WsZFAhTlDoXpFAjak
How to trace execessive oil consumption 850 MK2

Can't see the photo but it is hard to assess the wear without seeing it.

Oil seals will be easy to change.

Its a lot easier to get apart than a 6 cylinder Honda!

(The original factory manual has 850 piston bottom skirt and ring gap measurements to assess wear. Standard bore is 77.013mm, piston lower skirt diameter range 76.911mm/76.888mm, top ring gap is 0.254mm/0.305mm).
 
Yesterday I measured the barrel by a calliper which shows a diameter of 76.8mm. By checking manual and internet I found a bore of 77mm for standard cylinder.

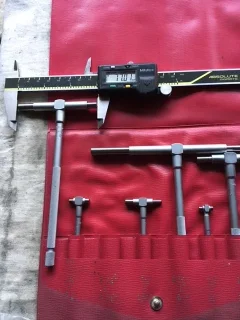
I've heard that the barrels shd be measured in 2 or 3 different places, and doubt you cd do this with a caliper. I think you need a telescoping gauge like this:
How to trace execessive oil consumption 850 MK2

Furthermore the cam shows a light wear track. I will also mak some pictures and share the link.
Would be graet to hera your comments.
Cylinder head is the next part I will disassemble this week.

Unless you have all the tools to extract and reinsert the valve guides without wrecking the head , you might wanna send it out?
 
Last edited by a moderator:
Unless you have all the tools to extract and reinsert the valve guides without wrecking the head said:
Target is to make most things by myself.
Missing tools are available by a friend.
Barrel are scrap, pistons have a STD mark on top and AE inside. Seems first pistons.
Cam show a light worn-out but no pitting on surface. Tappets have also a smooth surface without pitting.
I try to make pictures and show here.
 
A vernier type caliper is a little hit and miss when you are chasing 'thousandths.

A micrometer is a better bet but you could save the frustration by getting the bores measured by someone qualified with a bore gauge, that could be a non automotive machine shop even.
You would know the state of the bore within fractions of a 'thou. (or metric)

I have never used them personally but if the stock guides are worn maybe K Line type inserts are an option to refurbish them.
 
So a rebore, a pair of oversize pistons and unless the guides are loose, a pair of seals. Plus the fun of tearing down the engine of course!

I've been looking around the oil consumption issue on here and elsewhere as the first article I read mirrored my own experience: If I top my tank up to the dipstick H mark after a ride (so sump empty of oil) it uses a lot of oil on the next ride. But if instead I just check it to see how low it is then there comes a point where it loses very little oil.

Surplus oil flows out through the breather on the top front of the oil tank, either as liquid or bubbles/foam and I guess there comes a point where that stops.

If I combine measurements from the bulletin boards then it seems the later Mk3 dipstick was about 5 inches long and lowered the level: H was about 70mm and L about 89mm down from the cap rivet. If you have the earlier 3 1/2 - 3 5/8 inch dipstick H is about 62mm and L is about 78 mm down. Other variations exist.

If you have a short stick then potentially there is 70mm-62mm = 8mm of oil happy to exit via the breather. More if you have oil in the sump too.

It's a remote tank so the volume is more about cooling, oil life and guaranteeing supply. I am going to find the point where I no longer lose oil rapidly and dremel that onto my dipstick as my new H.
 
Hi RobinKent.
After I receive my reworked parts I will follow your advise.
I will send now all parts to a Norton Doctor. He will check and rework all parts, including the head.
Is the best to give it an expert before I ruin the motor :D
 
Saturday I've pick up my parts from Dieter Cordes. He is such a kind guy, has helped me in all belongs to the rework of engine. The conclusion was a desaster:
Piston was coated by burned oil , luckily it was the first bore. So now it had 0.20 oversice. Valves were also worn out, even the cylinderhead was not in a good condition. Thread of exaust screw was worn out, Spark thread also made new by helicoil.
In total ther overhaul of this parts are a Job I'd never could be done by myselft.
Now I have to rebuild my Norton and hopefully enjoy rest of summer.
 
Good to see you're getting sorted. Those exhaust threads are a design weak point that likely made sense when the heads were iron. I have one that has never caused a problem and one that will need repairing shortly. Despite my best efforts to look after them. I'm sure lots will give you advice if you start a new exhaust tightening thread on here!

Rob.
 
Hi Rob.
and One question to all: how have you fixed secured the exhaust nut? By a washer for lock ring? Or by a wire? Wire means a little bore into a cylinder rib nearby the lock ring. Should I use new lock rings?
Lorenz
 
I use the lockring tab washers, #27 on this drawing. https://andover-norton.co.uk/en/shop-drawing/78/850-exhausts-muffler-mutes-passenger-footpegs
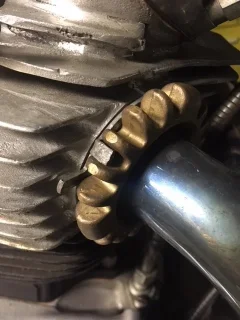
I bend the tabs backward for the head on the sixth fin from the top, and with the factory tool, an 18 inch extender pipe over the tool and a hot engine, run the nuts up as tight as possible, and bend over whichever tab will fall into a slot on the nut.
Many people seem to avoid these parts, and I'm not sure why. They have always worked for me.
 

Attachments

  • How to trace execessive oil consumption 850 MK2
    exhaustLock.webp
    41.6 KB · Views: 352
Status
Not open for further replies.
Back
Top