920 engine build waffle (2016)

Status
Not open for further replies.
Well, you never do things by half !
Is this motor for another chassis or for the blue Roadster ?
As usual , it looks fab :mrgreen:
sam
 
trident sam said:
Well, you never do things by half !
Is this motor for another chassis or for the blue Roadster ?
As usual , it looks fab :mrgreen:
sam

It going in the Blue Bomber Sam. One day I'd like to put it, or similar, into a nice new build, lightweight Manx rep chassis. But that'll have to wait a bit...!
 
Well,,, before looking at these pictures I never thought of myself as being a purveyor of porn, but after staring at them I don't know what else you could call such pictures !!!
 
what a great looking/spec motor i'll be following this with great interest,brilliant stuff
 
baz said:
what a great looking/spec motor i'll be following this with great interest,brilliant stuff
Plus One here! :mrgreen: All I can say is - I gotta make more money.
 
Not much progress lately guys I'm sorry to report. I did get the pistons from Jim though, a slight variation on his normal design with a thicker crown and 0.040" dish in the crown. If my fag packet (for avoidance of doubt with oir colonial cousins, that's a small cardboard box containing cigarettes) calculations are half right, this dish will give me the desired CR and still allow for a tight squish.
 
Last edited:
The 920 motor will be fiddled with over summer and hopefully be ready to nail in the the bike next winter. So I thought I'd fiddle about with the bike in its current form ready for spring.

I decided to go back to Cafe Racer guise. I got a JPN replica gear pedal from RGM which goes well with their T160 style kick start nicely, I've not ridden with the reverse lever on a Commando before though, so we'll see what its like. Along with the 2:1 exhaust, the neater footrest arrangement certainly cleans up the RHS of the bike:


920 engine build waffle (2016)
 
Last edited:
Jim, can you explain the machining process involved in "waisting" the barrel bolts? I'm guessing it's not just a case of running a lathe tool along them.
 
Another small step for mankind...

I received the barrels back from Laystalls who have silicone carbide coated the bores. I've never had this done before so it's all new to me! Its a nice finish, has a kinda dull, off-grey appearance similar to hard anodising on aluminium.

I have a few weeks away from the workshop coming up now, so hope to get the Pistons sent away for Diamondyze treatment and the cases and alloy barrels sent away for tumble cleaning.

There should then be very few remaining (viable) excuses in the way of beginning bottom end assembly.

Onwards and upwards...
 
920 engine build waffle (2016)
I got the Maney cases and barrels back from a guy called Stephen Smethurst today (thanks for the lead on him Sam). I did some fettling by hand before sending to Stephen, he does 'tumble cleaning' similar to that Comnoz did on my RH10 head. This gives a really nice smooth sheen finish, it's hard not to think they've been lacquered or something similar. Not only does it look nice, but due to the fact that the process closes the pores in the material, it should make it easy to keep clean in the long term.

Maney's quality is first class in my opinion, but he makes racing parts, and isn't concerned with appearance. I don't think the photos do them full justice, but they now look SO much nicer!

Next step is to procure the remaining parts I need for the bottom of the end so that as soon as I've finished faffing around with my Bonnie, I can start assembly with this.
 
Ron Wood turned me on to using Pliobond on copper head gaskests years ago...

Ken

And then you passed pliobond on to me (thank you Ken). The trick with pliobond is to apply it to each surface - the head, both sides of the gasket and the cylinder - many people miss this. Too prevent weeping you have to have a good bond between the sealer and each metal surface. Silicone and soft sealers with little or no adhesion will fail - the oil will just worm its way through. Applying pliobond to just one or two surfaces such as the HG and then clamping it down is not good enough. After the pliobond has bonded to the metal - then you can assemble and the layers of pliobond will bond to itself. I always add the .005" copper wire around the pushrod tunnels and oil return as well - and I never have leaks anymore.
 
View attachment 3002 View attachment 3003 View attachment 3004 View attachment 3005 I got the Maney cases and barrels back from a guy called Stephen Smethurst today (thanks for the lead on him Sam). I did some fettling by hand before sending to Stephen, he does 'tumble cleaning' similar to that Comnoz did on my RH10 head. This gives a really nice smooth sheen finish, it's hard not to think they've been lacquered or something similar. Not only does it look nice, but due to the fact that the process closes the pores in the material, it should make it easy to keep clean in the long term.

Maney's quality is first class in my opinion, but he makes racing parts, and isn't concerned with appearance. I don't think the photos do them full justice, but they now look SO much nicer!

Next step is to procure the remaining parts I need for the bottom of the end so that as soon as I've finished faffing around with my Bonnie, I can start assembly with this.

That looks fantastic! And it doesn't do any harm to the surfaces that are machined? Is this done in a big barrel with some material tumbling around?
Tommy
 
No damage to machined surfaces, slight visual evidence but no more.

Yes, it's put in a big barrel with ceramic balls, as I understand it.

I don't know much about it, but I am now a fan !
 
Chaps, shed time has been limited recently. Then what I did have got consumed by the 68 Bonnie shenanigans.

Nevertheless, I thought I’d share what little progress there has been...

As y’all know (and I do NOT expect y’all to agree with) I’m aiming for a hot rod here, a 920 Combat Plus! I’m certainly not aiming for a Harley beating ‘top torque @ tickover’ kinda thing. Nowt wrong with that o’course, just not what I’m wanting.

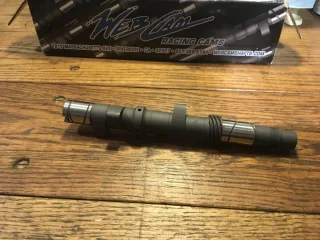
So, with this in mind, I decided to try a different cam approach. I’ve got JS cam gear in the 850 and it’s just great. But, in pursuit of my ‘920 Combat Plus’ idea, wanted something closer to a 2s, so I decided on a Webcam 86c/12c.

And, just in time for Christmas, It arrived fresh from Sir Comnoz. With the 10.5:5 JS pistons and rods, tight squish, cNw carbs and 920cc, I’ll be gutted if this doesn’t dislocate my arms above 4,500rpm!

Here’s the cam. Nice innit:


920 engine build waffle (2016)
 

Attachments

  • 920 engine build waffle (2016)
    C98E4397-58D4-4B1B-858C-44925C8DFDB4.webp
    156.8 KB · Views: 541
Last edited:
However, just to set the expectations right here, shed time is still gonna be a scarce resource in the near future, so I’m not optimistic about rapid progress in the short term I’m sorry to say. In fact, the engine has been downgraded from work bench to shelf...
I’ll try and make progress whenever I can and keep y’all posted.
920 engine build waffle (2016)
 
Last edited:
Oh No not another immature holigan Quick Eddie but i would of fitted a hotter cam as larger engines tame cam behavior compared to less displacement engines. On the other hand hot cams in bigger engine come on sooner. Roll on torque in hi gear is a delight for sane use but holigans know not to let revs get below 5000 grand when seeking kix. May your paths be clear rushing your tire smoking grin into future.
 
Status
Not open for further replies.
Back
Top