Seawulf
VIP MEMBER
- Joined
- Nov 3, 2020
- Messages
- 6
29 April 23
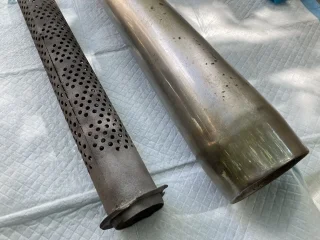
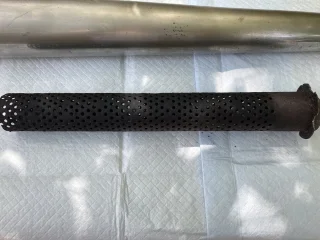
It seems none within this Norton crowd have ever gone internal on the Dunstall Decibel Silencers. So I ventured into the unknown and here are my results.
All this occurred today 29 April 23.
1 - I attached a carbide cutting bit to my die grinder with a 10" extension.
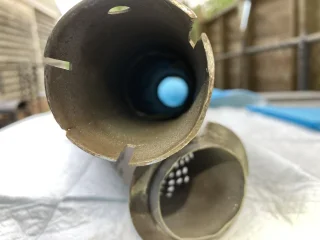
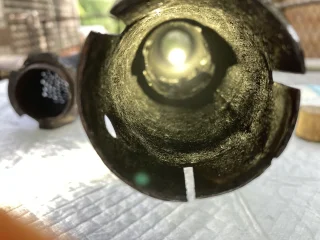
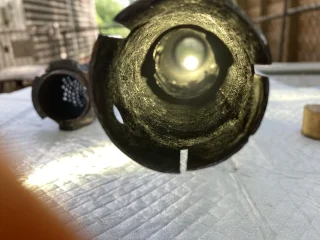
2 - I began to relieve the baffle from the can at approximately 7" below the inlet.
3 - The exhaust end had been cut free with the "Gatling Gun Nozzle" removed.
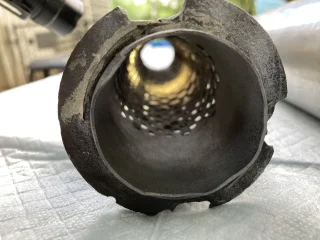
4 - Removed the blazed material around the flange that holds the baffle on the exhaust end.
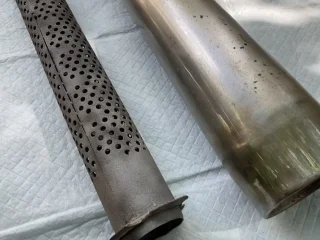
5 - Once all had been ground away the baffle merely fell out.
6 - I was surprised at the absence of sound packing around the baffle. I can not confirm if it was ever there to begin with. I have owned this scooter since 1979 and have not changed the silencers that came original to the bike.
7 - The next step will be to clean everything up as it will be going to the chrome shop later this month or next.
8 - I will be fabricating new removable baffles and flanges so maintenance will hopefully not be a challenge in the future. ( May opt to blaze the new components back into place as before). I have not decided on this yet.
9 - Overall if my efforts bear fruit then I will have been able to maintain the original "Dunstall Pipes & Silencers" that came with the bike.
10 - I will attach photos of this adventure for all to see and comment upon if and when I figure out how to do it. (Just figured out the routine. Enjoy the photos.)
Anyway not bad for a Saturday.
Thanks
1 May 2023
The Dunstall Decibel Silencer Saga Continues and today's story is as follows:
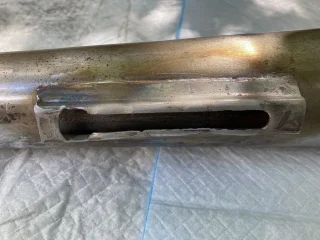
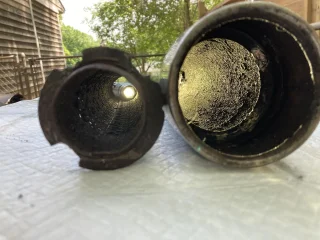
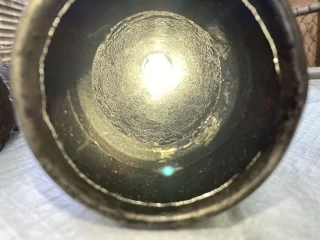
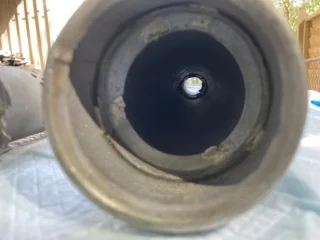
After soaking the "silencer" parts in vinegar/salt solution I decided to get a little more aggressive with the cleaning. Rinsed everything in a water & baking soda bath to neutralize the acetic acid. Once all was dried I focused on the mounting bracket. Got out the "blue tip wrench" and heated up the bracket to help straighten out the dents and close up the mounting bolt(s) slot. There is a little more fine tuning to occur, but there is no point in getting "too froggy". I can detail the remaining imperfections with a file. Lastly I media blasted the baffle and as much of the interior of the can as I could. Overall it looks pretty good. Take a look at the attached photos as the progress in this project is moving on. I look forward to any comments and a big thanks to all who have viewed my earlier posts.
It seems none within this Norton crowd have ever gone internal on the Dunstall Decibel Silencers. So I ventured into the unknown and here are my results.
All this occurred today 29 April 23.
1 - I attached a carbide cutting bit to my die grinder with a 10" extension.
2 - I began to relieve the baffle from the can at approximately 7" below the inlet.
3 - The exhaust end had been cut free with the "Gatling Gun Nozzle" removed.
4 - Removed the blazed material around the flange that holds the baffle on the exhaust end.
5 - Once all had been ground away the baffle merely fell out.
6 - I was surprised at the absence of sound packing around the baffle. I can not confirm if it was ever there to begin with. I have owned this scooter since 1979 and have not changed the silencers that came original to the bike.
7 - The next step will be to clean everything up as it will be going to the chrome shop later this month or next.
8 - I will be fabricating new removable baffles and flanges so maintenance will hopefully not be a challenge in the future. ( May opt to blaze the new components back into place as before). I have not decided on this yet.
9 - Overall if my efforts bear fruit then I will have been able to maintain the original "Dunstall Pipes & Silencers" that came with the bike.
10 - I will attach photos of this adventure for all to see and comment upon if and when I figure out how to do it. (Just figured out the routine. Enjoy the photos.)
Anyway not bad for a Saturday.
Thanks
1 May 2023
The Dunstall Decibel Silencer Saga Continues and today's story is as follows:
After soaking the "silencer" parts in vinegar/salt solution I decided to get a little more aggressive with the cleaning. Rinsed everything in a water & baking soda bath to neutralize the acetic acid. Once all was dried I focused on the mounting bracket. Got out the "blue tip wrench" and heated up the bracket to help straighten out the dents and close up the mounting bolt(s) slot. There is a little more fine tuning to occur, but there is no point in getting "too froggy". I can detail the remaining imperfections with a file. Lastly I media blasted the baffle and as much of the interior of the can as I could. Overall it looks pretty good. Take a look at the attached photos as the progress in this project is moving on. I look forward to any comments and a big thanks to all who have viewed my earlier posts.
Attachments
-
 ACCESS NORTON SILENCER PHOTOS -1.webp222.9 KB · Views: 207
 -
 ACCESS NORTON SILENCER PHOTOS-4.webp199.4 KB · Views: 218
 -
 ACCESS NORTON SILENCER PHOTOS-5.webp195.3 KB · Views: 198
 -
 ACCESS NORTON SILENCER PHOTOS-6.webp211.4 KB · Views: 201
 -
 ACCESS NORTON SILENCER PHOTOS-9.webp221.2 KB · Views: 200
 -
 ACCESS NORTON SILENCER PHOTOS-10.webp187.4 KB · Views: 212
 -
 ACCESS NORTON SILENCER PHOTOS (31).webp154.5 KB · Views: 158
 -
 ACCESS NORTON SILENCER PHOTOS (32).webp67.8 KB · Views: 164
 -
 ACCESS NORTON SILENCER PHOTOS (33.webp264.6 KB · Views: 153
 -
 ACCESS NORTON SILENCER PHOTOS (36).webp86.8 KB · Views: 157
Last edited: