Front Iso - strange?

robs ss

VIP MEMBER
Joined
Aug 16, 2016
Messages
3,506
Country flag
Having done my 12K mile service a few weeks ago I was just running the spanners over to check all was good.

Strange (to me) was that although the front iso through-bolt was tight, I could turn the adjuster nut/wheel back and forth by a hole each way using my special tool (blunt end of a drill-bit). I had never noticed this previously. The bike was behaving well in terms of vibes.

I pulled the RH exhaust of to get the iso through bolt out and wound the adjuster in and out, applying teflon dry-spray.

All appeared to be good so reassembled, adjusted and tensioned the through bolt. But, same thing - the adjuster nut/wheel still wasn't clamped

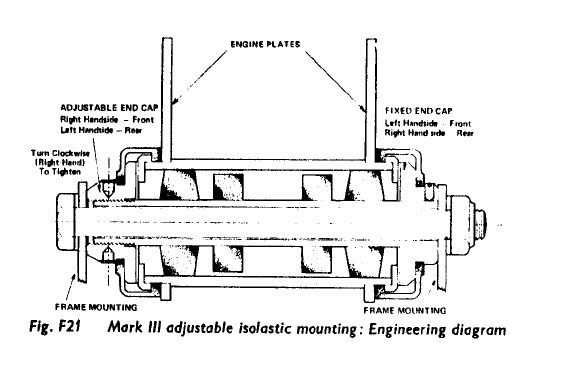
I have not seen a sectional view of a front vernier iso so don't know, but assumed the adjuster should be clamped - but can anyone advise here?

I haven't pulled the front brackets/iso off yet. Matt (cNw) has used 12 point (ARP?) bolts here and the top RH one will probably need a specially ground ring spanner to clear the crankcase.

Here's hoping for some helpful advice🤞

Cheers
 
I have not seen a sectional view of a front vernier iso so don't know, but assumed the adjuster should be clamped - but can anyone advise here?

Yes, it should be clamped.
Front Iso - strange?
 
Last edited:
I can only imagine the threaded tube is too long
And contacting the frame before the ISO adjuster
But this would be very noticeable on assembly 🤔
 
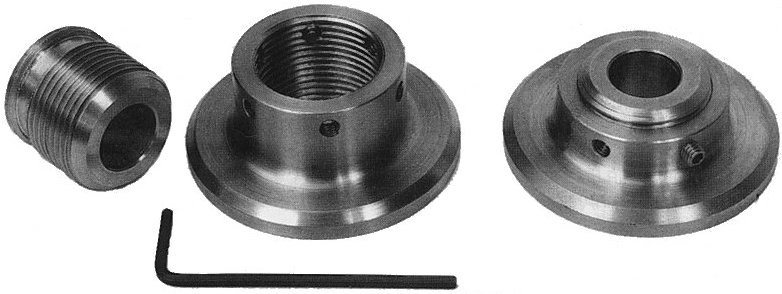
Mick Hemmings adjustable iso has little socket head grub screws. They are quite small and mine
had nylon tips. I bought a bunch of replacements as the tips seem to wear out quickly.
 
Rob,
I think Matt usually relieves the case on the one side so you can get a box end wrench on the nut.
Mike
 
Mick Hemmings adjustable iso has little socket head grub screws. They are quite small and mine
had nylon tips. I bought a bunch of replacements as the tips seem to wear out quickly.

Yes, but the standard vernier kit doesn't use grub screws to retain the threaded adjuster. Unless this is a Hemmings kit.
 
Yes, but the standard vernier kit doesn't use grub screws to retain the threaded adjuster. Unless this is a Hemmings kit.
Either way, those grub/set screws just hold setting until the through bolt is tightened.
If the adjuster nut is flopping around with the through bolt tight, (grub or no) you've got bigger fish to fry.
 
Either way, those grub/set screws just hold setting until the through bolt is tightened.

No, as there are no grub screw threads in the standard adjuster. The Hemmings adjuster isn't locked by tightening the through bolt.
 
Last edited:
No, as there are no threads in the standard adjuster. The Hemmings adjuster isn't locked by tightening the through bolt.
Could you explain further please LAB ?
The difference between a hemmings kit and a mk 3
 
Could you explain further please LAB ?
The difference between a hemmings kit and a mk 3

The Hemmings adjuster turns on a threaded sleeve so the bolt/stud must be fully tightened before adjusting. The grub screw/s when tightened then hold the setting.
Front Iso - strange?

The Mk3 and pre-Mk3 front conversion kit adjuster is threaded onto the inner Iso. tube so the through bolt must be loosened before making the adjustment.
Ok got it now 👍👍👍👍
 
The Hemmings adjuster turns on a threaded sleeve so the bolt/stud must be fully tightened before adjusting. The grub screw/s when tightened then hold the setting.
Front Iso - strange?

The Mk3 and pre-Mk3 front conversion kit adjuster is threaded onto the inner Iso. tube so the through bolt must be loosened before making the adjustment.
Thank you for the images.

I withhold comment on design.
 
His cousin's brother-in-law's next-door-neighbor's best friend was Rube Goldberg.


Actually Brian Tyree who I believe is, or was an American. I think they were available before the vernier upgrade kits which are now available. He patented them, and Mick Hemmings was licensed to make them. They actually work very well. The only downside is the fiddly grub screws. (It’s difficult to see which hole they are in) and the nylon tips get chewed up. I put pointed brass screws in mine, which also act as adjusting levers. To adjust, loosen off the screw, set the clearance, nip up the screw - simples. 👍 👍
 
Last edited:
The nylon tips are not the best idea. I generally just use two of them and that seems to take care of it.
 
Yes, it should be clamped.
Front Iso - strange?
Thanks Les
It's as I suspected - I will have to pull it apart and inspect (I'll report back)
...and no @YING , there is no relief on the case there - spanner grinding here I come!
Cheers
 
Okay - got it!
Oh, and by the way @YING , you were right - Matt has machined a hidden hollow which allows you to get a spanner on that nut.
The nub of the issue is the LH (primary) side iso nut (known as the fixed side in @L.A.B. s post #2 above) had started to loosen, allowing the LH (timing) vernier adjuster to pull the iso tube until the through bolt was clamping the iso tube, not the vernier adjuster.
Simple fix - clean everything up and assemble the fixed side with loctite blue (243)
It'd be nice if everything was this easy.

As an aside - Norton designers have outdone themselves (again) - imagine having to pull the entire LH exhaust system off to allow extraction of the through bolt! Sheesh!

Cheers & thanks for advice - even that of @texasSlick !
 
Last edited:
While I was in there I measured the thread on the inner iso tube.
It is 3/4" 20TPI
That means a full turn of the adjuster will open (or close) the iso gap by 0.050"
More importantly, given that there a 8 adjusting holes, a one hole movement will open/close the iso by 0.006"
Thats about consistent with my previous feeler gauge tests - I've been running just under 2 holes loosened from snug.
Hope this helps someone else 👍
 
Back
Top