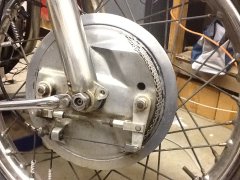
Front Brake Plate Adjuster Threads: G15

Joined
Jul 2, 2015
Messages
272
Country flag
Ok, so I have a spare brake cable for my G15-CS which I ordered years ago; recently tried to put on the bike. Thread for the adjuster was incorrect; it was close, and would thread halfway into the "abutment" on the brake plate.

Ordered another, specifically for the G15-CS, from Baxter Cycle...same issue. The bike and its original (now unusable) cable have a very slightly finer thread than the two spares.

I don't have thread gauges for all the various British threadforms. Anyone happen to know off the top of his head what threads I have? I'm debating ordering a different brakeplate fitting if the cables all come with a different threading. (Called Baxter about it, but they're closed Mondays.)

I really wanted to ride this week..grrr....

Thanks!

-Mike
 
tricky ... would suspect its bsf or unf... would find nuts of both thread forms and see which runsdown the adjuster and then ifyou dont have an originalty fetish run the approprate tap down the brake plate.. thus it was that my es2 finished up with a commando brake cable complete with brake light switch... that was bsf brake plate original and now unf as per commando.
 
I don't have thread gauges for all the various British threadforms.

Pitch gauges although useful aren't absolutely necessary.

According to the '66~'68 parts book, the cable adjuster for "ALL" is 025583 and locknut 025584.

025583 and 025584 according to the Norvil parts list are 26 tpi (CEI/BSC).

Norvil also list a "Late type" adjuster that is 24 tpi (UNF?).
 
The thread for the adjuster on the later twin leading shoe brake plate is different than the thread for the earlier single leading shoe. This can cause confusion.
 
Yes my Atlas 650SS etc are Cycle thread 26tpi where as my 69 Fastback is UNF.
 
If you hold the two threads up to the light you will see that they are not the same. Some m/c workshops have thread gauges, a good number of engineering w/shops have them. Soz I cannot help you on this, it's such a long time since I had a brake plate in my hands, but jampot website might know.

Commando came if I remember right 5/16 UNF.
Pre commando will /might be cycle or BSF thread.
Count threads over half inch, double it there you have TPI.
 
Last edited:
tricky ... would suspect its bsf or unf... would find nuts of both thread forms and see which runsdown the adjuster and then ifyou dont have an originalty fetish run the approprate tap down the brake plate.. thus it was that my es2 finished up with a commando brake cable complete with brake light switch... that was bsf brake plate original and now unf as per commando.

Hm, only way to get them onto the cable would be cutting a slit to slide the inner cable through...and I don't even have nuts of various known sizes/forms to work on it.

Pitch gauges although useful aren't absolutely necessary.

According to the '66~'68 parts book, the cable adjuster for "ALL" is 025583 and locknut 025584.

025583 and 025584 according to the Norvil parts list are 26 tpi (CEI/BSC).

Norvil also list a "Late type" adjuster that is 24 tpi (UNF?).


The cables I've purchased have a coarser thread on the adjuster than my original; my original search, as LAB notes, showed 26tpi as the early thread. I thought I'd get the right 26tpi one buying a cable listed for Atlas and G15 use...but I assume what I have is 24tpi (UNF?).


Thanks all for your attempts to help--I will call Baxter and see if they can send the right cable tomorrow.
 
Yes my Atlas 650SS etc are Cycle thread 26tpi where as my 69 Fastback is UNF.
Yes you are correct. I couldn't remember the thread forms since it has been a while since I had this issue. This caught me out when I made up a cable with a brake switch using an old single leading shoe brake cable adjuster and then tried to use it on a twin leading shoe brake.
 
I wonder if I could get away with carefully removing the 24tpi adjuster by cutting it, cut a slit down the length of the 26tpi adjuster, and slide it into place around the inner wire? Probably not, but what do I have to lose at this point...?
 
You will do better and do it right by unsoldering the nipple at the clevis end, swapping out the adjusters, then re soldering the nipple.

Make yourself a solder pot from a 1/2" black iron pipe cap. Use acid flux, and it is a piece of cake.

Slick
 
My solder pot is 220v...only realized when I took it out to use it last week; haven't used since being back to the States. Tried to do a stovetop job in tiny iron pan but failed miserably by not making it deep enough...maybe I should try again, but I really just wanted to buy a cable and do something simply for once.
 
You will do better and do it right by unsoldering the nipple at the clevis end, swapping out the adjusters, then re soldering the nipple.

Slick, thanks again--I am actually going to try this. I, however, have never UN-soldered a nipple. How is this best accomplished?
 
Ok, wasn't sure if torch would cause some problem with the wire by overheating. Thx.
 
If you have 1/2" surplus cable, after pushing back the nipple, cut off the old soldered end of the cable with a Dremel tool.

Then splay the wire in all directions, position the nipple, coat with acid flux, and dip into solder pot for about 5 seconds.

Slick
 
Just wondering if this is something not to do with a Teflon lined cable. Could heat travelling along the inner cable damage the Teflon lining of the outer wound casing? I've never considered this because I've never worked with Teflon.
 
Just wondering if this is something not to do with a Teflon lined cable. Could heat travelling along the inner cable damage the Teflon lining of the outer wound casing? I've never considered this because I've never worked with Teflon.

This is a possibility with a teflon lined cable. Problem is easily solved by attaching some sort of heat sink to the inner cable.

Hemostats, or welders clamps would work nicely.

I have several inches of exposed inner cable. In such a case, I do not believe there would be a significant heat conduction to the lined outer cable.

Front Brake Plate Adjuster Threads:  G15

Slick
 
Cable, cabled. I was able to change the housing length as well and this should solder up nicely once I've got the pipe cap later this afternoon. It's all cleaned and frayed/peened and ready to go.

I just changed to slightly lower bars so the overall length was excessive anyhow, and the repop Amal-style levers needed more bare wire.
 
Last edited:
Front Brake Plate Adjuster Threads:  G15


Slick, the tip on using the pipe cap was great. Much easier than my electric pot, even. Many thanks.

I sure hope that holds. I have made a bunch of throttle and clutch cables before, but my first brake. (Converted the Enfield to disc early on...) This makes me much, much more nervous.

I cleaned the cable with carb cleaner before, during, and after teasing out and peening the terminal end, and dipped in alcohol again for good measure once it evaporated. Then dipped in Rubyfluid flux before dipping the cable.

There was a little bit of brown junk around the juncture of the cable and end as you can see in the pic. Problematic?

I gave a large number of test squeezes and went around the block and it held. I will continue to reinspect through test rides, but don't know when I'll feel confident enough to give it a hard go.
 
The brown residue is most likely flux. If you splayed out the cable wires in all directions, it should hold.

It looks very nice.

You will get your confidence up when you find yourself gawking at some skirt, and find the truck in front of you has stopped, ..... as I once did.

Slick
 
Back
Top